Monday, December 1, 2025

A PLACE TO START DECEMBER 2025 - ANYTHING GOES W/Optional Twist: WINTER THINGS

 Hello, Crafty Mate!

Well, we have made it to the end of another year. For most of us here in America, it has been a tough year. Aside from my faith in G-d, my papercrafting was a major contributor to my sanity. The "Hubster" even started a new hobby; he makes rocks and boulders for his rock garden. Next week, he plans to start making his own Japanese Lanterns. It is an expensive hobby, but a fantastic stress reliever.

Winter Things: A Place to Start

For this month's "Winter Things" challenge, I decided to have a go at a "Shabby Chic" Poinsettia card. I wanted to use non-traditional "Christmas" colors and include straws! I found a beautiful Shabby Chic card on Pinterest that incorporated straws in the design, and I used that as my guide.

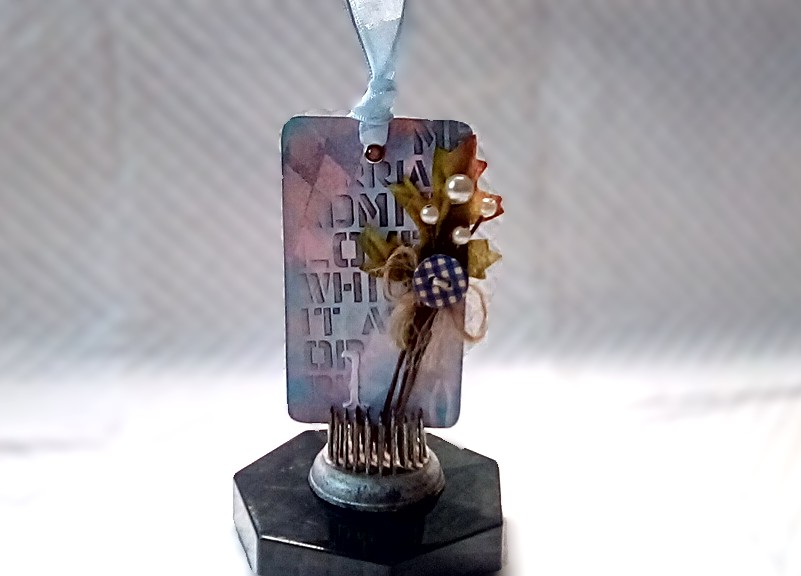
I did not have cardstock or paper in the pale pink color I wanted to use for my Poinsettias, so I used a combination of Distress Oxides, Liquid Water Color Inks, and Acrylic Paint to achieve the soft pinks and browns.
My snowy background was created using chipboard, a crimper, modeling paste, and white acrylic paint. I also added brown and white splatter.
The pink straws were left over from my granddaughter's Sweet Sixteen Party. I brushed a little Vintage Photo over them to tone down the pink. I added the Christmas Pine straw for contrast.
Beneath my focal grouping, I layered a torn piece of retro vintage paper. I cut a circle from the same paper and used it as the centerpiece for my medallion die.

I plan to make a few more of these Shabby Chic cards. I ordered a lot of straws, and I am looking at a lot of Pinterest creations and YouTube tutorials! I am sure most Americans will spend 2026 as stressed out as we have been in 2025! May G-d help us all.


To all my friends who celebrate Christmas, I hope your holidays are filled with Joy and happiness!
Hugz,
Chana Malkah!


Thursday, November 20, 2025

A PLACE TO START - SOMETHING NEW - MID-MONTH PROJECT!


 Hello, Crafty Peeps!

I have so many new things in my craft box, I decided to create a mid-month project for our challenge at A Place to Start.  The "New Things" in this project are: "Always Time For Tea Die," "Sun Umbrella and Chairs Die."

I am a big fan of Lisa Curcio!  She is a Stampin' Up demonstrator who always comes up with awesome fun folds and great ways to use DSP.  Whenever I get stuck, I visit Lisa's Stamp Studio.  She made a fabulous Christmas Card using a diagonal gatefold card.  I needed a design for a new promotional die, and I like this fun gatefold design. Here is a link to her tutorial. Creating this card is super easy and super quick!

Sun Umbrella and Chairs Cutting Die

When I review products, I like to use them in an actual project.  I think it is a better way to connect with creatives. Usually, I would put this "Umbrella and Chair"metal-cutting in a more "grounded" environment.  But, since this is one of those cards that will likely remain with me, I decided to let it float!

I am committed to using all of my DSP.  I have tons of Graphic45 Papers that I need to get rid of.  This sheet from the old "A Ladies' Diary" Collection is a perfect compliment to my "Always Time For Tea" themed project.

I had fun paper piecing my die cuts!  I really like this die and look forward to using it on future projects!


Lisa's Stamp Studio Tutorial (Please watch her video for step-by-step)
Lisa has downloadable project pages on her blog

Cutting Dimensions
Base: (Double-sided Paper) 5-1/2" x 12"
Scored at 2", 4", 8", and 10".
Make pencil marks at 2-3/4" at the top and bottom of the paper. Long side. (You will cut from these marks to the edge of your 4" and 8" scorelines.)

Inside  layers - 3-3/4" x 5-1/4" and  3-1/2" x 5".

Stuff I Used:
Graphic 45 "A Ladies' Diary"
Simple Stories - Polka Dot
My Mind's Eye "Nostalgia"


There's Always Time for Tea Die


Monday, November 3, 2025

A PLACE TO START - NOVEMBER 2025 - SOMETHING NEW!

 Hello, Crafty Makers!

I am exhausted! Every election cycle, I swear I am done, but just when I think I am out, "they keep pulling me back in!"  I am running behind on everything, including posting this project for MY OWN BLOG CHALLENGE!  

I am super excited about our optional theme (Something New) this month because one of the things I am running behind on is my Amazon Reviews. I have three new dies and some lovely papers to review and share with you.  Today, I am sharing this lovely Die, "There is Always Time For Tea."  And "Retro Material Papers."

There's Always Time For Tea

I wanted to use fall-inspired colors because I am trying to use all my old Graphic 45 Papers.  I found out way too late that the G45 aesthetic is simply not my Vibe.  I have been successful using many of their papers on small elements, such as the teapot, biscuit tin, and teacups, in this design!
I decided to leave the spoon white.  Covering it with designer paper made it indistinguishable from my kettle!  The word "nice" did not emboss on my napkin, so I used one of my rubber stamps instead.  I think the black ink provides the eye with relief from all the white and orange.
As a final touch, I added a bit of "White Opal" Liquid Pearls to the lid of the tea kettle and the biscuit tin.

Thanks so much for stopping by!
 I hope you will join us at A Place to Start!  We would love to see what is new at Your Place!


STUFF I USED:
There's Always Time For Tea Die: https://amzn.to/480EvY7
Retro Material Papers: https://amzn.to/4oIU5ya
Bazzill Tangelo Cardstock: https://amzn.to/4nxswqn
Hamilco Cream Colored Cardstock: https://amzn.to/47kawes
LUXPaper-Chocolate Brown 100LB Cover: https://amzn.to/43eAU78
Graphic 45 Designer Series "An Eerie Tale."
Self-Adhesive Gems - https://amzn.to/47Egd5K
Distress Oxide Ink- Spiced Marmalade: https://amzn.to/49yJnWw
Distress Oxide Ink - Rusty Hinge: https://amzn.to/4oiZ7S3

Find Scrapbook Cutting Machine: https://amzn.to/47ll78W
My Sweet Petunia Glue Press

Monday, October 6, 2025

HAPPY 21ST BIRTHDAY - FUN FOLD BRIDGE CARD

 Hello, Crafty Makers!

My eldest grandson turned 21 on September 22nd.  When he was born, the obstetrician (who was also Jewish) commented that we almost had a "Succoth" baby.  This year, his birthday fell on Rosh HaShanah.  He came home from college so we could celebrate before the holidays began.  I was afraid he would think his card was juvenile, but he did not.  He remembered the special dances we used to do when he was a toddler.  He had a toy that played different animal sounds, and we had a "special" dance for each one. His favorite music was "Baby Elephant Walk."

My grandson is in art school, so I am never concerned about sticking to masculine colors for his cards!  As an artist, particularly a sequential artist, he does not think about colors in that way, but I still wanted to stick with a muted palette.  I love bridge cards
I used one of my abstract stencils to create the background design. I find that Tim Holtz's Lost Shadow Distress Oxide Ink is perfect for creating soft backgrounds.  I used my "Smoochies" to stamp the mirror image of my little Elephant.


The black cardstock was the perfect base.  I added a balloon heart and a circle with his age stamped on it.  I needed the age to balance the design.  My grandson has a display cabinet in his room.  One section is dedicated to craft gifts I have given him over the years. He added this to his collection before heading back to school.    

Thanks so much for stopping by!
Hugz,
Chana Malkah
Stuff I Used:


Wednesday, September 17, 2025

AUTUMN "THANKS FROM THE HEART" A PLACE TO START - MID-MONTH ATG!

 Hello, Crafty Peeps!
Mid-Month Project_ ATG

My daughter received an extraordinary performance evaluation for her 10th anniversary with her company. Her employer went above and beyond her ask, and, as is typical of their relationship, she suggested capping her future increases as they work to build their cash reserves. Her employer was impressed by that, and he made significant changes to her retirement plan, annual bonus incentives, and there is a partnership in her future. I am sending him this card as a personal thank you from me and my husband. Over the years, he has given my daughter the type of respect, rewards, and consideration that are extremely rare these days. More than money, the intangibles have made it possible for her to have an outstanding work-life balance. She has worked hard and earned all that she has received, but so many people work hard and are never given the proper recognition. So we want to thank him for being a positive participant in my child's life.

Autumn "Thanks From The Heart
I wanted to use colors that were both Autumnal and masculine. I also wanted a design that had clean lines. I used the sketch of a design from a Penny Black project that was posted back in 2022. That design had a flower pot in the middle, but that was not appropriate for my card, so I substituted a bold sentiment and heart graphic!
I used 12 Distress Oxide Inks on this project. I love the effect that I got. The undertones are nice, and the blending smoothed out better than I anticipated. The splatter is an elevating element for this design.  
I spent half an hour looking through my 12"x12" designer papers before I stumbled upon this ideal sheet. The light marble design pulled in my primary highlight colors. That made it simple for me to cut small strips and add them as accents on the envelope. I stamped the cancellation image on one of my scraps and added the date portion. I haven't decided how to add his name to the envelope. I want something creative. 
I wish I had more sheets of the paper I used for my envelope.  It would be ideal for a few more masculine card projects I want to create!
Autumn Thanks - Process Video

Stuff I Used:
Materials:
DISTRESS OXIDE INKS
Uncharted Mariner: https://amzn.to/4ndkUKs
Crackling Campfire: https://amzn.to/4moCry9
Fossilized Amber: https://amzn.to/4n7vQZV
Spiced Marmalade: https://amzn.to/4n7vUc7
Carved Pumpkin: https://amzn.to/3Im8jWb
ACRYLIC PAINT:  
White and Black: Gotideal Paint Set - https://amzn.to/46EM5Ia
Strathmore Watercolor Paper: https://amzn.to/3K5IZEo
Stencil: The Crafter's Workshop:  "ART IS"
Background Stamp: Vintage: https://amzn.to/420lkLL
SHARPIE MARKERS ASSORTED: https://amzn.to/46FZ505
EQUIPMENT/TOOLS:
WRMK Envelope Punchboard:
Bira Stamping Pro Stamp Platform:
Craftelier Multi-Use Mat (Grip Mat): https://amzn.to/46aYXFY


Thursday, September 4, 2025

A PLACE TO START SEPEMBER - LEAVES AND CIRCLES #2

 Hello, Crafty Peeps!
I decided to create a second card for the challenge this month at A Place to Start!  I saw a project by Brigit that I thought was a fabulous design for Leaves and Circles.

I followed the cardinal rule of CASE and changed at least three things about the design.  
I used a chocolate card base, added leaf stenciling on my white layer, and used a tree instead of individual leaves.  Distress Oxides used were: Tea Dye, Vintage Photo, Walnut Stain, Hickory Smoke, and Lost Shadow.
I also stenciled a leaf pattern on the focal, and I changed the sentiment!  Autumn was supposed to be centered on the tree.  Somehow, that didn't happen!😊I added a few crystals, which worked out nicely! The foiling around the image was created using Martcolor Metallic Gel Pens.
Stuff I Used:


Monday, September 1, 2025

A PLACE TO START - LEAVES AND CIRCLES

 Hello, Crafty Mates

I hope this is a fun challenge for our players.  I look forward to seeing how the players combine/blend/mash-up Circles and Leaves.

My stenciled leaves got covered, but there are leaves behind my pearl stems.  I used one of my favorite background stamps and my abstract circle stencil.
Challenge Dates: September 1, 2025 - October 3, 2025
ANYTHING GOES w/OPTIONAL TWIST
Optional Twist: Leaves and Circles


Wednesday, June 25, 2025

PLAYING WITH STENCILS - A SIMPLE TAG!

Hello, Crafty Creators!

I had so much fun creating this little tag. I was reviewing a set of diamond/harlequin stencils and wanted to make a quick project video to accompany the review.  I was unsure of where I was going with this, but I am pleased with the results!


I actually used two promotional items on this project. The tag cards come in a box of 100. They are the perfect size for tags, ATCs, and other small projects!

The floral focal was created using pearl-tipped flower stems and a leaf and button in my stash.

I used my diamond/harlequin stencils to create the background. I was afraid that blending the Worn Lipstick, Seedless Preserves, and Lost Shadow would result in a muddy background, but, to my surprise, they blended beautifully!


-------
Challenges Entered:

THINKING OF YOU - GENERAL GREETING CARD!

 Hello, Crafty Creators!

I keep my desk covered with newsprint. It is cheaper and more convenient, so I can test my markers, dab my blending brushes, and accomplish many other tasks that once required copier paper or paper towels.   

Last week, while recording one of my Amazon Favorites videos, I reviewed a diamond and checkerboard stencil set. My original plan was to stencil a few shapes on my newsprint. But, as often happens in crafting, I couldn't stop there. I liked my design so well that I used it to create a card. Newsprint is a 22 - 24lb paper, so I glued it to 60lb cardstock and trimmed it down!

This project also allowed me to use one of my old Martha Stewart punches. I had forgotten that these punched borders can be so pretty!


I used my MS punch to decorate the top of my note panel inside.
-------
Challenges Entered:


Wednesday, June 4, 2025

A PLACE TO START - RECYCLE - BROWN PAPER CARNATION

 Hello, Crafty Makers!

This is my second project for A Place to Start!  

I created a carnation using brown shipping paper! I have a ton of this stuff. It helps me craft, and it is helpful in our compost! Twelve years ago, I started making these little carnations when flower dies were not as ubiquitous. I still prefer them to die-cut flowers with white borders.


Now that I have decided to get back to the basics of card making, I am revisiting basic techniques that don't require purchasing anything.  Metal dies were already way too expensive for my taste, and with the tariffs on aluminum and other metals reinstated, I can only imagine.

BROWN PAPER CARNATION

My favorite part of creating the mixed-media background for these flowers is incorporating colors from the other design elements on the project. I also enjoy creating unexpected textures.

My Favorite skin care product is packaged in these cute containers.  I am repurposing this one to give my daughter a couple of small bottles of Essential Oils to use on her Wool Dryer Balls.


Brown Paper Flowers Tutorial


Thanks For Stopping By!
Hugz,
Chana Malkah