Tuesday, July 31, 2018

Shopping Our Stash - Weekly Challenge - Shaker Cards

Hello, Crafty Makers!

This week's challenge at Shopping Our Stash is: Shaker Cards

Well, I am posting this a little late. I had my infusion therapy yesterday and today and I failed to do my final check last night to make sure I had my post scheduled.  Of course, I had made a change and did not publish the update. 
Even worse, I forgot that I was hosting. 
It's the drugs, people.  It's the drugs!

I promised my grandson that I would use one of his anime drawings as the subject of a shaker card.   I looked through his images and really fell in love with this one.   It makes me so jealous that everyone in my family can draw with the lone exception of yours truly.  None of them ever took a single art class.  In a few weeks, I might post a couple of the Hubsters drawings.  Sigh!


Again, I went a little crazy for this challenge and I made a bunch of shaker cards!
I love this stamp!  I have had it for about 10 years.  I removed it from its wood block and used my Tim Holtz Stamp Tool.  I was able to put it back on the block and it stuck just fine.  My long-term goal, though, is to peel away the backs of all my wood block stamps and add new foam so that I can use them with the stamping tool.  Between my meds and my disease, the old hands are sometimes just a little shakey! :D
I created this shaker card for my Graphic Design class.  My sequins all fell behind my little chimp, but you get the message.   I created the camouflage paper using my gelatin plate and a few stencils.
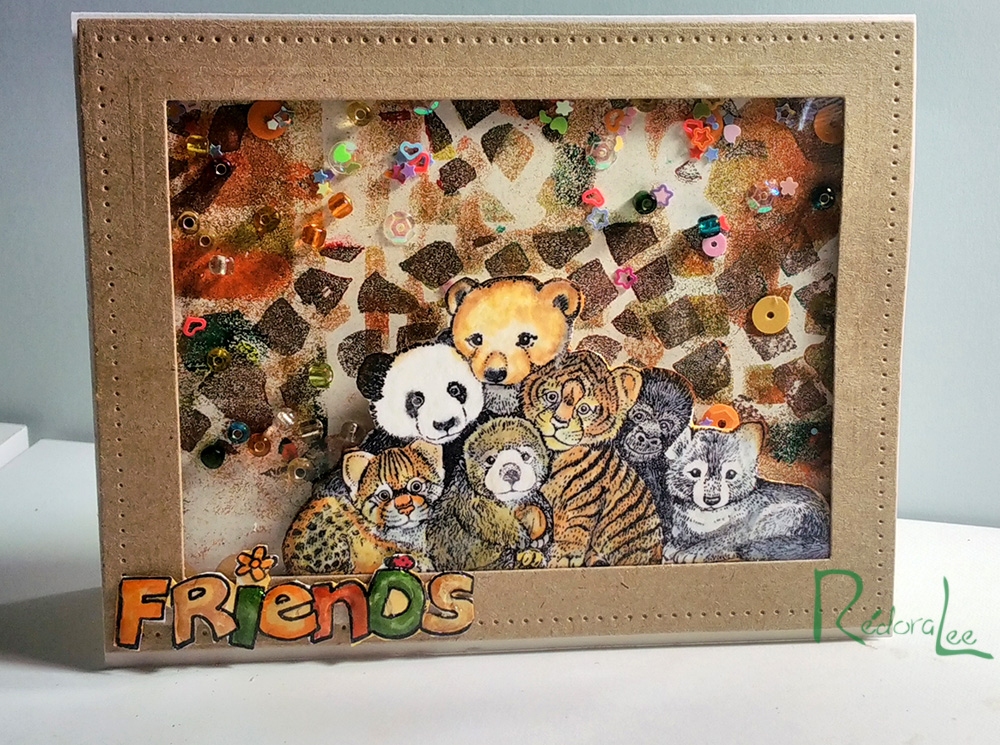
I so loved the look of the kraft frame that I created this little friends shaker using another really old stamp (about 20 years old).  I successfully removed this one from the block and mounted it on new foam. Works like a charm on my stamp tool. YaY!  I thought the coloring worked okay for me, too. Whew!

Please join us in the challenge and Shake, Shake Shake!
Hugz,
Chana!


Friday, July 27, 2018

Debossed Die Impressions

Hello, Crafty Makers!
Am I the only one who learns a new technique and then goes nuts with it?  I sincerely hope not!  Recently revisited Jennifer McGuire's site looking for inspiration and new techniques.  She calls it Reverse Die Impressions but to me it is debossing.  Anyway, I started going through my old Memory Box/Poppy Stamps medallion and circle dies and boy did I have a ton of fun.  
Here are some of my creations.
This Kraft card is my favorite!  I just love Kraft!  I was pleasantly surprised how well the Prima® flowers integrated into this design.
I was afraid the gray flower would not work here, but after I put it on,  I was really impressed with how it added contrast, created tension, and visual interest.

I don't create many sympathy cards but this technique lends itself to the creation of elegant cards as well as more whimsical designs.
Two looks using the same dies and layout.

I added the score line to the paper after the card was completed.  I just felt it needed more visual interest and the score lines were a quick, simple, and elevating solution.

Thanks for stopping by! 
Happy Making!
HUGZ,
Chana Malkah


Poppystamps Birthday Challenge - Have A Fabulous Birthday

Hello, Crafty Makers!

Once again, I have been inspired by the work of Jennifer McGuire.  She has lots of fun and relatively easy to follow tutorials  The most recent endeavor involved creating a debossed impression of a die and then filling the debossed impression with a positive die cut.  This fun technique is a little like letterpress.
I created my own "lined base" using my scoreboard.  I did not have the dies that Jennifer used in her tutorial but I own over sixty-five Poppystamp/Memory Box Dies and I figured a few of the medallion and circle dies would work with this technique.  Here, I used the  Quinn Flourish Die (green) and the Whimsy Circle (cream layer).  
To color the debossed area, you apply ink to the back of the die 
(I used Tim Holtz Peeled Paint Oxide Distress Ink™ and a petal from the ColorBox® Envy Collection).  Although it does not show in the photo, I applied Modpodge™Sparkle to the debossed area and I applied clear Wink of Stella™ to both die cuts.  In real life, the focal grouping is beautiful.  The sentiment is from the Unity Stamp Company's Itty Bitty Stamps "Fabulous Birthday" by Joslyn Nielson.

The adorable lavender pearl clusters were in my stash.  I love green and lavender together.  I made several cards using this technique and will come back and post them later today! 
Thanks for stopping by!
HUGZ!
Chana Malkah

Here is a link to Jennifer's tutorial.  Reverse Die Impressions
Click here to visit the Poppy Challenge

Tuesday, July 24, 2018

Shopping Our Stash Weekly Challenge: Get Krafty! Use Kraft Paper In Your Design

Hello, Crafty Peeps!
This week, the SOS Design Team challenge is: 
Create a project using Kraft Paper.  
I love kraft paper for creating "faux" leather notebooks and tablet covers.   The cost is low and I can swap covers on my Fire Tablet almost daily.   I am eager to see your makes... 
I am always looking for "Krafty" inspiration.
~~~~~~~
I created one new project for this challenge  
Using the Tim Holtz Die Alterations® Die  "Umbrella Man.
"TRANSFORMATION" 
I used craft foam instead of foam tape to add dimension to my project.  Craft foam is cheap and allows you to die cut cardstock and foam at the same time.
I reversed the "Transition" on my interior image.
Stash Items:  Every item used in this project is 15 months old or older.


 Here are some past faux leather projects using kraft paper.
Hope you find some "krafty Inspiration!" 


Orange You Special
My infusion nurse requested a Traveler's Notebook Cover but she wanted it to be Orange and she wanted me to use the "faux leather" technique.  She was convinced her family and friends would not believe that her planner cover was made from paper.  She took the finished planner before I could get pictures, however, I found two shots on my tablet.
I used Tim Holtz® Carved Pumpkin™ and  Abandoned Coral™ Distress Inks to create the orange undertones desired.  She was very pleased with the result.  
The orange is there but does not overwhelm.

"Itty Bitty Notebooks" 
Using Kraft Paper to Create Faux Leather 
Sunflower
I use the sunflower embossed design quite often when creating notebooks and Planner Covers.  It is the most requested.


"Waves of Grain"
I don't get as many requests for this one, 
but it is still one of my favorite embossed designs.
"Butterflies are Free"
This design is fabulous on a mini planner.
 
"A Pocket Full of Posies"
My five-year-old granddaughter chose this design for
her mini notebook cover.  This summer she is going to do her first planner.
I used Darice folders for these projects but any embossing folder will work just fine. 

 Join us at Shopping Our Stash!  We look forward to seeing what you create with your kraft paper!
Hugz,
Chana Malkah

Tuesday, July 10, 2018

Shopping Our Stash Weekly Challenge - Feed Me! Use Food In Your Design

Hello, Crafty Folks!
This week we are giving you the perfect opportunity to pay creative homage to your favorite food!
My Farmhouse Recipe Album
A little over two years ago, I created this recipe album for my friend, Amy.  The construction was bad and I replaced it. I deconstructed this album with the intention of reconstructing it and giving it to my niece.  But it languished in my unfinished projects box until I saw the "Feed Me" Challenge and knew this was the perfect opportunity to put the mini back together and fix the problems.
~~~~~
My Favorite Cake Recipe
The Reconstruction
I am a huge Mod Podge fan, but it did not work for this project.  The first time I constructed this project, I used Scor-Tape® and Modpodge to secure the cover to the base.  It began to peel away.  To repair the book, I used a combination of Scor-tape®, Art Glitter Adhesive™, Tombow® Metal Liquid Glue, and Tombow® Mono Liquid Glue.  I have learned the hard way that different glues give better results based on the materials. 

Glue Guide

During the reconstruction process, I realized that glue had seeped out from beneath the tabs, what a mess.  I was not sure I would be able to salvage the pages but two of my most favorite tools saved the day.  If you do not have glue erasers in your stash...get one or two, they are well worth the price!  As you can see, these got quite the workout on this reconstruction project.   I generally wipe down my cylindrical eraser with a baby wipe and I use an emery board to clean away the glue on the other one. If I were to repeat this project, I would use the WRMK® Tab Punch Board.
A New Beginning

Selfish me, I have decided to keep this Recipe Album for myself.  The Hubster is renovating the kitchen and one of our goals is to de-clutter.  I am in the process of going through my old cookbooks and selecting my favorite recipes.  We are then going to ship the cookbooks off to the Goodwill Store.  I still prefer recipe cards over videos.  With the cards, I can take my time and not worry about a device that is going to time out on me or having to rewind the video.  Okay, mostly, I am just a paper person!   Here are some looks at the completed, all new recipe album.

This is the front set of recipe pages.  The recipe pages are all magnetized as is the back of the binder.  This makes it easy to flip down pages.  The center spine is also magnetized.


This is the back set of recipe pages.  Because the magnets hold the pages together, it is easy to flip from front to back.  


A magnetic sheet beneath the design paper provides a place for paperclips 
and Magnets.  There is also a clip for recipe cards and a pen rest.

This is the ideal "stash reduction" project.  I used up a lot of loose 6"x6" paper pads and was able to get rid of quite a few 12"x12" kitchen themed papers.   If you decide to make a recipe album, I would recommend selecting one that uses ribbon to tie down the cards.  This project requires the use of eight magnets per page and that can get very expensive.


Thanks for stopping by!  I hope to see your work in the 
SOS "Feed Me" Challenge
Hugz,
Chana Malkah

Thursday, July 5, 2018

Don't Stop Believing - A Gelli Print Inside Shadow Box Card

Hello, Crafty Peeps!
Last night, I decided to play around with some stencils and my newly made Mono Printer (Gelli Plate). 
Mono printers are easy to make and fun to use.
This print was so pretty I just knew I had to use it to make a shadow box card. 
This closeup shows the wonderful texture on my monoprint.

Don't Stop Believing
Inside Shadow Box Card
The front of the project is very, very simple because the payoff is on the inside. 
The Butterfly Dies are Memory Box® - "Darla" and "Vivienne"
The acrylic inks are a combination of Liquitex® Basics and Martha Stewart® Pearlized Acrylic Paints.
 The Stencil "Mini Flutterby" is from The Crafter's Workshop
Click Here for Jennifer McGuire Inner Shadow Box Tutorial


Tuesday, July 3, 2018

Shopping Our Stash Weekly Challenge - Geometric Patterns

 Crafty Peeps!
 This week's Challenge at Shopping Our Stash is 
Geometric Patterns.  
I  created three projects for this challenge.
 DIAGONAL STRIPE w/DIE CUT
 
Stash Items:  ColorBox Dye Inks, ColorBox "Four-in-One" Inks, 
Sizzix Diagonal Die, Hero Arts Candy Stripe Background Stamp
DIAGONAL STRIPE w/SENTIMENT
 Stash Items: Momento Inks, Mod Podge Sparkle Glue, Sentiment Stamp, Neenah Papers, Kraft Card Stock, Flatback Pearl.
GEOMETRIC CHEVRON BANNER
 Stash Items: Simple Stories "Awesome" 6"x6" Paper Pad, Sentiment stamp and Neenah Papers.  All older than 1 year.

Tutorial for creating the diamond pattern 

 Thanks for stopping by!   
I hope to see your geometric inspired project at Shopping Our Stash