Monday, October 4, 2021

A PLACE TO START - OCTOBER 2021, CHALLENGE #10 - Purely Handmade "Fauxbonichi Agenda"

Hello, Crafty Mates!

Three months have passed since my last blog post.  I wish I could say that I am 100% and ready to start crafting full-time again, but that is not the case.  I miss "making" stuff!  Anyway, completing this project forced me to work on my small motor skills.

ALERT !!!!!
 LONG POST WITH LOTS OF PICTURES
100% Handmade Fauxbonichi Agenda
Bookmaking is another one of my crafting passions.  When I came up with the idea of a 100% handcrafted challenge, I thought a handmade journal/planner would be the perfect project.
The Cover
To create my cover, I used heavyweight chipboard and covered it with grey textured cardstock.
I knew I would sometimes use the planner out of its jelly cover, so I added corner protectors.
Transparent Leather Cover
Creating this cover was easy.  I only had to measure, fold, pin, and then sew the four edges of the cover.  To remain true to the challenge, I hand-stitched the edges.
Front - Inside:  I was able to create one long pocket, and one rounded corner pocket on the inside of my front and back covers.  These provide storage for my sticker kits and decorative paper clips.
I used papers from one of The HoneyBShop "Babe Boxes" to decorate the inside covers and fly pages.  I also used them as cover pages for my inserts.
Handstitched Inserts
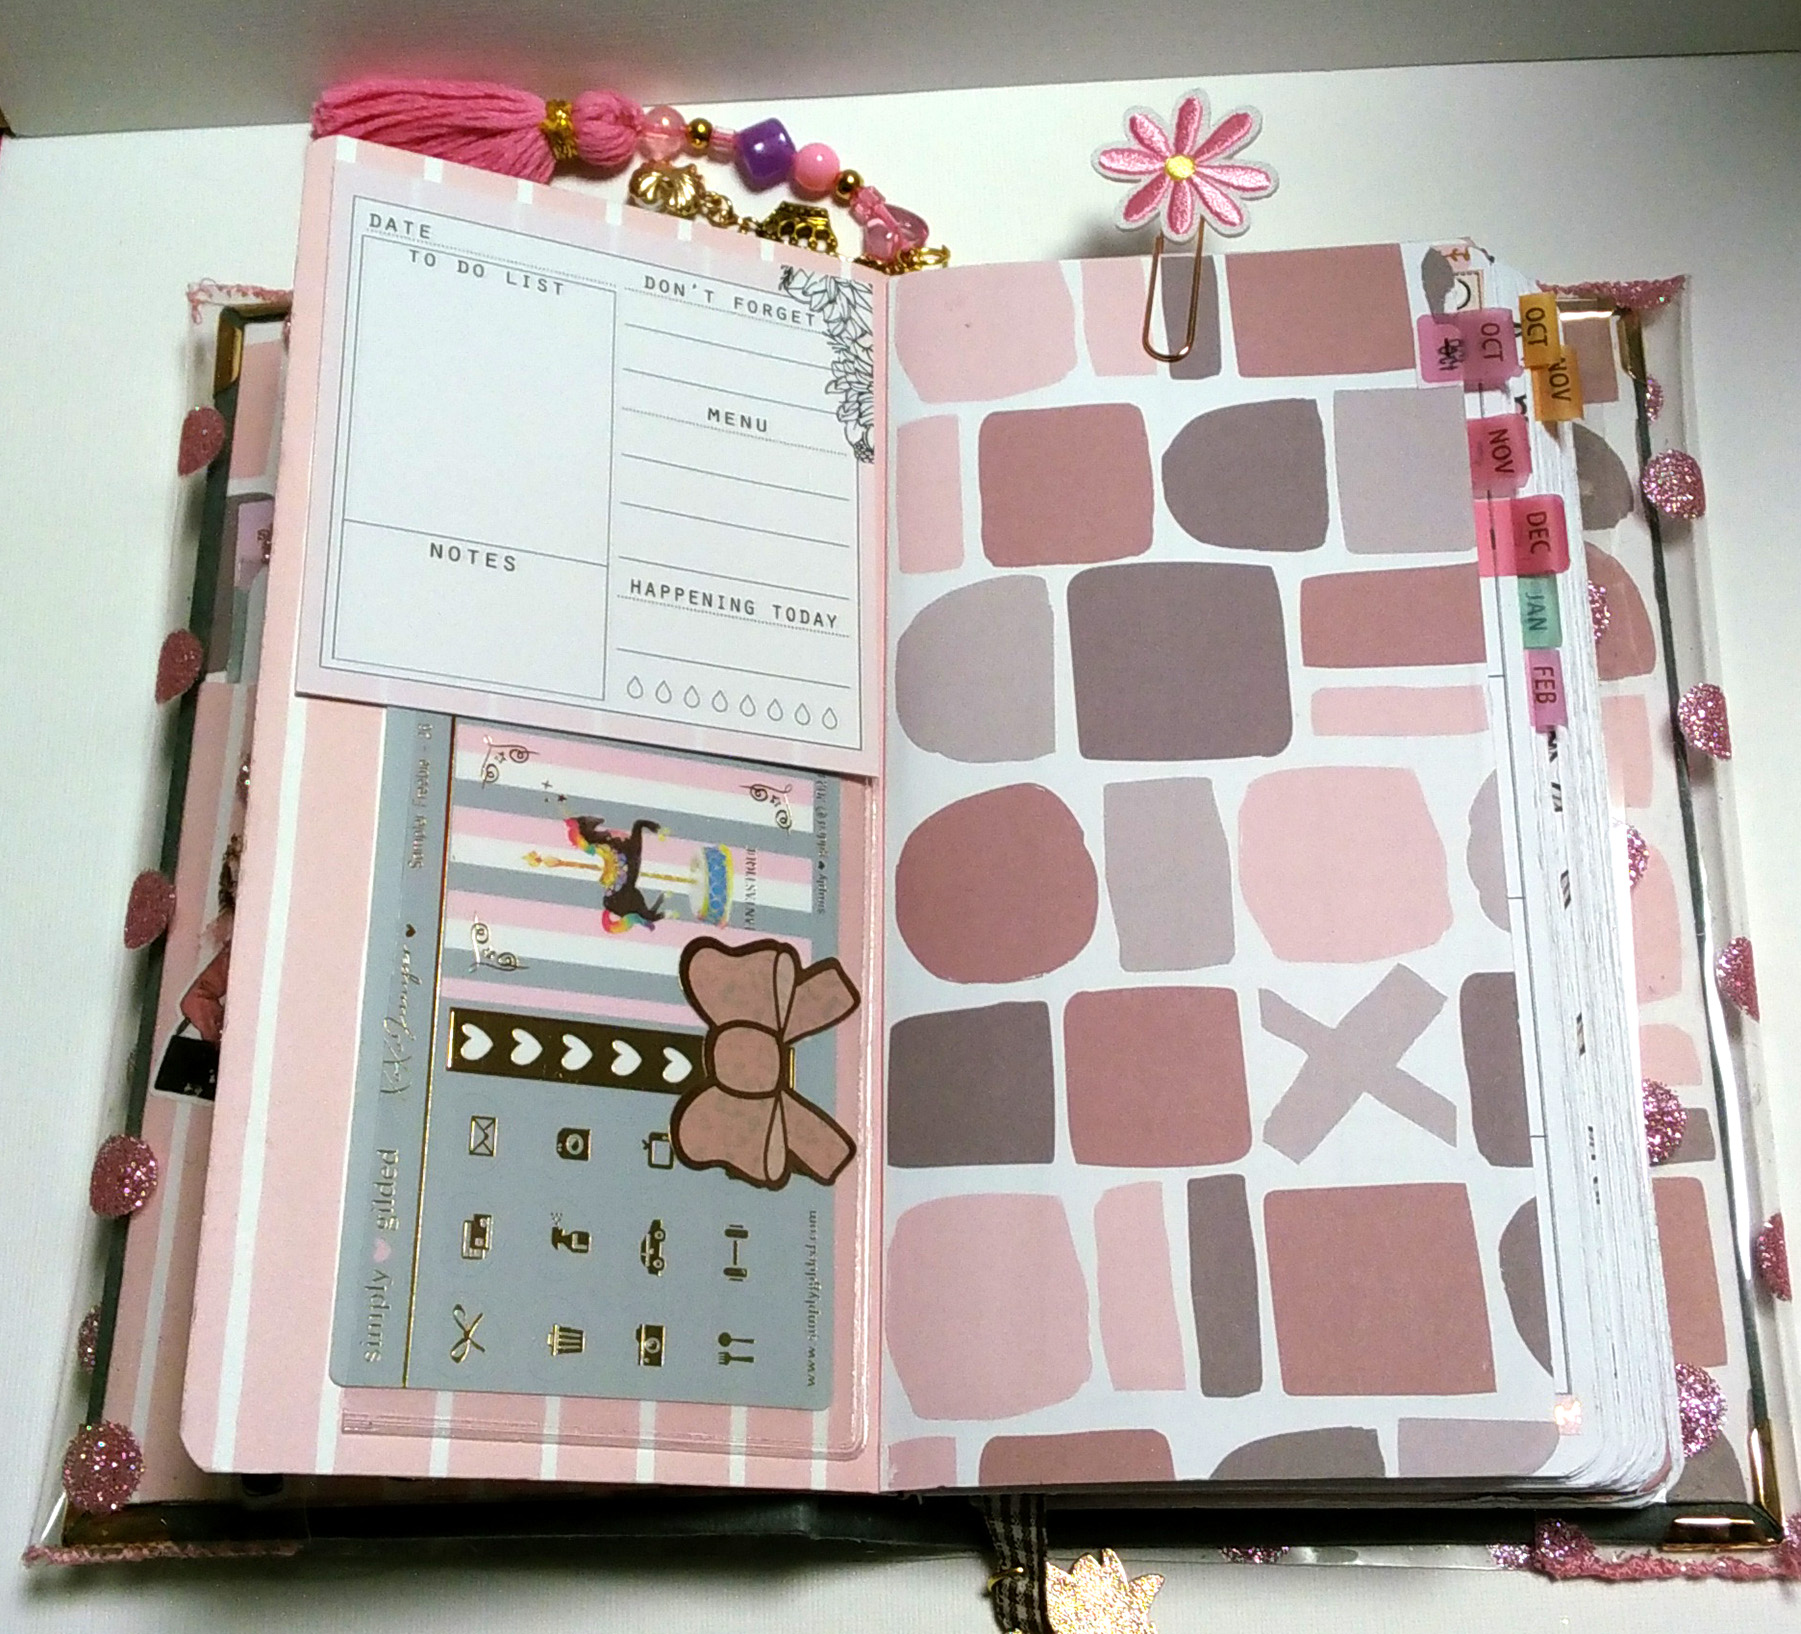
I used the fly page opposite my monthly insert as an "inbox."  To create the pocket for my sticker sheet (below the note pad) I used an adhesive pocket mounted sideways.
I used this pretty floral for my weekly insert.  It gives the eyes relief from the strong geometrics on the other inserts.
"Hustle" and "Growth" are my vision words for 2022.  I just love the beautiful design on this paper.  Because "The BabeBox" comes with a digital component, I was able to upload the pages to PS and manipulate them as needed.
Handmade Beaded Dangle
I have wanted to try this for a while.  I used to make stick pins, so I had tons of beads in my stash.  For some reason, I purchased a 50pc bundle of embroidery floss, so I had everything I needed to create this cute embellishment.

The inserts were all hand-cut and sewn using a
Sea Lemon Tutorial for Kettle Stitch Binding.


Page Marker Pockets
No agenda is complete without page markers.  I had seen a video a few years back that I wanted to try.  Fortunately, the Etsy Shop that sold the Craft Cart Stickers had a few left in stock.  The stickers are no longer available, but they sell a companion note pad that can be used instead.  I surely hope she restocks because these carts are the best.  Most months, my BabeBox sticker book has a craft cart sticker included.  I am going to try to create a page pocket using one of those.
THE END
Thanks for stopping by!
Hugz,
Chana Malkah
Stuff I Used:
Designer Papers: The HoneyBShop - June Digital Babe Box 
Hobonichi Style Inserts: Rhoro Designs (Etsy)
Craft Cart Stickers: Frank Hearts You Etsy)
Hobinichi Weeks Sticker Kits: Plan4Happy (Etsy)

Other Companies: Inserts, clips, pens, etc.
Goldmine and Cocoa
Simply Gilded
The Planner's Society
Krafted by Kayy

Tuesday, July 20, 2021

SOS #450 - QUIT BUGGING ME - STEAMPUNK BEETLE

 Hello, Crafty Makers!
It is time for another fortnight challenge at
I am not a big fan of insects. I don't care how pretty they may be (butterflies and ladybugs.) I prefer to admire them from a distance.

STEAMPUNK BEETLE
This card was fairly simple to complete!  Both the background and the beetle were colored using Vintage Photo Distress Oxide Ink.  I used a black Sharpie™ to create faux black matting around my panel.  I added Glossy Accents to create a little more interest, and I was done!

I live in the South, and I have made peace with the fact that bugs are simply one more thread in the crazy fabric of southern living.  It does not matter how clean you keep your house or how much you pay your pest control service, southern bugs are the Michael Jordans of the insect world.  You can't stop them, you can only hope to contain them.

That said, I cannot explain why I like this beetle image so much.  It took much self-control to refrain from purchasing another steampunk beetle image.  The second one is full-on steampunk and would have integrated well with some AALL&Create background stamps.

Thanks for stopping by.  I look forward to finding out what is Bugging You!
Hugz,
Chana Malkah


Monday, July 5, 2021

A PLACE TO START - JULY 2021 CHALLENGE 7 -The Blessings of The Ancestors

 Hello, Crafty Mates!

This month's challenge at A Place To Start is

Craft Your Favorite Holiday/Celebration

I have chosen the birth of a child as my favorite!

Blessings of the Ancestors
This beautiful digital stamp by artist Robert Jackson has been in my digital image stash for almost six months.  This image speaks to me on so many levels.  More now than ever before, I need to believe that each new generation will live free from oppression, free from disenfranchisement, and free from fear. May each generation learn to listen to the voices in the wind, the voices of our ancestors!
~  ~  ~  ~  ~
I don't do a lot of CAS, I am not so good at it, and technically, this card is not pure CAS.  To fit the true description of Clean And Simple design, more than fifty percent of my face panel (topper) would need to remain totally untouched. Additionally, CAS projects should be designed so multiple cards can be created over a short period of time.  The amount of time needed to stamp, print, stencil, and color the images moved this project way beyond CAS. Not many crafters have been able to master that skill so the definition of CAS has been expanded.

Thanks for stopping by!
Hugz,
Chana Malkah


Sunday, July 4, 2021

613 Avenue Create - July Challenge #7 - Anything Goes w/Optional Twist: Watercolor

 Hello, Crafty Makers!
This month at 613 Avenue Create, we are challenging our players to get messy with watercolors!  As long as you mix ink with water and put it onto paper, your project meets the twist criteria!  
We Are All Mad Here!
"Either the well was very deep, or she fell very slowly, for she had plenty of time as she went down to look about her, and to wonder what was going to happen next." ~ Alice In Wonderland
I began the background for this project using three Distress Oxide inks, Salvaged Patina, Squeezed Lemonade, and Worn Lipstick.  Since I knew my "Chicken Dance" images would be in a primary color, I figured using pastels in the background was a pretty "Mad" thing to do.  I used a water brush to make swipes and squiggles across the card panel. I used my heating tool to speed up the drying time.
It was my intent to create an impressionistic interpretation of all that Alice saw as she fell.  I thought about adding book and teacup stamps but decided that was too pedestrian.   I chose instead to use a stencil that would look like a distorted wall.
Next, I added Bundled Sage and Picked Raspberry Distress Inks to an acrylic block and spritzed it with water. I smooshed it down onto the panel in two spots. I layered four different stencil images onto the watercolored background using Hickory Smoke Distress Ink.
It would be impossible to create this card and not include the mad hatter's hat!  I found a free image on Google.  The hat was colored using Derwent® Inktense™ Pencils.
I thought these little chicken stamps from ALL&Create just screamed, "We are all mad here!"  They were colored using Inktense™ pencils.  I am still learning how to use these pencils.  The color is more intense than what you get with watercolor pencils, but there is a bit of a learning curve.
In this picture, you can see the impression made by the acrylic block.  Also shown is the black border edge that I created using a ruler and my black Inktense™ pencil.

I look forward to seeing your project in our challenge at

Thanks so much for dropping by!
Hugz,
Chana Malkah

Stuff I Used

Mad Hatter Hat - Click to download

Tuesday, June 22, 2021

Shopping Our Stash #448 - Tropical Delights

Greetings, Happy Crafters!

The current fortnight challenge at Shopping Our Stash, Tropical Delights, is a chance to create projects that celebrate summer.  The imagery that can be used includes but is not limited to: Palm trees, Parrots, Toucans, Hula girls, Tiki bars, Hibiscus, Pineapples, blue drinks with little umbrellas, etc., are all acceptable.

The Lone PineappleThis challenge theme was particularly daunting to me. First, it took several days to locate a beach-themed kit that I purchased ages ago. Then, after wasting all that time, I decided not to use it but only after wasting another two hours fooling around with various layouts.  As the clock ticked toward midnight, my frustration level increased.  Finally, I figured I would just die-cut pineapple and place it in the center of a color-blended panel.
I cut the pineapple from a color-washed paper kit.  I applied a little Bundled Sage, Peeled Paint, and Squeezed Lemonade Distress Inks to deepen the color.  I cut the crown of the pineapple from a scrap bit of light green card stock.  I highlighted the center of the crown with Squeezed Lemonade Distress Ink and distressed the edges with Peeled Paint.  

To finish off the topper, I splattered on a bit of white paint and added a piece of twine. I adhered the pineapple to the topper with foam tape.  I also added glitter to create more interest.  My little fish was leftover from this shadow box project.
The distress inks used to create the background are, Picked Raspberry, Squeezed Lemonade, and Salvaged Patina!  After the night I have had, I need a Pina Colada!

I look forward to seeing your projects in our challenge!

Hugz,
Chana Malkah


Tuesday, June 8, 2021

A Place To Start - Challenge #6 - June 2021 - Create Your Own Challenge

 Hello, Happy Crafters!

This month at A Place To Start we are allowing you to create your own challenge based on a list we provide.  
Good Luck!
Please list your choice(s) from each column!  This makes it easier for us to choose our Rising Stars and Top Sprouts1

IT'S YOUR BIRTHDAY
Slimline Birthday Card (Trend: Stencil, Mixed Media)
I added stickle to the body and the wings, and covered the entire bee with Glossy accents.  The scroll was a scrap from my typewriter project.  I created the sentiment on my computer.
I kept the inside simple. I picked up my fly stamp instead of my bee stamp. Since I was already late with this project, I decided to let it bee (get it?) I will make a new panel to go on top of this one.

Thanks so much for stopping by!  
I can't wait to see the challenge you choose for yourselves! 
Hugz!
~~~~~~~


Sunday, June 6, 2021

613 Avenue Create - June 2021 Challenge #6 - Anything Goes w/Optional Twist: Paper Piecing : A Funky Flower

 Hello, Crafty Makers!

This month at 613 Avenue Create, our challenging twist is a throwback to an oldie but a goodie.  I love paper piecing!  While creating this project, numerous ideas for future projects kept popping into my head.  I have over 200 6x6 paper pads and probably an equal number of 12x12 and 8x8 pads.  I could paper piece the world if I set my mind to it!😁

A Funky Flower
AALL & Create #120 Growth in Numbers
I am a big fan of the AALL & Create border stamps.  For one thing, I can afford them!  But more than that, they are extremely versatile and ideal for slimline card projects!  I actually combined components from three AALL & Create Stamp sets in this design.

Step One - Choosing A Stamp
I like to choose stamps that have large open areas.  This makes the paper pieced area more visually impactful.  Generally, if I am using multiple patterned papers, I find that a large image ensures that my design will not be too busy!
Step Two - Choosing Papers
I chose these papers because they matched the style of the image, and I knew they would work well with a Kraft card base. For the most part, when choosing papers, the sky is the limit.  
Step 3 - Determining The Background
I knew from jump street that I would need to highlight the colors in my patterned papers somewhere in the design.  The patterns are not bold enough to stand on their own. I felt that they would not make a strong enough artistic statement.  Adding a stenciled element is an easy way to level up a project.  The stencil should be related to the design.  In my case it was geometrics.
This has to be my money-saving tip find of the year.  Instead of using black cardstock to border my face panels, I go around the edges with a black (or colored) Sharpie™.  Thanks, Jo Rice.
Step 4 - Paper Piecing
I used simple pattern papers. This simplified the stamping and saved paper.  The image was stamped in the corner of each sheet.
Using a bold design also increases the ease of cutting out your image.
I played around with various combinations of my chosen patterns.  In the end, I felt that selecting two papers for the petals worked best. Rather than trying to get a precise cut to match the center, I added a brad secured with a dollop of Glossy Accents.  
I used the two remaining papers on the flower vase!
The vase was pieced from the floral paper, and I used the final geometric pattern for the collar.  The final step was the addition of a piece of twine and a mini brad!
Step 5 - Finishing The Design
Little things matter!  Nowhere is that more true than in the world of paper crafting.  I wanted to pull in more of the Kraft color, so I added splatters using Vintage Photo and Picket Fence Distress inks. 
~~~~~~~~~~~~~~~~~~~~~~~~~~~~~~~~~

Thanks so much for stopping by!  
If you have never tried Paper Piecing, we hope you will use our challenge as a place to start!
Hugz!

Stuff I Used:


Papers: My Mind's Eye - Vanity Fair (2011)
Stencil:  DecoArt Andy Skinner Bubbles (12"x3")  (discontinued)
Brad:  Imaginisce - Fairy Dust Brads (Fairest of Them All Collection)