Thursday, February 20, 2020

2020 Stash Party #7 - You Are Unforgettable - Birthday Card

Hello, Crafty Peeps!
Ann Butler and Jennifer McGuire are two of my favorites designers!  I was able to combine techniques from both of them to create this birthday card for a very special lady.
If you have been following me, you know that I have become addicted to the Split Card design 
created by Jennifer McGuire.
I have now fallen in love with the stenciled background technique that Ann Butler shared last week.
I used a combination of inks (Chalk, Dye, Washable, and Distress Oxide) to create this background.  The Chalk, Dye and Washable Inks were Inkadinkado inks that have been in my stash since 2010.  The stencil is a Heidi Swapp.  I have had it for about 8 years.
I used another 10-year-old ink product to stamp the sentiment and the cute little baby elephant!

Tomorrow, I plan to spend the day experimenting with my stencils and my orphaned inks to see what kind of fun backgrounds I can create!  You should try it!
Thanks, Ann!
Thanks, Jennifer!
and
Thank You, Crafty Peeps, for stopping by!
HUGZ,


Wednesday, February 19, 2020

2020 Stash Party # 6 - The Color of Love

Hello, Crafty Peeps!
This is project #6 in my 2020 Stash Self-Challenge
All of the projects I have made this year have been made from items already in my stash. 
I created this project for the Color Challenge at The Outlawz!  
My project uses the last three colors: Mauve, Beige, and Green.   For some reason, I saw was blue/violet so that is what I used on my flower.  We'll see how it works in the challenge.
The Optional Twist for the challenge was to use the word "Love!"  I only have one script die of the word love so that was an easy choice.  The difficulty was in finding the right position.  I didn't like it in any of the corners.  I absolutely love it across the flower and I think the black adds a little drama and a little tension between itself and the other focal objects!
The green gingham ribbon on this card was the catalyst for my project.  I used the ribbon on a previous project and I had a small piece still in my scrap pile.  All of the papers used in this project are over 10 years old.  The Bazzill colored card came in a pack of 25 assorted sheets. Bazzill papers.  I bought them back in 2011 at Big Lots for $2.00/package. Each time I went into the store, I would purchase at least ten packages.  So I still have tons.  My envelope photographed weird, but IRL it is a pretty salmon color that goes surprisingly well with the card!

Thanks for stopping by!  I hope you found some inspiration here!
Hugz,
Challenges Entered:
The Outlawz- Tuesday Color Challenge (Must be a member to sign in)

Stuff I Used:
Dies : Gina Marie Designs
Ribbon - Really Reasonable Ribbon

Tuesday, February 18, 2020

Shopping Our Stash #414 - The Great Outdoors

Hello, Crafty Makers!
Today starts another fortnight challenge at Shopping Our Stash.
The challenge theme is "The Great Outdoors,"  
Share with us any project that has anything related to the "Outdoors" or "Nature."
I am doing a series of split cards and this challenge seemed a perfect opportunity to experiment more with the technique.
I AM ALLERGIC TO BEE STING!
Solitary Bees invade our yard each year. I really want to reclaim our lawn and get back to the beautiful street appeal we once had but, in order to do, that we would have to put down chemicals that would kill the Bees and that does not work for us. Also, the county extension office told us that it is illegal to kill Solitary Bees because they are often more efficient at pollination than Honey Bees.  And, if you add to that my compromised immune system, you can see our dilemma.  
The inside of the card is very simple!  I may stamp a birthday sentiment at the very top. I might be able to do that and still leave room for a personal note.
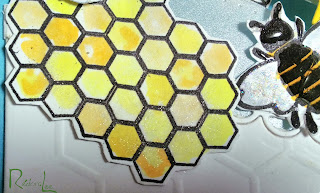
The most fun part of creating these split cards is figuring out how to arrange the focal grouping.  It should tell a story, I think. My honeycomb was originally totally on the outside of the card but it accidentally slipped behind my top panel and I thought, "oh, yeah, that will work!"   I used Stickles on the bee's wings and "Glossy Accents" on his body.  I also used "Wink of Stella" on the honeycomb and the sun!
As for our real bees, we could have the entire yard dug up after they leave.  Turning the yard would destroy their tunnels and we can hope that they won't return but that could be expensive and possibly futile since it is the flowers that attract them.  In the meantime, at least I honored the bees with a fun, crafty card!
You can find my Step Tutorial for Split Cards HERE
You can link to Jennifer McQuire's Video Tutorial HERE
HAPPY CRAFTING!
HUGZ,
Challenges Entered:


Stuff I Used:

Sunday, February 9, 2020

2020 Stash Party #5 - Romantic Love


Hello, Crafty Makers!
I am continuing my quest to diminish my stash and keep my money in my pocket!

 Romantic Love
As a part of my stash reduction self-challenge, I sometimes will just grab a couple of loose 6"x6" designer papers and try to turn them into a cohesive project!  That is what happened here.  The sheets I picked up just happen to be from the Graphic 45 French Country Collection.  So, I knew they would work well together I just needed to come up with a design.   I had a white panel with a heart cut out on my table, so I figured that would be an additional stash reduction.  I had seen a design like this in a CAS challenge and the only thing on the panel was the sentiment.  I just couldn't go with that.  My solution was to stencil on small hearts using Ranger's Walnut Stain Distress Oxide Ink.
 I still wanted more interest on the panel so I applied my homemade glimmer to each heart!   I use an old Wink of Stella brush to apply my glimmer.  I love that the glimmer also gave the hearts a satiny look.  I distressed the edges of the cutout with Ranger Vintage Photo Distress Ink.
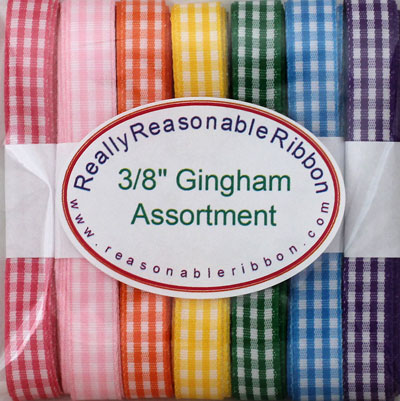
To further incorporate the green patterned paper into the design, I used it to cut a strip of tiny hearts. The gingham ribbon was added for a bit of contrast and finished it off with a champaign pearl.
I was able to create dimension by cutting a second heart panel using craft foam! I am planning to do a lot of I "heart" you cards and since I don't want to purchase red cardstock, I am trying to come up with designs that use non-traditional colors and sentiments that are appropriate for various occasions.

THANKS FOR STOPPING BY!
HUGZ,
Challenges Entered:

Stuff I Used:
Memory Box Heart Chain Border
Image result for Memory Box Heart chain dieMemory Box -Cupid Heart
Image result for Memory Box Cupid Heart Die

Graphic 45 6x6 Patterns and Solids - French Country
Image result for graphic 45 French Country Patterns & Solids
Really Reasonable Ribbon - Gingham/Plaid Collection
3/8" Gingham Ribbon Assortment

Tuesday, February 4, 2020

Shopping Our Stash #413 - My Heart Is On Fire!

Hello, Crafty Peeps!
It's time for another fortnight challenge at 
"My Heart Is On Fire"
You may use Red, Hearts, Fire or any combination of the three!

Everything used on this card is from my stash.  I have had this Neenah "Hot Pepper" linen card stock since 2003.  I am down to my last three or four sheets.  It is so expensive now I doubt that I could afford it! The gold card has also been in my stash since 2001.  I have quite a bit left.  In the past, I didn't use much gold but that is slowly changing.

One of my crafting goals this year is to use my embossing folders and my old impression plates.  I was able to use three of my favorites in this project.  I was also able to use one of my flatback pearl hearts, which are almost 10 years old.  I am not spending one unnecessary penny on crafts.  I am finding far too much good stuff in my stash!
I decided to keep the inside very simple.  I do think that I am going to go back and stamp a sentiment.  I was running a tad bit late with my project and it wasn't until I took the pictures that I realized I need a sentiment.  I only have like 100 Valentine stamp sets!😀
I cut my little heart using one of my old steel rule dies!  They are the reason that I have a brand new, still, in the box, Big Shot under the bed in the guest room and another in my studio, along with my BS Plus and BS Pro.  The Hearts EF is a WRKM Next Level.  I am glad I purchased almost all of these before they were discontinued.  The diagonal embossing was made using a Couture Pinstripe EF. I just turned the panel at an angle.   The Swiss Dots EF is a very old Cuttlebug A2 EF and was among one of my first purchases back in  2004.
THANKS FOR STOPPING BY!

Challenges Entered:

Stuff I Used:

Monday, February 3, 2020

A Place To Start - February Challenge - Create A Masculine Card or Project


Hello, Crafty Makers!
our theme is Masculine projects.  
You can create cards, altered art, whatever you wish as long as it has a masculine theme, look, or feel!

I am long overdue to give my spouse a card just to thank him for being the best "The Hubster" in the world.  Celebrated our 50th Anniversary last year and I am looking for another 50!

I made this quick card and used a muted, masculine palette.  He was visiting me in my studio and mentioned that he liked a scrap piece of designer paper that was on my board.  I used my Alterations Framework Lattice die to cut a design that I could use at the bottom of the card. 
HE LOVED IT!
(well, not so much the sequins)

Thanks for stopping by!
I look forward to seeing your entry at
Hugz!


Sunday, February 2, 2020

613 Avenue Create- February Challenge - Banners and Bows

Hello, Crafty Peoples!
My fascination with the split card design continues.
As always, Our challenge at 613 Avenue Create is
Anything Goes
with an optional twist
this month it is
Banners and Bows
````````
Aged To Perfection Friends
 I have had this cute little Art Impressions stamp for several years and this is my first time using it.  I want to try a bunch of images on this split card design because it is great for using up paper scraps.  It is also giving me the opportunity to use some of my borders and edge dies that have not been used in a while.
I used my Tim Holtz® Lattice "Frameworks™" Die to create the banners that form the top of the card.  This is a flip-up style split card so after cutting my white layer, I used the die to cut two more layers from scrap paper and layered them on top.  I used the same papers to cut the bottom shapes for the card.  I also included a shimmer vellum layer to add a little glam.   I also added a little Wink of Stella™ to the entire image.

I kept the inside fairly simple.

Thanks so much for stopping by!  I look forward to seeing your Banners and Bows at 613 Avenue Create!
Hugz,
Stuff I Used
(Available at the webstore.com for $5.99)
Lattice  Tim Holtz Frameworks Sizzix Die 659432 *