Tuesday, May 21, 2019

Shopping Our Stash #396 - Get Your Drink On

Hello, Fellow Crafters!

The fortnight challenge at
Shopping Our Stash is 
"Get Your Drink On"
We want to see your creations paying homage to your favorite beverage.  I am a tea person but I also love coffee so I tossed a coin and it came up coffee!  Here ya go!

I don't do a lot of masking and I wasn't sure that I could get the image in my brain successfully from my brain to paper.  Masking was the only way to make it work.  I had a coffee ring stencil but the detail is not as good as the stamp that came with this image.  I also believed I would have more control using the single stamp.

Stuff I used:
Distress Oxides: Squeezed Lemonade, Broken China
Distress Inks: Tea Dye, Weathered Wood
Papers: Neenah Solar White, Bazzil "Hummingbird"
Images: Java Nice Day
Misc: Copic markers, foam tape, sequins, "Wink of Stella"

Thanks for stopping by!
Hugz,


Monday, May 20, 2019

A Place To Start Mid-month - "Showcase Your Favorite Technique"

Hello, Crafty Peeps!

The designers have designed a new batch of projects to inspire you to create projects using your favorite technique and showcase them in our challenge at A Place To Start!  
I chose to do a "Wet" Shaker Card! This is a fun technique.  
I colored the background and images with Copics.  This card is constructed the same as any other Shaker the only exception is that you do not have to put foam tape around the window.  You will, however, have to use foam tape on the back of your image and other parts of your frame just to create dimension.  I should have added a few more sequins, I think.
Don't you just love all the little bubbles!

Looking forward to seeing your creations in our challenge!

Hugz,

Sunday, May 19, 2019

Favorite Teacher Appreciation - Part Two - Basket and Cards

Hello, Crafty Peeps!
Since we will not see Mrs. R. again, I decided to give her a second gift.  Throughout the school year, I would send cards from my stash that I thought she would like.   This time, I decided I would make cards just for her.  I started a few months back, so some of these you may have seen before.
Farewell Cards
It is amazing the effect you get from a little hand sanitizer!
 I blended distress inks to get my "ocean waters".
Gift Basket
These little gift baskets are a big favorite of mine.  They were designed by Grace Nywening.  I use them all the time to give small gifts like candy, soaps, candles, etc.  One great feature about these baskets is they can be made using one letter size sheet of paper.
I chose to use a woven basket EF on this basket but any EF design would work.  One year, I used a ruler and alphabet EF to create baskets.
Old Library Cards
Mrs. R. teaches Literature and Composition so I thought including an old library card with student signatures would be a gift she could appreciate.  I used Distress Oxide Inks to add color to the card and then used a stencil to add the silhouette of the children.  On the backside, I used a clock stencil and stamped an image and sentiment.  I also cut a strip from the bottom of one library card and used it to create a tasseled paper clip.  These library cards were a gift from one of my teammates at Shopping Our Stash and I use them sparingly. There was no doubt that they were the perfect element for this gift package to this particular teacher.
Expressions of Faith
 Knowing that Mrs. R.'s faith is a very important part of her life, I decided to create two faith-based cards using two hymns that were personal favorites of mine when I was a Christian minister.
I used the smooshing technique to create the background paper.   This corner die cut has become a "go to" die for my shaker cards!
I haven't used my border punches much since wafer dies became all the rage but 2019 is the year I pledged to reach back and use "old" things.  This butterfly punch is an old EKSuccess product that was in their "American Girl"™series.
 Tea Bag Caddy
I know this was a long post!  Thanks for making it all the way to the end!  I hope you found some inspiration here!
Hugz,


Favorite Teacher Appreciation Package - Stationery Box

Hello, Crafty Makers!
This appreciation package was created for my grandson's favorite teacher.  This is her last year at his academy and I am as sad as he is to see her go.  She is one of those teachers who is truly invested in giving her students the best possible chance to succeed in their academic pursuits far beyond high school.  Our family will never forget the wonderful way she inspired Josh. We may even eventually get used to him correcting our grammar!😀


Saturday, May 18, 2019

Liquid Shaker Card - It Could Have Been Worse

Hello, Crafty Peeps!
Today, I am sharing a new technique I learned for creating a fun and unique shaker card.  This is my second "wet" shaker project and I am definitely hooked.  The other benefit of learning this technique was that I finally opened the Fuse tool that I purchased (or received as a gift) over 4 years ago.

I don't like this one as much as I did my first project (which will post here on Monday) but it is still a really cool card to give someone.  The Hubster and my grandson got a real kick out of pushing down on the "water" and making the sequins move around.  It is kinda cool, I must admit.  I still think I need to be more gen I ordered a few more aquatic-themed stamps and dies so I can vary my underwater scenes.  I need some little fish!

Stuff I Used:
Stamps: Sea Friends
Paper: The Paper Studio
Plastic: WRMK Plastic Sleeve
Liquid: Assured Hand Sanitizer
Misc: Distress and Distress Oxide Inks- Broken China, Weathered Wood, Stormy Sky
Copic markers


Thursday, May 16, 2019

Teacher Appreciation Gifts - Taylor

Hi, Crafty, Peeps!
I am so happy that I am really hitting most of my creative goals for 2019.
  I have significantly reduced my stash, played with inks, stamps, dies, and tools that have gone untouched for years. 
And so, when the time came to decide on appreciation gifts for my grandson's teachers, I reached back for an oldie but a goodie!

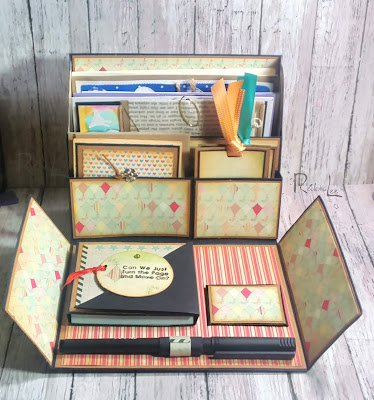
I absolutely love "construction" projects and I never use dies to create a project if I can do it with chipboard or card and build it from scratch.  There is nothing I enjoy more than building stationery boxes.  
This particular design is one of my favorite.  The template is the brainchild of a former Stampin' Up Demonstrator.  This design uses 8-1/2"x11.0" paper.  The original called for 12"x12" paper. 

I did not attempt to make new cards for this project.  I had used cards created for past challenges and/or my personal blog posts!

Thanks, Ms. Taylor!
Back
The original template has 1-inch  flaps that wrap around the back.  
I prefer this style
Side

This is a super fun project and a very impressive appreciation gift!

Wednesday, May 8, 2019

Gift Car/Tag Pouches - A Nice Way To Use Old Book Pages

Hello, Crafty Makers
Yesterday, I shared a gift card/tag pouch that I created using old book pages.  I mentioned that I deviated a little from the tutorial by using text weight stationery paper as backing.  After I completed that project, I thought I would try using some kraft packing paper as backing for my pages and it worked pretty well.  I have tons of this packing paper and I want to use it creatively.  I used to make flowers with it and I plan to revisit that technique in the coming weeks.
~~~~~~
Hugs
I am hoping that creating these small packets will help me improve my ability to create focal clusters.  I want to work on adding five or more elements to a cluster.  For this one, however, I felt that a small grouping would work better.
These pouches are great stash reducers.  In this case, I used scrap lace and papers.  Even the white die cut is a scrap piece.  I need to work on my stitching, though!
The most time-consuming part of this process is creating your focal group.  Probably the best strategy is to create a bunch at one time and then when you want to give a gift card or money, you can create an appropriate pouch.  I think I might do a wedding themed pouch.  How fun would that be?

Hugz,


Tuesday, May 7, 2019

Shopping Our Stash - May Flowers

Hello, Crafty Makers!
The Shopping Our Stash challenge for this fortnight is to create a project that reflects your take on MAY FLOWERS.  The flowers can be your focal image, your papers, or text.  We look forward to seeing some creative interpretations!
I found a tutorial on YouTube for using old book pages to create pouches/pockets.  I thought combining that idea with our May Flowers challenge would be fun.
Obviously, we cannot have May Flowers without Bees so...

Bee Happy
The tutorial uses old book pages to create the entire pouch but I wanted to use make use of some pretty text weight specialty paper that was ordered for some wedding stationery I create a few years ago.  The paper has a soft velvety surface and I thought it would feel make the pouch feel like cloth.
My flowers are off a little because I forgot to stamp the flap while my stamp was still on the stamping platform.  I got pretty close, though.  
This is the first time I have used my sewing machine in almost two years.  

The pouch is so handy.  You can use them to hold a gift card, tags, Artists Trading Cards, and Coins.  The pouch can also be used on a journal page.
I wish "Wink of Stella" showed up better when photographed.  My flowers, stems, and my little bee were all brushed with "Wink of Stella". I also used Glossy Accents on the Bee.
I think the Wink of Stella shows up better on this shot!

I look forward to seeing your entries at


Monday, May 6, 2019

A Place To Start - Favorite Technique - Serendipity Squares

Hello, Crafty Makers!
is challenges you to show off your 
FAVORITE TECHNIQUE(s)
If you are like me, choosing one technique as a favorite is pretty difficult.  Fortunately, you can submit five entries to our challenge, so just pick your top five and let it rip!
If you need help choosing a technique, 
if you are a Newbie to crafting,
click the 1001 Techniques link above.   
~~~~
If this is your first time using a particular technique, we would also love to have you enter it into our
 Crafty Hugz!
This was my first time using the Serendipity Technique on a card.  I have used it a few times on mixed media projects and while a little time consuming, the results are well worth the effort.  I only used three square here, but my project actually yielded nine.
~~~~
How I Did What I Did

1.  I chose scrap papers that coordinate and tear into pieces and or strips.  I later added grey and blue polka dotted papers to the ones shown in this picture.  All of my papers were double sided so I got a lot of different colors and patterns.  Most will be hidden but the bits and pieces that show through will create a unique mosaic.
2.  I cut a piece of kraft cardstock to 5"x 5"(use whatever size and cardstock you wish for your base.) Just make sure it is card and not paper.  I glued the beige polka-dotted sheet (which I cut to 4.75" x 4.75" to create an eighth-inch border all around. This is not necessary, I just wanted my squares to have a lip) I stamped two images onto the paper.  I used a large background stamp and a smaller text stamp.  Once the image was stamped.  I colored in random parts of the flowers.  Then I began randomly gluing down my scrap papers.  I made sure that I left so areas of the flowers uncovered.
3.  Once the glue had dried (helped a little by my heat gun) I created a gold glitter wash and brushed it randomly over the paper.  I use DecoArt Metallic Paint "Splendid Gold", Glitter "Crystal", and Water to create the wash.
4.  I used Ranger "Wilted Violet" Distress Oxide Ink to color portions of my flowers and I knew I wanted to use a Lilac colored cardstock as my base so I decided to create a second wash using Inka-Gold "Violet Violet" Metallic Wax.
5.  Next, I repeated the stamping that I used on the first layer.  I stamped the small stamp first using black ink.  Then I stamped the larger image using embossing Ink.  I embossed the image with white embossing powder.
6.   Next, I cut my squares (1.50"x1.50").  I ended up with six even squares and three squares that are 1.50" x 2.0".  I used a cream card to cut three squares 1-5/8" x 1-5/8" as layers for my squares.
7.  I found a scrap piece of green card onto which I stamped my large floral background.  Again I heat embossed it using white embossing powder.  Using another piece of one of the scraps I used to create my serendipity design, I stamped my sentiment and cut it out with my circle punch.  I cut a piece of kraft card and colored it with Rangers Tea Dye Distress Ink.  A used my gold wash to give it a sheen. I used the Wilted Violet Ink to distress the edges of a piece of white card and then layered that onto the kraft card.  I had a thin strip of serendipity
left over from cutting my squares.  I added this to the center of the small layered card and attached my sentiment circle using double-sided foam tape.
8.  The final step was to add the elastic gold string and a small brad.
Thanks for stopping by!
Hugz,
Stuff I Used
Stamps:    Hero Arts™ "Flower Text"; LaBlanche Stamps "Transilvano Dialogo"
Papers:     Various scraps from my stash; Neenah® Classic Cream, Kraft Card
Inks:         Ranger® Distress Ink™"Tea Dye", Ranger® Distress Oxide Ink™ "Wilted Violet; Inka-Gold® "Violet Violet" Metallic Wax.
Product Links