Tuesday, July 28, 2020

2020 Stash Party #36 - So Sweet, Thank You!

Hello, Crafty Peeps!

In my continuing effort to use my stash, I decided to use this fade-out stenciling practice panel. You can see the other project, FLAMINGO, (HERE). The great part was all I had to do was add ribbon, cord, sequins, and a brad.  The oval sentiment was resting on the panel in my stash pile so I decided to use it. I originally mounted it on white card stock but the black is far more dramatic!
A Lotus Thanks
Thanks so much for stopping by!
HUGZ,


Monday, July 27, 2020

2020 Stash Party #35 - Joy Looks Good On You - Crayons, stencils, and Gesso Resist

Hello, Crafty Peeps!
It is so good to feel well enough to craft again, even though it only an hour or so each day.  I am still working with background creation and the use of bold sentiment stamps.  On this project, I am using another Tammy Tutterow sentiment.
JOY!
I always forget that stamping on resist projects can be challenging.  I probably could have stamped the sentiment several more times to get a bolder impression but I was hoping the clear embossing would intensify the color to my satisfaction.  Alas, it is okay but not ideal.  This was a fun technique to learn. 

I started by making random scribbles on my panel with the Art Crayons.  I used a sponge to blend the colors.  Next, I used a stencil and gesso.  I need to thin out my gesso.  I did not get the full impression of my stencil but a nice section shows through in the lower right-hand corner.  I applied gesso in a random fashion.  After this has dried, I came in with darker crayon color and scribbled it randomly just as I did with the first layer.  I used a baby wipe to spread the color so that I can see the stencil design (gesso resist.)  I used a piece of tissue paper to wipe the area of the panel where I used the baby wipe.  I added a little more of the dark color in one or two random spots and use the baby wipe again to blend it out.

Once I was satisfied with my background, I used my Bira Stamping Platform to add the sentiment.  I rummaged through my stash and found a small piece of green ribbon and some green and aqua flowers.  I added these to the panel along with a few sequins.  I stamped a simple image on the inside of the card and added a thin washi strip across the top.

I hope this week will be one in which I can do more crafting and less resting!  I have yet to use any of the items in the "Dollar Tree" haul that "The Hubster" presented to me.
Thanks for stopping by!
HUGZ
STUFF I USED:

Friday, July 10, 2020

2020 Stash Party #34 - Another Baby Wipe Background

Hello, Crafty Makers!
I found another baby wipe technique on YouTube! 
My "Stash Party" is a way of exploring all the "stuff" I have accumulated over the years and using it for the first time or in new and different ways. Like most other crafters, when Tim Holtz introduced his Distress Inks, I purchased them all (quite a financial investment.) I also purchased the re-inkers. Because I am a creature of habit, I found myself using pretty much the same ink colors all the time and I have untouched pads and re-inkers that are still wrapped in the original plastic. The last few stash projects have also been an opportunity to use my Momento Inks. I sort of abandoned them when I started using Distress Inks. Now, I have rediscovered them and the colors are so vibrant!  Stash diving is fun and it saves money!

This is a fun and very simple technique.  You simply choose the colors you want to use, add a small dot of each color to a folded baby wipe. The spacing of your dots is up to you and mostly depends on the plaid design you want to create.  Swipe the wipe down your card panel(Vertical) and then turn it (Horizontal) and swipe again. I recommend cutting your panel slightly larger than the size you intend to use on your finished card.  Inks I used: Spiced Marmalade, Faded Jeans, and Mustard Seed.

When I talk about stash reduction, I have to include all the papers I own.  Back in 2008, Big Lots was selling the 25 sheet packages of Bazzill's Core-dyed Textured and Smooth cardstock for $5.00.  I think I must have purchased about 10 packs per week until it was all gone.  The Hubster thought I was crazy but now he has to admit that I made a good investment against inflation.  The papers came in assorted colors and there were different assortments.  I still have twenty or more unopened packages and many packages from which various colors have been used.  The paper I used for this project came from one of the assortment packs.
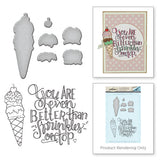
The Happy Gram Sentiment Stamp is a new purchase.  I love Tammy Tutterow's Big Sentiments and when I saw them in the Amazon Marketplace at a reduced price, I had to grab two of them. I actually set aside a portion of my stimulus check for use to purchase a few new dies and stamps. It was the first time I had purchased crafting supplies in almost two years. I can make one more purchase and then I am back on my "crafty diet" and won't make any more purchases this year or in 2021. I fussy cut the sentiment and colored it with oil pencils.  The uncut area of white card stock was too jarring so I used Faded Jeans Distress Oxide and Wink of Stella to calm it down and add a little interest.  I also reduced my brad stash by adding one that coordinates well with my colors to the sentiment.  
Speaking of brads, I have over fifty sets of Bo Bunny Brads (white foam ones) and maybe 30-40 of the carded brad sets.  This was another 2008 Big Lots find.  They were selling these for $1.00 and $1.25.  I recently went through my collections and separated the orphans and grouped them by size.  I also have about forty Prima brad packs and some miscellaneous ones that I purchased from a crafty supplier who was going out of business that same year.

Thanks so much for stopping by!  I hope your stash reduction plans are going as well as mine.
Hugz
Stuff I Used:

Wednesday, July 8, 2020

2020 Stash Party #33 - I Love Life - Baby Wipe Pseudo Stamp Pads

Hello, Crafty Peeps! 
Today, I thought I might practice the "baby wipe" technique.  A very pretty card was entered into one of my challenge blogs and I liked the look.  I have used the baby wipes on stencils but never as a stamp pad.
I am going to add this card to the "Floral" challenge at A Place To Start!

Love the Life you Live and Live the Life you Love
I had no plan when I started.  My goal was to simply practice baby wipe stamping but the practice panel looked okay so it was only natural for me to figure out how to build it into a card.  

To create my floral background, I made two faux stamp pads using baby wipes.  One for the colors in my flowers and one for the colors in my leaves.  I practiced stamping on scrap paper until I had the look I wanted.  I toyed with the idea of coloring in the flowers but in the end, I decided that I liked it better uncolored. To add some dimension and texture, I made two small vellum flowers, colored them, and attached them with a brown brad.  The ribbon was added to balance the design and I embellished the ribbon with flatback pearls, again to add texture and depth. I used my Vintage Photo re-inker and water to create splatter.  Finally, I inked the edges with Vintage Photo Distress Ink and layered it onto the base.  This is definitely a fun technique and I know I will use it often to create my backgrounds.
Thanks for Stopping By!
I hope to see your Floral Inspired project at
Stuff I Used

Monday, July 6, 2020

2020 STASH PARTY #32 - Sprinkles On Top

Hello, Crafty Peeps!
I created this project for the Optional Twist portion of my challenge at 613 Avenue Create!  I wasn't pleased with the card color I chose for my base, so I took some time today to fix it.  I have been playing around with my art crayons and I was trying to recreate the look of ice cream dripping down my card.  I still couldn't translate the image in my mind onto the paper but since I have to make a ton of Birthday cards, I think I will get the practice I need!

The Optional Twist at 613 Avenue Create this month is 
Make Your Sentiment The Focal
I hope to see you there.  You can enter up to eight (8) projects for the month.

 This is one of my favorite stamp and dies set by Tammy Tutterow.  I originally purchased it for my granddaughters to use during their summer visit but, as it turned out, they were more into coloring books than stamping that summer.  One more item pulled out of my stash and used!  YaY!
Stuff I used:
Tammy Tutterow Stamp/Die - for Spellbinders
Spellbinders Stamp & Die Set By Tammy Tutterow Ice Cream Cone


Sunday, July 5, 2020

2020 Stash Party #31 - A Simple CAS Card

Hello, Crafty Peeps!
Today I am taking a break from my blended backgrounds and sympathy cards to create a CAS project for the Anything Goes option of my challenge blog 613 Avenue Create!  As with sympathy cards, CAS is not a genre that I tackle often.  It would seem that it would be easy to create a clean and simple project but I don't find that to be the case.  I am reminded of that famous quote of Henry David Thoreau, "If I had more time, I would have written a shorter letter."  Achieving the "less is more" mentality in card making is a difficult pursuit!

 You Can Always Read Me
This year has been all about cleaning out my stash and using stamps, dies, stencils, and papers that I have long neglected.  This cute little image is from an adorable stamp and dies set that is intended to be used to create a cozy "reading" corner scene.  I am not much of a scene builder but I might give it a go when I once again start working on my masking techniques. The background text stamp has been in my stash for a minute as well.
613 Avenue Create
We are a monthly strictly for fun challenge.  Our challenges are always Anything Goes w/Optional Themes.  Our theme this month is "Your Sentiment As Your Focal."

Thanks for stopping by and I hope to see a project from you in my challenge!
Hugz,

Thursday, July 2, 2020

2020 Stash Party #30 - Sympathy Card #4

Hello, Crafty Makers!
Well, we are at sympathy card # 4 of 5!  I am trying to think of one more new design.  I want to stick with the embossed clinging vine background  I may just change up the color and maybe fine another border die to use as an inset die cut.  We'll see.
Wishing You...
I know I am breaking that unwritten rule that sympathy cards should be in muted colors and maudlin.  I can't do it.  Anyway, I figure if she does not like it as a condolence card, she could always use it as a get well card.  I am sure Covid-19 has presented lots of opportunities to wish all of the above for people.
This soft pink EP is one of my favorites for background embossing. And, as you can imagine, it works great on flowers.  This company made a similar EP that they called Sahara Pearls.  It is a translucent rather than opaque EP.  I may use it on the next condolence card.  The color is lovely!
When I emboss my card backgrounds, I always hope for this bumpy, leather looking finish.  It is not only visually pleasing but also very much a fun texture that feels good when you touch it. I was super pleased with the outcome of this background.
Matching ink colors with paper when they are sourced from different companies is always a challenge.  I was over the moon at the perfect match up of my 20-year-old vellum paper and Ranger's Peeled Paint Distress Oxide.  Just amazing!  That oh so pretty Prima flower was the perfect finishing embellishment.

Thanks for stopping by!
Hugz