Hello, Crafty Peeples!
The Shopping Our Stash Team would love to see a "STAMPLESS" creation from you!
This is a two week opportunity to get rid of some paper and stuff!
This is a two week challenge, so I will post a new project next Tuesday!
NO STAMPING
WONDERFUL DISTRESS INK BLENDS
This is a two week opportunity to get rid of some paper and stuff!
This is a two week challenge, so I will post a new project next Tuesday!
NO STAMPING
WONDERFUL DISTRESS INK BLENDS
I chose to play around with blending distress inks. Using dies, embellishments, rub ons, flowers, etc., is an interesting way to stimulate the creative juices.
THE FlAMINGO BEACH TAG
Distress Inks: Stormy Sky, Scattered Straw, Broken China, Dusty Concord, Embossing Ink
THE FlAMINGO BEACH TAG
Distress Inks: Stormy Sky, Scattered Straw, Broken China, Dusty Concord, Embossing Ink
The Stork Beach Tag - Supplies Used:
Die Cuts: Echo Park Designer Dies - Flamingo Die Set
Craft Tag 6 1/4" x 3 1/4
Donna Downey Stencils - Blooming Floral
Darice Embossing Folder - Flowers and Vines Pattern
Ken Oliver Craft Paper - Studio, Graphic 45 - Tropical Travelogue
Clear embossing powder
Blended Background
Apply Distress Inks to tag. Blend colors until you have the pattern you desire.
Flick water onto the tag to create water spots or you can lightly mist the tag. Use heat tool.
Place your stencil on the tag and apply embossing ink.
Sprinkle clear embossing powder over the tag, shake off and use heat tool to emboss.
Apply Distress ink color of your choice. Allow ink to dry.
Emboss tag using embossing folder. Add additional distress inks, as desired or needed.
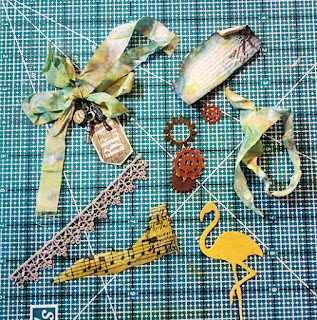
I tore a piece of tissue paper(no pattern in mind) and colored it with Fossilized Amber DI.
I also made a random tear in a piece of dp from Ken Oliver's "Studio" Paper Pack, distressed the edges and gave it a few gentle swipes of Fossilized Ameber. The Flamingo was also colored with Fossilized Amber.
I always do a mock up, take a photo and then use that to get items back in place. I may make some minor changes( I changed the arrangement of my gears and distressed the edges of my Stork with Vintage Photo DI,) Once satisfied, I glue everything down.
Thanks for Stopping by!
Please visit Shopping Our Stash! My Teammates rocked this challenge!
Hugz,
Chana


Wow, you and Lauren amaze me with your ability to load stuff up on a project and it looks so good!
ReplyDeletewell i already thought this was luscious, and i knew it had millions of perfect layery details, but i ♥LOVE♥ seeing the process... even more impressed now, which is sayin' somethin'!!! ♥
ReplyDeleteBeautiful beautiful beautiful, your crafty skills never cease to amaze me Chana!
ReplyDeleteOooh! A picture tutorial! It's amazing how you can put all that together so effortlessly. This tag looks amazing!
ReplyDeleteWhat a smart idea, taking a picture of your layout so you remember where everything goes. This tag is super gorgeous. I love all the texture and detailed elements on it.
ReplyDeletehugs,
Teresa