Hello, Crafty Peeps!
Here is a quick post to show off the bird feeder that hubby and I did as a joint venture! :D) I love animals! I mostly love them outside and not inside my house, so bird watching is a good hobby for me. I don't do the serious climbing mountains, staring through binoculars bird watching. I like to watch from my kitchen or bedroom as the birds eat and bathe, and play.
Birds, squirrels, ground squirrels, and deer, visit our backyard on a regularly. It is amazing how they all respect each other's territory. I am glad that we can provide a safe place for them.
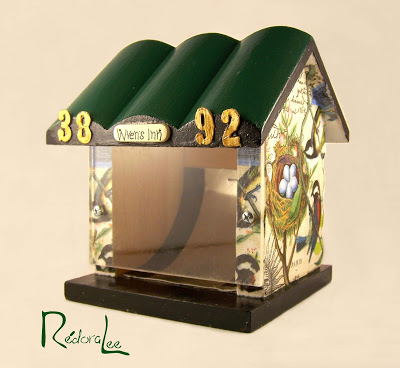
We put up one regular feeder and one Humming Bird Feeder. The regular feeder has to be refilled daily and the Humming Birds are happier when they have their own space , so hubby went to Goodwill and found two birdhouses. He transformed one into a feeder and then asked me to "make it pretty!"
We had visitors while we were photographing.
The sunshade is a regular light fixture cover that we purchased at Home Depot, I painted the inside and outside edge to match the color of the house. I also decoupaged a piece of napkin onto a square of kraft paper and used that for the center of the sunshade. I die cut the Bird Branch and glued it to the front. We purchased the serving tray at the Goodwill Store for ninety-nine cents.
I enjoyed this decoupage project! The only change I would make was my decision to add a varnish coat. The varnish was not needed because this is exterior house paint. Adding the varnish darkened the color so that it does not match the benches on our terrace which is what I was wanted. The transformation from plain birdhouse to a beautiful feeder was amazing.
STEPS TO CREATE BIRDHOUSE FEEDER
1. Remove the front of the birdhouse! Cut a piece of plexiglass to the desired size. Leave enough clearance so that your bird seed will flow freely into the feeder tray. We created a slope using a piece of aluminum. ( You can use a regular coffee can cut to the correct size.) We added electric tape to the sides because we had a small gap.
I don't know if this will work for other styles of bird houses. You will have to decide. We found our birdhouses at our local Goodwill. $3.00 each.
2. Cover the entire house with two coats of Gesso.
3. Applied two coats of "Exterior" house paint to the roof and back: I used Sherwin Williams' Woodscape Exterior House Stain - Pine Needle. I did not paint the sides because the white spaces on your napkin, will become the color of the paint beneath it. If you want the color to show through, then paint the entire house.
4. Apply Mod Podge to the sides of the birdhouse and allow to dry.
5. Separate your napkin and cut the design to fit the portions of your birdhouse you want to decoupage. Place the napkin piece on the area to be covered. Cover with parchment paper and use craft iron to apply heat. Keep the iron moving, do not allow it to rest in one place too long. Repeat on all sides you wish to cover
6. Apply 2-3 coats of Mod Podge and 1 coat of varnish to the decoupaged areas
Thanks for stopping by!
Chana


 My husband purchased an unfinished cedar birdhouse from the Goodwill Store for $3.49.