Showing posts with label chana malkah. Show all posts

Tuesday, August 9, 2016

Shopping Our Stash - Card Sharks - My Ace in the Hole

Hello, Crafty Peeples!
My teamies at SOS have yet to learn their lesson and have allowed me to host. 
 This week my theme is Card Sharks - Use A Playing Card.  
So Players think all the way outside the box or, in this case, outside the deck!


Here is my "Ace In The Hole" Thank You card!
This is call "forced creativity."  I created another project and when I went to post it, found that a teamie had already posted a project that was almost identical.  PANIC!  I actually like this design better!  Kismet!  
I even had some fun inside!  I must be in my Black and White period! :D)

Materials Used:
Neenah® Solar White Linen Cover Stock
Neenah® Epic Black Linen Cover Stock
Memory Box®  Open Studio™ Stitched Heart Layers
InkaDinkaDoo®  Vintage Expressions - Hello Clear Stamps
Tim Holtz® Idea-ology™Remnant Rubs - Words
Really Reasonable Ribbon
Memento™ Tuxedo Black Dye Ink
Bo Bunny® Brads


Thanks For Stopping By!
Click HERE to go to the challenge!


Saturday, July 23, 2016

Clearsnap® - It's In There! - Vintage Rx Pocket Page

Hello, Crafty Peeps,

This week on the Clearsnap® Blog, my teammates and I are sharing ideas for pocket pages, swaps, and letters.  I must admit this was my first foray into the world of pocket letters.  I previously created a pocket page cookbook.  

Our featured product this week is the fabulous Susan K. Weckesser Color POP Mint ink pad!  More details and product information can be found Here


GET EMOTIONAL AND KEEP CRAFTING!

Hugz!

Disclosure Statement

EFFECTIVE DECEMBER 1, 2009, FTC GUIDELINES REQUIRE BLOGGERS TO DISCLOSE ANY TIME THEY ARE COMPENSATED FOR ENDORSING OR REVIEWING PRODUCTS OR SERVICES.

The Project demonstrated above contains components received for free in return for my services and for posts on my blog. I affirm that I have not made, nor would I ever make or endorse, misleading statements regarding any product or service used in the operation of this blog.

IF YOU HAVE QUESTIONS REGARDING ANY PRODUCT OR SERVICE USED ON MY BLOG, PLEASE CONTACT ME AT CMALKAH@YAHOO.COM.


Saturday, July 16, 2016

Create Your Own Patterned Paper

Hello, Crafty Folks!
I enjoy creating my own backgrounds and my own patterned papers.  

The most difficult part of this project was deciding which Teresa Collins™  products to use.  Choosing from a new line of stamps created for ClearSnap® and exciting A4 embossing folders created for Craftwell® wasn't easy but I finally chose the "Love" and "Hope" stamps and her new Craftwell® A4 embossing folder "SnapShot".  Need I say more?

Before


To see the tutorial for this project and to learn more about the new Teresa Collins® products for ClearSnap® and Craftwell®, please check out my post on the ClearSnap® Blog

HUGZ
Challenges:


Disclosure Statement

EFFECTIVE DECEMBER 1, 2009, FTC GUIDELINES REQUIRE BLOGGERS TO DISCLOSE ANY TIME THEY ARE COMPENSATED FOR ENDORSING OR REVIEWING PRODUCTS OR SERVICES.

The Project demonstrated above contains components received for free in return for my services and for posts on my blog. I affirm that I have not made, nor would I ever make or endorse, misleading statements regarding any product or service used in the operation of this blog.

IF YOU HAVE QUESTIONS REGARDING ANY PRODUCT OR SERVICE USED ON MY BLOG, PLEASE CONTACT ME AT CMALKAH@YAHOO.COM.


Thursday, June 16, 2016

Cardmaker® Magazine and ClearSnap® "All About Chalk" Blog Hop

Hello, Crafty Peeps!
It truly does not get any better than this! 
"All About Chalk" 

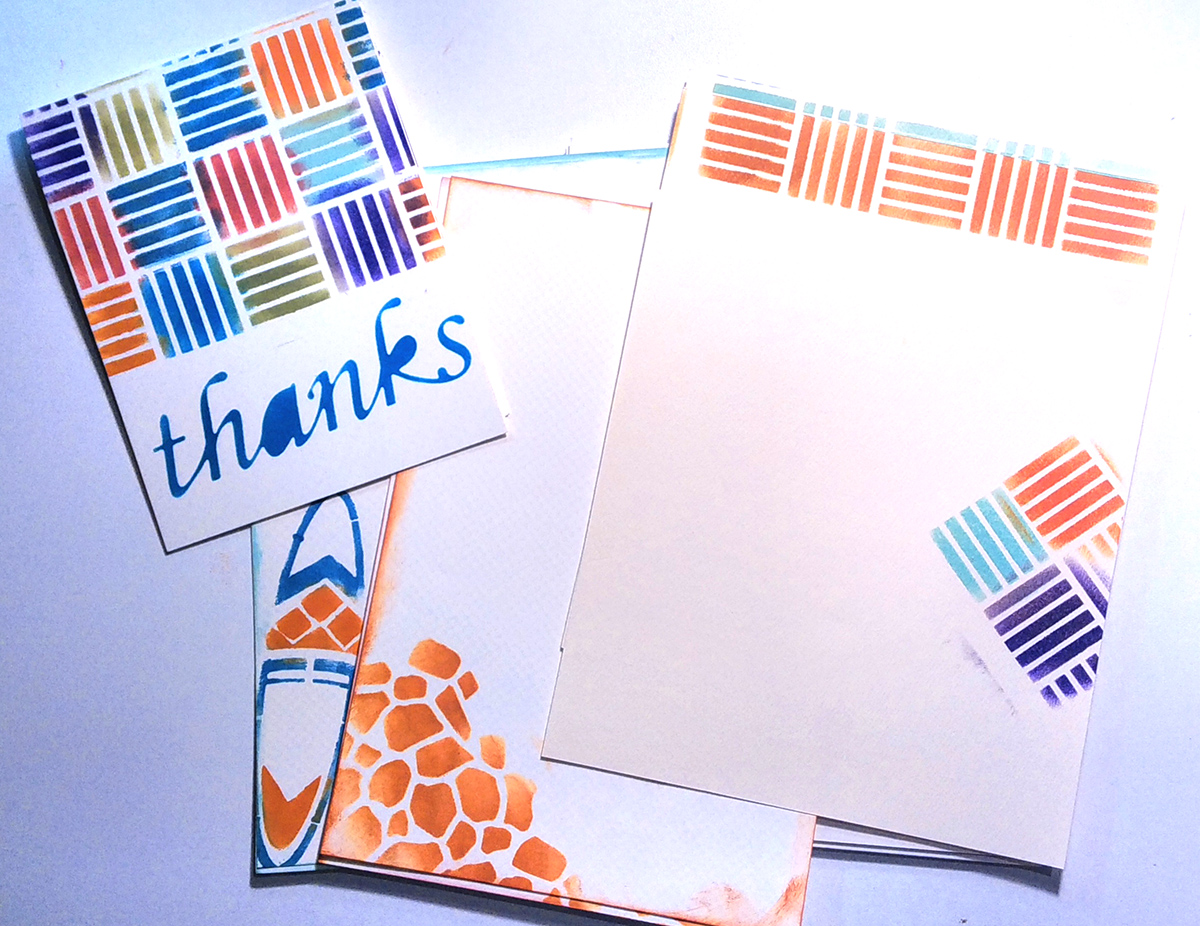
I knew my time as a Guest Blogger with ClearSnap® would be exciting but this is an excitement extra!   I love stationery, I love Chalk Inks, I love Africa and Kenya is one of my favorite countries! Just imagine my delight when I learned I would have the opportunity to combine these three passions in a design for this hop!  
KENYA
A CHALK INK TRIBAL STATIONERY SET

  Africa is rich in natural resources and beautiful, engaging people.  I drew inspiration from the rich colors used in tribal clothing, particularly among the Maasai, a pastoral tribe famous for their authentic culture.  They defied modern culture to retain their traditional way of life.
The vibrant colors of the ColorBox® Chalk Ink Pads made it easy to bring the essence of the Maasai Tribe and the country of Kenya to my stationery design. I wanted to create an organic project that would bring my three loves together in an elegant presentation.

Tutorial Supplies 
STEP TUTORIAL

  • Start with an empty Stationery box (or create one.)   Link: DIY A2 BOX

  • Cover the interior and exterior of the lid and tray with either white gesso or a white chalk paint. For my project, I used an off-white chalk paint.  You can make your own chalk paint. Link: DIY Chalk Paint 


Use a ColorBox® Stylus tool to apply the desired ink colors to the box top and tray.

  • Apply your stencil design.  For my "woven" design, I used ink colors: Alabaster, Red Barn, and Guacamole from the PaintBox® "Mercantile." The Alabaster ink is actually an off white, but when stenciled on the black background it looks almost silver.  This was an unintended consequence but I like it.   
  • Depending on the intricacy of your stencils, you will need to use daubers, blenders, and the Stylus tool to apply your inks.
  • Embellish your project as desired.  I cut my letters from heavy weight chipboard and applied a coat of gesso prior to applying my chalk ink.
  • seal the box with two applications of an acrylic spray sealant.
  • Use your stencils to create the desired number of stationery sheets.  I created four of each (notecards, Full Sheets (6"x6"),  Short Sheets (4"x6") in each stencil design.  I used an Antique Laid Paper for the stationery.  The texture communicates the strength and resolve of the Maasai!  The Zebra design was created using the ColorBox® Art Screen - Cobblestone
ENJOY THE HOP!  IF YOU HAVE QUESTIONS ABOUT THIS PROJECT, CONTACT ME AT:
HUGZ!


Disclosure Statement

EFFECTIVE DECEMBER 1, 2009, FTC GUIDELINES REQUIRE BLOGGERS TO DISCLOSE ANY TIME THEY ARE COMPENSATED FOR ENDORSING OR REVIEWING PRODUCTS OR SERVICES.

The Project that is demonstrated below contains components I received for free from ClearSnap® in return for my services as a Guest Designer and for posts on my blog. I affirm that I have not made, nor would I ever make or endorse, misleading statements regarding any product or service used in the operation of this blog.

IF YOU HAVE QUESTIONS REGARDING ANY PRODUCT OR SERVICE USED ON MY BLOG, PLEASE CONTACT ME AT CMALKAH@YAHOO.COM.


Tuesday, June 14, 2016

Shopping Our Stash #256 - Let Me Take A Selfie - Create A Polaroid Scene

Hello, Crafty Peeples!

Well, we have a fun one for you this week at Shopping Our Stash!  The team is excited to see your polaroid scene creations using items from your stash!
I have embarked on a self-imposed challenge to go through all the cards that are in my studio.  I am either giving them away or removing salvageable elements and using them on current creations.  I salvaged this Robert Jackson Image from a project I created almost five years ago.   This image is a personal favorite and it was nice to be able to reuse it!

Stash Items Used:
Image  - 5 years old
Black Card Stock - 5 years old
White Card Stock - 6 years old
Designer Paper -   3 years old
Brad -   3 years old
Photo Corners - 4 years old

My teammates have created delightful designs that I am sure will inspire you as you create your very own polaroid scene!  I expect the creativity level will be sky high for this one!

Thanks for Stopping By!
HUGZ,
CHANA


Tuesday, May 31, 2016

Shopping Our Stash - The 4 Elements - Earth, Wind, Fire, Water

Hello, Crafty Folks!
IT'S STASH REDUCTION TIME
WELCOME,  New SOS Design Team members!

The Shopping Our Stash Team has a wonderful talent for coming up with offbeat challenge themes.   I usually get stuck trying to come up with a suitable project and this week was no exception.  I finally chose WIND and EARTH as my ELEMENTS.  This was a fun project and I had a chance to use the Emboss/Resist Technique.

You only need to choose ONE element but feel free to incorporate as many as you can/want in one project.   Please let us know your element choice.

Wind and Earth Elements Tag
Using the Emboss/Resist Technique.
 The element WIND is represented by the Butterflies.  Some are hiding in the forest!
I love to watch these elegant, beautiful insects as they float gracefully on air and then land gently on a limb, rose, or on your finger, if you are lucky!
The Green Ink is more of my Earth Element.
Stash Items:  Graphic 45 Product Backing Card.  An Irregular piece of cheese cloth leftover from another project was colored with chalk ink and used as ribbon.  
The back of the tag was colored with ColorBox® Pigment Ink - Ocean - from the Taos Paintbox®.  The edges were inked with ColorBox® Fluid Chalk Ink - Pumpkin Spice.  

What Was Done
This is a stash item!  Whenever I purchase carded items, I save the cards to use as tags.  The card is glossy so I covered it with a layer of gesso. 
I embossed the card  using the WRMK® Next Level™ Embossing Folder

COLORING THE TAG
  • Use the ColorBox®  Color Blender™ to apply your  Paintbox® inks.  For this project, I used colors from ColorBox® Chalk Paintbox®  Mercantile™(Alabaster, Red Barn, Guacamole, Sea Crystal) and Pigment Paintbox® Taos (Amber and Chianti)
  • Add ColorBox® Fluid Chalk Ink - Pumpkin Spice.  (I blended colors until I achieved a "forest" background.)
  • Heat Set the inks.  
  • Place ColorBox® Top Boss™ Clear  Embossing Pad directly on the tag and skim across the top.  Do not apply too much pressure.
  • Sprinkle clear embossing powder over the tag, shake off excess powder and then use your heat gun to melt EP.
  • Spritz card with complementary colors and blot away excess. 
  • Sand around the edges of the tag to remove some of the melted embossing powder.  Ink the edges.
  • Use SMOOCH® to paint my die cut sentiment. 
  • To add more color to the embossed images, paint the inside wings with Liquid Pearls®.  Also use Liquid Pearls® to trim the butterfly wings.
Thanks so much for stopping by!  If you decide to try the emboss resist technique, share your project results with me at A Place To Start in our Neverending Challenge!

HUGZ,
CHANA MALKAH
PRODUCTS - ClearSnap


OTHER PRODUCTS
We Are Memory Keepers® Next Level™ Embossing  Folder - Butterflies
Sizzix® Alphabet Dies - Mac and Cheese™
Liquid Pearls®
Pro Art® Premium Gesso

Disclosure Statment:
EFFECTIVE DECEMBER 1, 2009, FTC GUIDELINES REQUIRE BLOGGERS TO DISCLOSE ANY TIME THEY ARE COMPENSATED FOR ENDORSING OR REVIEWING PRODUCTS OR SERVICES.
The Project demonstrated above contains components I received for free in return for my services and for posts on my blog. I affirm that I have not made, nor would I ever make or endorse, misleading statements regarding any product or service used in the operation of this blog.
IF YOU HAVE QUESTIONS REGARDING ANY PRODUCT OR SERVICE USED ON MY BLOG, PLEASE CONTACT ME AT CMALKAH@YAHOO.COM.


Wednesday, April 6, 2016

Life's A Picnic - Upcycled Styrofoam Ice Chest

Hello, Crafty Peeps!
 I am continuing my quest to "Happydize" all the equipment and other paraphernalia connected with the treatment of my disease.  Monday I posted my updated Banana Hanger.  Today I am posting my updated styrofoam ice chest.
My Immuno-therapy medications used to be delivered every month in this "environmentally" toxic puppy.  Thank goodness, when my provider company was purchased by a large insurance company, they switched over to the "space bags."  The Hubster and I no longer have to figure out what to do with the containers.  Anyway, two of the ice chests are with me permanently.  One, to store nursing supplies and one to hold emergency supplies.

I thought it was great, artistically, when pieces of the styrofoam began chipping away as I worked.  My illness is a lot like that, it slowly robs you of muscle function.  Sometimes, it is easy to focus more on what I can't do or what I used to do, rather than focusing on the beauty that remains in all that I still can do.  Life is a picnic!

The edges are painted gold and speak to the golden moments that Amy and I share during our two days together.  We have solved all the world's problems, more than once!  We have found differences in our sameness and sameness in our differences, and we have become friends.  Best of all, she refuses to attend any of my pity parties.  The Hubster moved our hummingbird feeder closer to the bay window so Amy and I can actually see them feed.

 Jimmy is "The Hubster."
 Amy is my friend and infusion nurse.
 Stacie, is my daughter.
Josh is my eldest grandson
Timothy is my son.
Dr. Greene is my neurologist. 

Danielle, Sean, and Michaela are my three younger grandkids whose names will be added later
 The book pages represent my love of reading and writing.  The bird nest decoupage napkins speak to my love of nature (a gift from my Cherokee father.)  The color blue represents the sky, which for me reflects the eternal presence of G-d.)  The molding plaster pays homage to the rough patches we all face in life.  The green and orange represent the earth.  It is here that we have dominion.  It is here that we are given the power to overcome any challenge life puts in our path.

I had fun doing this.  Even The Hubster thought is was good emotional therapy for me.  I am such a control freak it is very difficult living each day with something I cannot control.  Maybe this is the lesson I am to learn, maybe this is the correction for my Neshama!

Thanks for stopping by!
Hugz,
Chana

Tuesday, March 29, 2016

Shopping Our Stash #245 - Something for the Big or Biggest Boy

This week,at Shopping Our Stash, Alica is hosting and she wants us to create a masculine card.  I feel badly about presenting a work in progress, but I am still working on this card for my son's birthday.  I hope to have updated pictures later in the week.

My son is a Systems Engineer and sometimes has to come up with extremely "creative" solutions for his clients.  Tight budgets and grand expectations have to be balanced to create systems that are functional and cost effective.  Sometimes he has to think way outside the box!
 I used WRMK's Next Level Embossing folder to create the basket weave.  Then I rubbed Rub N' Buff Grecian and Autumn Gold across the front and buffed it to a shine.  I tried to get the "golden glitter" on camera but failed.  Maybe I can talk my photographer into taking pictures tomorrow.

Tuesday, January 26, 2016

Shopping Our Stash Challenge #236 - Inspired By A Book - N'tilat Yadayim

Hello, Crafty Peeps!
Well, we have a good theme for our challenge this week at Shopping Our Stash!
We want you to create a project that was:
Inspired By A Book
I really thought this would be easy.  Not only am I an avid reader,  but also, one of those who keeps books to read them again.  Last year during our decluttering push, I sent tons of books off to my grandson's school and to a store that resells books.  Still,  I have tons more that belong to me and some that belong to my son, who also a hoarder of books.  Needless to say, even surrounded by all this potential inspiration, I came up empty!  While I was wandering around picking up books and putting them down again, The Hubster called to say that lunch was ready.
I was still seeking inspiration when I picked up the hand washing cup and was stunned by how awful it looked.  Immediately, I knew this cup would be my project for the challenge.
N'tilat Yadayim
 Inspired by the Bencher Siddur Birkat Hamazon,  a book of Prayers and Songs
Yadayim = Hands

HOW THIS WAS DONE!
The hand washing cup is used for ritual hand washing prior to eating a meal with bread.  As wedding gifts, we were given several beautiful cups that we use on Shabbos, however, for everyday use, we chose these plastic cups.  Over time, they have become discolored.
I love using the faux metal technique and wanted to see how it would work on my cup!
I love  these WRMK Next Level Embossing Folders.  You get 2 Folders
 Texture Paste on the Debossed side of the foil preserves your design 
and helps with application.
This was applied to the bottom of the cup.  I covered it with clear shelf liner and the entire cup was sealed first with Mod Podge™ and Varnish!

Supplies Used:
Plastic Hand Washing Cup
Aluminum Foil
WRMK® Next Level Folder - Butterfly (Each Pkg has two folders.)
Liquitex® Molding Paste
 Ann Butler Designs® Iridescents™ 
Earth Safe Finishes® Chalk It Up Paint™
Liquitex® Professional Varnish - Gloss
Mod Podge™
Scor-Tape
Rub n' Buff ® Wax Finish - Silver Leaf (used on the rim of the cup)
Ranger ® Distress Paint™ - Hickory Smoke (Used to paint the inside)
The Hubster and I both feel much better now when we say the N'tilat Yadayim!  I believe anytime we honor HaShem, our ritual items should always be at their very best.  He is Worthy of the Honor and the Praise!

Thanks for stopping by!
HUGZ!
Chana Malkah
 My teammates have created some pretty fabulous projects!  Pay them a visit and leave some love!