Friday, April 22, 2016

StencilGirl Earth Safe Finishes/Ann Butler Earth Day Blog Hop

Hello, Crafty Peeps!

Thanks for participating in the

StencilGirl 

AND 

 Earth Safe Finishes®/Ann Butler Designs™ 

Earth Day Blog Hop

Those of you who follow me regularly know that I am big on reusing, re-purposing, and recycling.  The Hubster says my single Cherokee gene drives me to preserve nature. 
 That may be true, but on the other hand,  it just makes sense to take care of the place that supports your survival.


The frame was another great find by The Hubster.  He does most of my "picking" at the Goodwill Store.  He presented this to me with an unceremonious, 
"I suppose you can do something with this!"  
I kept the frame on one of my work tables for two months and, during that time, experimented with possible project uses.  Nothing really inspired until I saw the 
"Tribal Men" Stencil.  

I created two projects for the Hop!
 Project #1

"Out of Africa, Kings"
I reversed the canvas and stenciled the image.  Looks like a Shadow Box!  Although not visible in this shot, the inside edges are painted with Earth Safe Finishes® Chalk It Up Licorice Paint.  Very dramatic.  I also use the Licorice chalk paint on the warriors.   I used the bottom of the stencil to create the design around the outer frame.

Project #2

"I Am The Strength of Africa"
Since the original picture was perfectly sized, I decided to use it as my canvas.  I applied two coats of Chalk It Up™ Snickerdoodle paint.  I allowed that to dry before adding a coat of Chalk It Up™Razzleberry, and finally, I used a toothbrush to swirl in Earth Safe Finishes ® Yellow Pigment and Chalk It Up® Avocado Pie.
I love how the colors of my "forest" provide the perfect material for  the warrior's garment.  The gold trim was in good shape, so I just cleaned it up and painted on a coat of Ann Butler Designs™ Iridescents - Sunshine.  The Black layer is Earth Safe Finishes® Chalk It Up™ Licorice.  The frame was painted with Avocado Pie and highlighted with gold and copper metallic wax.  The outside edges were painted with Ann Butler Design's Sunshine.  The interior molding was painted using Razzleberry.  


Products Used:
StencilGirl:  Tribal Men Stencil
Earth Safe Finishes® Chalk It Up™ Paints:
Avocado Pie, Licorice, Razzeleberry, Snickerdoodle
Earth Safe Finishes Pigment Inks:  Yellow
Ann Butler Designs™ Iridescents:  Sunshine


HOW WOULD YOU LIKE TO WIN A JAR OF EARTH SAFE FINISHES VOC FREE PAINT?
Just leave a comment below and at the end of the hop, I will select two winners.  Our paints are earth friendly and pretty kind to DIYers too! I know you will love them as much as I do!


The Earth Safe Finishes® Design Team Members


The StencilGirl Design Team Members

Mary Beth Shaw
Mary C. Nasser
Carol Baxter
Gwen Lafleur
Janet Joehlin

Just leave a comment below by Monday, April 25th at 11:59PM Central Time.
The more blogs you comment on in the blog hop, the more chances you have of winning!
Winner will be announced on StencilGirl's Facebook page on Wednesday, April 27th.


THANKS FOR VISITING!  HAPPY HOPPING!
HUGZ
CHANA MALKAH

Wednesday, April 20, 2016

Shopping Our Stash - Chip Off The Old Block - Use Chipboard

Hello, Crafty Peeples,

I am a day late with my post for Shopping Our Stash, but this was one of those projects that literally turned into a vendetta.  To make a long story short, everything that could go wrong did go wrong.   I was incapable of cutting a straight line or cutting paper, or applying paper completely straight. I only have good stamped images because I stamped using pigment ink on chalk paint and could remove my mistakes with baby wipes.


I started this project as a gift for my grandson's teacher.  The 4th, 5th, and 6th-grade classes went on a camping trip (4 days, 3 nights, what brave parents and teachers) and I wanted her to have this as a little thank you!  They left on Monday and the project was still in disparate pieces on my board. 


I was surprised to discover the clip would hold the chalk without any additional anchoring.   The problem of the chalk had plagued me throughout the process.  I shook it, dropped it, no problems!

I used the Frosted Flakes™ chipboard box to create my sleeve.  The clipboard is also constructed from chipboard.

Other Supplies Used:
Earth Safe Finishes® Chalk It Up™ Razzleberry
DecoArt® Americana® Decor™ Chalky Finish™ - Relique (1 part) Sleeve color
DecoArr® Americana Decor© Chalky Finish™ - Yesteryear (1part) Sleeve color
DecoArt® Americana Decor© Chalky Finish™ -  Carbon (for the clipboard)
Graphic 45 - An ABC Primer Collect Papers and Stamps
My Mind's Eye® record it! - all things CHALK! - (Journal Card and Alphabets on sleeve) front and the Happy Campers paper on the sleeve back.)
Rubber Stampede® Paint Pad Pigment Ink - White

THANKS SO MUCH FOR STOPPING BY!
Share some of that love with my teammates!

Hugz,
Chana

Challenges:
Frilly and Funky Challenge - It's Not Easy Being Green

Tuesday, April 12, 2016

Shopping Our Stash Challenge #247 - You Stamped With What?

Hello, Crafty Peeples!
Chris is hosting this week and she has asked us and you to 
Stamp your project with a project not intended for stamping. 

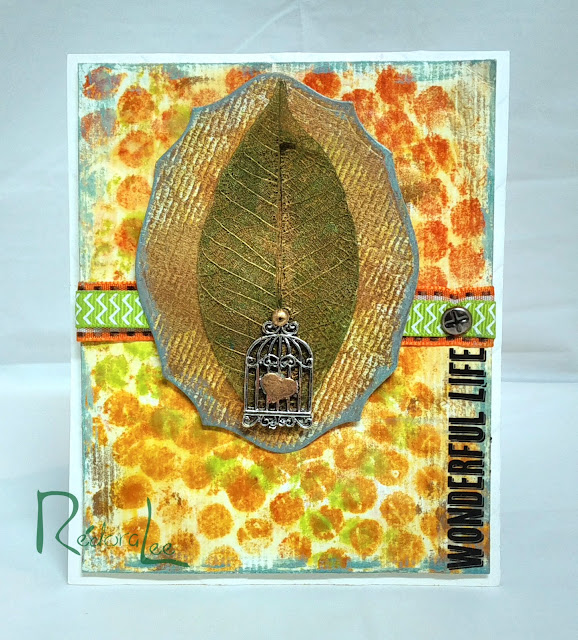
For my project, I used bubble wrap to stamp both my background and the die cut panel beneath my leaf.
 This is a shot of the inside.   I love this stamp!

Thanks, Chris!  This challenge really causes one to step out of their comfort zone and push the creative boundaries.  

Stash Items:
Bubble Wrap
Ribbon
Water Color Paper
Tim Holtz Rub Ons
Charm and Leaf
Thanks for stopping by!  Now share some of that love with my teammates!

Wednesday, April 6, 2016

Life's A Picnic - Upcycled Styrofoam Ice Chest

Hello, Crafty Peeps!
 I am continuing my quest to "Happydize" all the equipment and other paraphernalia connected with the treatment of my disease.  Monday I posted my updated Banana Hanger.  Today I am posting my updated styrofoam ice chest.
My Immuno-therapy medications used to be delivered every month in this "environmentally" toxic puppy.  Thank goodness, when my provider company was purchased by a large insurance company, they switched over to the "space bags."  The Hubster and I no longer have to figure out what to do with the containers.  Anyway, two of the ice chests are with me permanently.  One, to store nursing supplies and one to hold emergency supplies.

I thought it was great, artistically, when pieces of the styrofoam began chipping away as I worked.  My illness is a lot like that, it slowly robs you of muscle function.  Sometimes, it is easy to focus more on what I can't do or what I used to do, rather than focusing on the beauty that remains in all that I still can do.  Life is a picnic!

The edges are painted gold and speak to the golden moments that Amy and I share during our two days together.  We have solved all the world's problems, more than once!  We have found differences in our sameness and sameness in our differences, and we have become friends.  Best of all, she refuses to attend any of my pity parties.  The Hubster moved our hummingbird feeder closer to the bay window so Amy and I can actually see them feed.

 Jimmy is "The Hubster."
 Amy is my friend and infusion nurse.
 Stacie, is my daughter.
Josh is my eldest grandson
Timothy is my son.
Dr. Greene is my neurologist. 

Danielle, Sean, and Michaela are my three younger grandkids whose names will be added later
 The book pages represent my love of reading and writing.  The bird nest decoupage napkins speak to my love of nature (a gift from my Cherokee father.)  The color blue represents the sky, which for me reflects the eternal presence of G-d.)  The molding plaster pays homage to the rough patches we all face in life.  The green and orange represent the earth.  It is here that we have dominion.  It is here that we are given the power to overcome any challenge life puts in our path.

I had fun doing this.  Even The Hubster thought is was good emotional therapy for me.  I am such a control freak it is very difficult living each day with something I cannot control.  Maybe this is the lesson I am to learn, maybe this is the correction for my Neshama!

Thanks for stopping by!
Hugz,
Chana

Monday, April 4, 2016

A Place To Start - Upcycled Banana Stand

Hello, Crafty Peeples!

Sharing a project I created for my Crafter's Info Blog


Last week, I decided that I am going to up-cycle everything that is connected to my disease and its treatment.  Because my Potassium levels tend to dip to unacceptable levels, I eat a lot of bananas.  It was while reaching for one of those bananas for my smoothie, it occurred to me that everything I touch that relates to my illness is so very drab.  I decided to change that.  This banana stand is the first item to be dressed up.  In a day or two, I shall have another.
This week's challenge is:  Upcycle a common household item.

We all have things around the house that could use a little Spring sprucing up.  I have decided to spruce up anything that is remotely connected to my illness.

I eat a lot of Bananas because I NEVER want to have to take potassium again.  NASTY!

THIS IS MY UPCYCLED BANANA STAND
Supplies:
Banana Stand
Napkins
Chalk or Acrylic Paint
Decoupage Glue
Matte Varnish
Bananas
Disassemble and Wash thoroughly with warm soapy water.
 I allowed mine to air dry for a day before I started painting.

No one has entered a project in the challenge in the last couple of challenges, so I am not setting up a link.  If you decide to upscale one of your household items and want to share it with me, you can enter it here - Never Ending Challenge

Have A Fabulous Week!
Hugz,
Chana