Showing posts with label mixed media. Show all posts

Tuesday, January 31, 2017

Shopping Our Stash - Days of Yore!


Hello, Crafty Ones!
Shopping Our Stash  would like to see your
Vintage or Shabby Chic creations.
I look forward to seeing lots and lots of distressing!
Thes fabulous flowers were included in a bouquet of flowers given to us to lift our spirits. We lost The Hubster's mother and my sister within two weeks.  I just knew these would be wonderful in my Vintage Vase.
I love "engineered" projects!  This year I want to try as many new designs as I can find or think up in my own head.  I purchased these hinges to use on some cigar boxes I am up-cycling.  When I saw Alexandra's wonderful YouTube Video, I decided I would try her technique for using these closers on a standard box design.   I have a step tutorial for creating a post it note holder that creates the same box but the note holder tray can be made from less substantial paper (card stock instead of chipboard) and it does not require the closer.  You can find that tutorial here: RLD-Inky

Keepsake Box with Swing Hasp Closer
(using The Graphic 45® French Country Collection)
This elegant cut sheet from the G45 French Country Collection was perfect for the Crackled Bud Vase.  I love these bottles.  Good thing I like my probiotic drink.  Guaranteed bottle supply!
 Stamping on your crackled bottle will add to the vintage look!

Thanks for stopping by and be sure to enter your project into our challenge this week at:  SHOPPING OUR STASH!

HUGZ,
CHANA MALKAH

Friday, July 1, 2016

Altered Eclectics - Dressmaker's Closet - Altered Altoids Tin

Hello, Crafty Peeples!
Welcome to the July Challenge at Altered Eclectics!  
As always, our challenge is Anything Goes.  Remember, projects should be:
Mixed Media, Altered Art, Upcycling, Recycling, Repurposing .
Please, no ATC's and no Cards.

My Dressmaker's Closet
For a long while now, I have toyed with the idea of altering an Altoids tin. Many fabulous projects have been created using these little tins so the true challenge becomes thinking of a design that has not been shown.  
I was my intention to add a sewing machine, but all my dies were  too big.  
I really like making my own "rust."   
The Hubster says my altered tin looks like it has been hanging out in some old barn for years!   Lovely, that is just the look I was going for. 
I have begun work on another idea using a tin and hope to be able to share it by the end of July!  We shall see, you know our muses can nut up sometimes.

Please check out the fabulous creations presented by my Eclectic teammates.  You will be inspired!

Hugz,
Chana


Wednesday, June 1, 2016

Altered Eclectics - June Challenge - Always Anything Goes -

Hello, Crafty Peeps!
This is my inaugural post as a member of the Altered Eclectics Design Team!   I love Elaine's work and am honored that she finds my projects worthy of her team.  

This Challenge is for 
Mixed Media projects, Altered Art, Upcycling, Recycling Only!   
Cards and ATC's will be deleted!

ART BUD VASE
My most recent passion is exploring ways of altering soft drink bottles.  Occasionally,  The Hubster will purchase a six pack of Red Rock® Ginger Ale.  I think their little bottles are so cute and that they would make an awesome bud vase.
 I wrapped the jar with cheese cloth and that plastic netting that oranges are packaged in.  I glued it all down with Mod Podge® and allowed it to dry overnight.  I randomly applied acrylic and chalk  paint and molding paste to the bottle.  I let everything dry for about two days and then applied several different colors of metallic wax and buffed.

I have tons of loose flowers and butterflies in my stash.  I coated  plant wire with metallic wax paint and created stems for them.  One butterfly was a plain blue, so I used a finger dauber to apply spots of color.  The Hubster was dispatched to the yard to pick greenery.  I think he did a very nice job! 
The clipping from our Yellow Tip Shrub added just the right touch of organic brightness.
 I don't normally use a lot of bling but this piece seemed to cry out for it!  

I was really fascinated by the "cat" faces that appeared with the placement of the pearls.  The Hubster says the one at the bottom of the jar is an owl, not a cat.   I like the huge black cat face at the top.  Don't worry if you can't see them.  

I thought my bud vase might be a bit too esoteric for The Hubster but he really seems to like it!

I am saving up orange packaging because I think it will look neat on a canvas.

My teammates have created some fabulous projects.  We look forward to seeing your creations!


THANKS FOR STOPPING BY!
HUGZ,
CHANA


Challenges Entered
Rhedd's Creative Spirit - Always Anything Goes - Mixed Media and Altered Art Only

Wednesday, April 20, 2016

Shopping Our Stash - Chip Off The Old Block - Use Chipboard

Hello, Crafty Peeples,

I am a day late with my post for Shopping Our Stash, but this was one of those projects that literally turned into a vendetta.  To make a long story short, everything that could go wrong did go wrong.   I was incapable of cutting a straight line or cutting paper, or applying paper completely straight. I only have good stamped images because I stamped using pigment ink on chalk paint and could remove my mistakes with baby wipes.


I started this project as a gift for my grandson's teacher.  The 4th, 5th, and 6th-grade classes went on a camping trip (4 days, 3 nights, what brave parents and teachers) and I wanted her to have this as a little thank you!  They left on Monday and the project was still in disparate pieces on my board. 


I was surprised to discover the clip would hold the chalk without any additional anchoring.   The problem of the chalk had plagued me throughout the process.  I shook it, dropped it, no problems!

I used the Frosted Flakes™ chipboard box to create my sleeve.  The clipboard is also constructed from chipboard.

Other Supplies Used:
Earth Safe Finishes® Chalk It Up™ Razzleberry
DecoArt® Americana® Decor™ Chalky Finish™ - Relique (1 part) Sleeve color
DecoArr® Americana Decor© Chalky Finish™ - Yesteryear (1part) Sleeve color
DecoArt® Americana Decor© Chalky Finish™ -  Carbon (for the clipboard)
Graphic 45 - An ABC Primer Collect Papers and Stamps
My Mind's Eye® record it! - all things CHALK! - (Journal Card and Alphabets on sleeve) front and the Happy Campers paper on the sleeve back.)
Rubber Stampede® Paint Pad Pigment Ink - White

THANKS SO MUCH FOR STOPPING BY!
Share some of that love with my teammates!

Hugz,
Chana

Challenges:
Frilly and Funky Challenge - It's Not Easy Being Green

Wednesday, April 6, 2016

Life's A Picnic - Upcycled Styrofoam Ice Chest

Hello, Crafty Peeps!
 I am continuing my quest to "Happydize" all the equipment and other paraphernalia connected with the treatment of my disease.  Monday I posted my updated Banana Hanger.  Today I am posting my updated styrofoam ice chest.
My Immuno-therapy medications used to be delivered every month in this "environmentally" toxic puppy.  Thank goodness, when my provider company was purchased by a large insurance company, they switched over to the "space bags."  The Hubster and I no longer have to figure out what to do with the containers.  Anyway, two of the ice chests are with me permanently.  One, to store nursing supplies and one to hold emergency supplies.

I thought it was great, artistically, when pieces of the styrofoam began chipping away as I worked.  My illness is a lot like that, it slowly robs you of muscle function.  Sometimes, it is easy to focus more on what I can't do or what I used to do, rather than focusing on the beauty that remains in all that I still can do.  Life is a picnic!

The edges are painted gold and speak to the golden moments that Amy and I share during our two days together.  We have solved all the world's problems, more than once!  We have found differences in our sameness and sameness in our differences, and we have become friends.  Best of all, she refuses to attend any of my pity parties.  The Hubster moved our hummingbird feeder closer to the bay window so Amy and I can actually see them feed.

 Jimmy is "The Hubster."
 Amy is my friend and infusion nurse.
 Stacie, is my daughter.
Josh is my eldest grandson
Timothy is my son.
Dr. Greene is my neurologist. 

Danielle, Sean, and Michaela are my three younger grandkids whose names will be added later
 The book pages represent my love of reading and writing.  The bird nest decoupage napkins speak to my love of nature (a gift from my Cherokee father.)  The color blue represents the sky, which for me reflects the eternal presence of G-d.)  The molding plaster pays homage to the rough patches we all face in life.  The green and orange represent the earth.  It is here that we have dominion.  It is here that we are given the power to overcome any challenge life puts in our path.

I had fun doing this.  Even The Hubster thought is was good emotional therapy for me.  I am such a control freak it is very difficult living each day with something I cannot control.  Maybe this is the lesson I am to learn, maybe this is the correction for my Neshama!

Thanks for stopping by!
Hugz,
Chana

Tuesday, July 21, 2015

Shopping Our Stash - Challenge #212 - Don't Get Stressed, Get De-Stressed

Hello, Crafty Peeps!

Simple challenge  this week at Shopping Our Stash - How Do You De-Stress?
For some it is a walk on the beach, or rock climbing, or vegging out in front of the TV!  Maybe playing online games!  Whatever your de-stressing passion, we would like to see you attempt to capture that in a project.


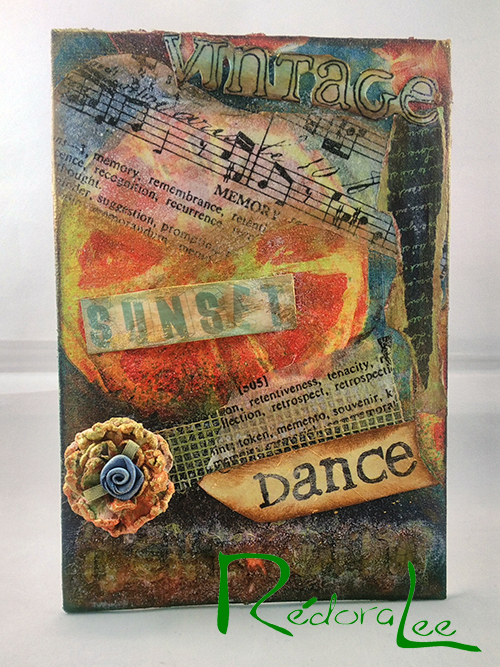
Creating mixed media projects is my great de-stresser!  I love playing with paint, and the excitement of not really knowing how the final project will look is an elixer for me! For my canvas panel, I incorporated one or two of my favorite crafting techniques (Vintage and Decoupage) and then added some other de-stressors, such as listening to music, watching the sunset with my hubby, reading, and dancing!  When I stress eat, I eat fruit, so I figured a big grapefruit would be appropriate.  The word at the bottom of the panel is "Transform."  I think I put just a wee bit too much crackle!

1. Apply a coat of Mod Podge to the front of panel and allow to dry
2. Position Cocktail Napkin  (single ply) as desired, cover with Parchment Paper.
3. Use craft iron to apply even heat to the napkin.  Do not leave iron in one place too long.
4. Wait for surface to cool, then apply 1-2 coats of Mod Podge.  Allow to dry completely.
5. Paint and collage as desired.


Supplies:
Cocktail Napkin:  Fruit Expressions by Elise
Stencil:  Dina Wakley for Ranger - You Can
Distress Spray Stains: Cracked Pistachio, Abandoned Coral, Picket Fence
Ranger Tissue Paper - Musical
Stash:  Designer Paper Scraps, drywall tape, flower
Misc.:  Gesso, Mod Podge, Varnish, Parchment Paper, Craft Iron.

Tuesday, May 26, 2015

Shopping Our Stash #203 - Play Misty For Me

Hello, Crafty Peeples!
Welcome to another fun challenge at Shopping Our Stash!  Leslie and the ladies always come up with such wonderful theme and I just love "PLAY MISTY FOR ME!"   Here is your opportunity to get messy and use some of your old spray inks on some old papers and embellishments.

My oldest grandson is starting his first journal. 
This fall, he is transferring to a new school which requires all students to keep journals, so we thought we would use this summer to help him form the habit of recording his daily thoughts.  
Joshua just got his first big, fancy bike, so I wanted to make it a focal on the front of his new journal.
I tried to find ephemera that represented all the things that he loves.  I am saving soccer, basketball, computers, and robots for his next journal.
 It is hard to see in the photo, but the journal has a metallic sheen.  Joshua, loves it!

How It Was Done:
Materials:
Canvas Journal
Prima Finnabair Stamp (Brick Wall)
Prima Papers (Almanac, Printery, Life Time)
Ranger Tissue Paper (Postale, Melange)
Ephemera
Dylusion Inks Sprays (Cut Grass, Cherry Pie)
Tattered Angels Mists (Grass, Cozy Yellow, Tropical Pink, Un-Birthday)
Tim Holtz Distress Spray Stain (Mermaid Lagoon, Abandoned Coral)
Ranger Distress Ink (Vintage Photo)
Viva Inka Gold (Oldsilver)
Homemade Sprays (Picket Fence (PF Paint mixed with water), Chana's Gold
Misc.:  Gesso, Mod Podge, Helmar 450 Quick Dry Adhesive

EASY TUT
  1. Basically, you cover your journal with Gesso. (I used a navy blue journal because I wanted that color to show through.)
  2. Arrange your collage pieces and add any stamped or stenciled images.   I distressed the edges of some of my pieces with Vintage Photo DI.
  3. Apply a coat of Mod Podge over the collage. The goal is to make edges disappear.
  4. GO CRAZY with mists and sprays to achieve your desired color profile.  Add another layer of ephemera (I added the sentiments, bicycle, Joshua, 2015) seal with mod podge or Aleene's Matte Sealer.

Step 1
Step 2
Step 3
 Step 4

Have Fun!   
Stop by SHOPPING OUR STASH to see the fabulous creations of my teammates.
Hugz,
Chana


Wednesday, May 6, 2015

The Outlawz Greetings Challenge - Show Us Your Polka Dots

Hello, Crafty Peeples!

Last week I made the painful decision to step down as Team Leader of the Outlawz Monday Greetings Challenge Design Team.  For the first time since 2010, I am creating as a regular member.  
The Outlawz was my first team and will always hold a special place in my memories.

So here is my Polka Dots Card.  I chose to do a mixed media panel for the front of my card!  I have so many new paints and spray with which to play, I just couldn't pass up the opportunity.

Painting on burlap paper was an experiment that worked out pretty well.  I also enjoyed the effects achieved by varying the sizes of polka dots and making irregular strokes across the wet paste. 
Viva Inka Gold Wax (Old Gold, Old Silver, Greenyellow) added highlights and kept the colors from becoming too muddy.  The most difficult part of this design was choosing the ephemera!

STEPS AND PRODUCTS USED TO CREATE THE PANEL: 
  • Cut a piece of burlap paper to 4"x6"  - (DCWV Burlap Stack)
  • Apply a thin coat of Gesso.  (Earth Safe Finishes) VOC Free Product
  • Use Stencils and molding paste (I used three different sizes) to create Polka Dot
  • Circle Stencils: Heidi Swapp, Hero Arts, Crafter's Workshop (Mini Life Shapes)
  • Molding Paste: Liquitex, Homemade Texture paste mixed with Stormy Sky DI
  • After past has dried (use heat tool to speed drying time) apply paints in the desired colors
  • Tattered Angels: Plain Jane Simply Sheer Cozy Yellow; Plain Jane Baseboard Grass
  • Tattered Angels: High Impact Paint Tan
  • Shimmerz: Bamboo Leaf
  • Tim Holtz: Distress Spray Stains: Mermaid Lagoon and Abandoned Coral; Paint: Picket Fence; Distress Ink: Vintage Photo
  • Viva's Inka Gold: Old Gold, Old Silver, Greenyellow
  • Choose and apply your Ephemera.  I used Tim Holtz's Thrift Shop, Emporium, Expedition.  The Hello speech bubble was cut from Simple Stories SNAP Color Fusion
  • Polka Dot Designer Paper - Simple Stories Snap Color Vibe 1
  • Border Punch: Martha Stewart's Embossed Zigzag
  • Ribbon and twine from my stash
I am finding my way back to making cards now that I have a comfort level with using mixed media for my front panels.  I am off to try to color a Rick St. Dennis image to use in a project!  Fingers don't fail me now!    Thanks so much for stopping by!
Hugz,
Chana

Monday, December 29, 2014

OUTLAWZ GREETINGS CHALLENGE - HAPPY NEW YEAR! - USE SOMETHING NEW!

Hello, Crafty Peeples!
OUTLAWZ MONDAY GREETINGS CHALLENGE
THEME:  HAPPY NEW YEAR!
The Outlawz is a NING site, so you will be required to join!  It is a fun group with 7 weekly challenges, plus a cool Progressive Challenge.   We would love to have you!
Since I do not celebrate New Year ( I celebrate Rosh HaShanah),  I decided to approach this challenge from the USE SOMETHING NEW point of view.

My current notebook is full, so my inspiration project is a new mixed media cover.   
Considering the amazing haul of supplies I received for my birthday back in November, added to
 "INDECENT" amount of money I "SAVED by taking advantage of the "December Deals," this should have been an easy challenge. The sheer volume of items proved to be a bit overwhelming.
I settled on a new 6" x 9" Spiral Notebook.
Other new items include 3D paint (used on the rose die cut) new inks and sprays.
MIXED MEDIA NOTEBOOK COVER
THIS IS MORE "Chana's Creative Process" THAN A TUTORIAL
Click on Images to enlarge
 De-construct a Plain Notebook
Schematic Design
Not a patient crafter, when working with plastic covers, do not deconstruct, 
because you cannot use a heat tool and must wait for paints, etc., to air dry.
Instead,  cut a lightweight piece of chipboard to size.
 (do not include punched border in your measurements.)

Design Development
Final design rarely ends the way it starts.  These pictures keep me from straying too far 
from my initial Concept, in this case Chevrons, Birds, and Roses.
Initial Composition

APPLY GESSO/PAINT/TEXTURES/PAPERS
(I use a homemade texture paste.)  Recipe : This is a YouTube video by Luvleescrappin
This is just one layer of Gesso.  I applied three.  Black Gesso would have required fewer coats.

APPLY BASE COLORS/PAPERS
I used four cut out from Graphic 45's Botanical Tea Collection.  I wanted to decoupage the entire front, but I would have lost most of my textured cheverons.  
DD is the place to make these decisions.
Play around wtih your elements before you lay anything down permanently.
Don't worry about colors.  One fun part of Mixed Media is that you can paint over any and every thing with Gesso or Spray with inks and achieve some pretty fabulous results.

Construction/Composition
COMPOSITION
This is where I make all my final decisions.  I take time to try several configurations before finally placing and adhering my elements.   I also add color during this phase.  Follow your creative eye!
You can see how the composition has changed from Schematic Design.
CONSTRUCTION
The Final Frontier
(I'm a trekkie, what can I say!)
This is the best part for me.  It is when the design really begins to take form and that restless feeling tha comes over me, when the design is in my mind and not on paper, begins to abate.  I think this is when creativity is at its highest.  Just go with what you feel, I say!

The Final Placement
I became so involved in the project I forgot to take photos as elements were placed in their final postions.  I alway add a coat or two of Mod Podge to each layer of elements.

THE 3D ROSE
To make the rose, I used Cheery Lynn Designs "Lace Rose and Flourishes" die cut. I separated the rose from the flourishes ( I used the flourishes on the front edge of the cover,) decoupaged the rose with Mod Podge (2-3 coats) and then filled in the petals and leaves with Crystal Color Lacquer.  After the lacquer dries, apply 1-2 coats of Mod Podge.
 
The project needed to be darker, so I inked the edges with Vintage Photo and Black Soot DI. 
 I sprayed the cover with Dylusions Melted Chocolate and blotted immediately with soft cloth. 
(be careful when spraying an almost completed project.)
 Blue acrylic paint was mixed with a small portion of my homemade texture paste and smoothed over the Weathered Clock Die Cut.  Play with your colors.  Avoid allowing your colors to get muddy.

OFF TO PHOTOGRAHY
Always present the best possible image!
Simple adjustments to Contrast and Brightness can make a huge difference in the appearance of your project.  Never post "blurry" or "dark" pictures.  
It is not necessary to "Stage" your projects.  
When done properly, clear, sharp photo are just as impactful. 
No matter how much hard work you put into a project, it will be meaningless if you project is poorly photographed.  As a Design Team Member, I have seen so many "fabulous" projects that were so poorly photographed they could not be considered for prizes.


Hope this hasn't been too much of a picture overload!  Thanks for stopping by!
Hugz,
Chana Malkah

Challenges Entered: