Wednesday, May 31, 2023

Craft Along With Me #2 - Using Embossing Folders as Letterpress

 Hello, Crafty Makers!


This post was intended for the What's On Your Workdesk Wednesday Challenge. I think it is a bit too late in the day to post an entry, so I will try again next week.  I have not participated in the challenge for a while and am eager to join again.  

~~~~~~~~~~~~~~
Letterpress without a 3D Embossing Folder
My goal was to suggest a path that leads into the sunlight.  I was inspired to try this technique by a video at Lisa Horton's Crafts.

I don't own 3D embossing folders (Unless my WRMK Next Level Folders count as 3D) and I don't plan to purchase any. So I decided to try this letterpress technique using my regular Daric EF. I have an old-school letterpress system that can get messy and expensive. This is a great alternative.
It may be difficult to see in these photos, but this technique makes stamping images and text onto your embossing folder possible.  This creates depth and makes your embossed image stand out even more.  The stamping and inking are done on the "debossed" side of the embossing folder.

I think my text and butterfly are sort of visible in this photo.  They are easy to see on the actual card.  One of my ring lights stopped working so my colors are slightly off.


I reduced the lighting to show the flatback crystals grouped around the daisies. They are my favorite element in this composition.
I added a light layer of glitter glue to the image.  The depth of the impressions from these EFs is amazing.  My husband said the flowers looked like they were leaning off the page.  That is a result of the shadowing around them.
The glitter is not heavy, the lighting in the above picture makes it appear thicker than it really is.  The final image looks like it has been brushed with Wink of Stella!

I had a great time creating this project.  I am working on several others and will share them as they are completed!
Thanks so much for stopping by!  
Hugz,
Chana Malkah
This is the Process Video from my Craft Along With Me Session.


CHALLENGES ENTERED:


Stuff I Used:


Friday, May 26, 2023

DIY Kraft Gift Bags - Nurse Appreciation Week: Thanks For Taking Care of Me

 Hello, Crafty Makers!
I just started doing video craft along sessions with a few friends.  When my turn to present came along, I decided to kill two birds with one stone.  I made my streaming video about Gift bags I was putting together for the nurses at my infusion center.

This little note card is cute and so simple to create!  I made a separate short video showing how I created it.

I tried to coordinate the colors on the bags with the colors of the contents!
These are not the best photos, but they give you some idea of the final project!   I was pretty rushed at the end and forgot to take pictures of the bags with the tissue paper, etc.   I snipped these photos from the process video.
``````````````````````````````````````````````````````````````````````
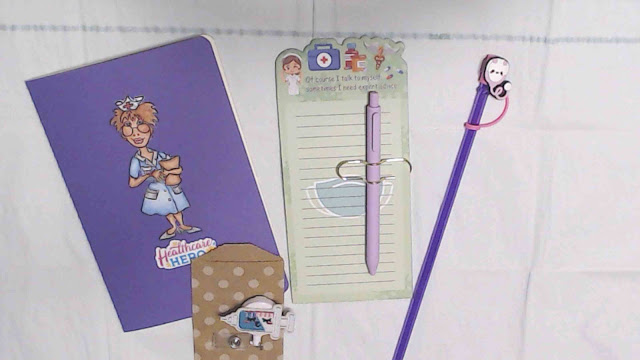
Each set included a reusable straw, reusable straw cover, and retractable badge reel.  One notebook, one ink pen, one graphic notepad, and one pen holder.  In my haste, I omitted the shower bombs and another ink pen that was supposed to be included in the gift.  I will take those next month! 


I stamped and then colored the nurse image.  I created the sticker using the scan and print function of my Cameo 4.
I added a pocket to the inside of the notebooks.  Behind the thank you card, and back cover, I added nurse themed stickers.  


Gift bags are fun.  There are so many ways to make your bag "Younique!" 
Hugz,
Chana Malkah
~~~~~~~~~~~~~~~~~~~~~~~~
Our sessions often last two or more hours, but I was able to edit the video down to 26 minutes for my YouTube Channel.


--------------
Stuff I used:
Distress Oxides: Salvaged Patina, Worn Lipstick, Squeezed Lemonade, Spiced Marmalade, Fossilized Amber, Shaded Lilac.
Stencils:  The Crafter's Workshop, AALL & Create
Stamps:  AliExpress, Heidi Swapp, Misc. Amazon

Wednesday, May 10, 2023

613 Avenue Create May Challenge: WALL FLOWERS

Hello, Crafty Peeps!
I am sitting on the throne of "better late than never!"  This project was supposed to be posted on Sunday!  I've decided to complete my projects, even if I have to post them late!

The May Challenge at 613 Avenue Create is Anything Goes w/Optional Twist: Say It With Flowers!


This project took several twists and turns along the road to completion!  Each time I thought I had nailed down a concept, one of the elements would fail!  I finally took the "throw it against the wall and see what sticks" approach.  I could have improved on the final design, but I was just tired of looking at it!

I made these little vellum flowers several years ago.***  They have been languishing in my stash.  This seemed the ideal time to use them.  I enjoy creating vellum flowers. 

I applied various colors of distress inks to a sheet of vellum.  Next, I applied VersMark Embossing Ink to a sheet of flower stamps.  These were then heat embossed with white embossing powder.  I added the wall stencil using Black Soot Distress Ink.
I played around with my window die-cut until I found the floral grouping I wanted to use.

I kept the inside simple!

Thanks so much for stopping by!
Hugz,
Chana Malkah

Stuff I Used:
***The Heartfelt Creations™  floral stamps used in this project came out of my stash.  They are so old, I fear they may have been discontinued.  I no longer have the packaging for the die.