Showing posts with label Inka Gold Wax. Show all posts

Tuesday, May 29, 2018

Shopping Our Stash - Graduation/Congratulations

Hello, Crafty Peeps,
Graduations and weddings will dominate the summer months so my teammates over at Shopping Our Stash would like to see your creations for your graduates from K-PhD!

This canvas panel is a gift for the IT /Systems Analyst grad.
The symbolism in this panel may be lost on many.  I included the 1's and 0's because the binary code is nothing more than a series of 1's and 0's. 


Materials Used:
Andy Skinner® Mixed Media Stencil - "Code Breaker"
Tim Holtz® Collection Stencil - Crackle
Tim Holtz® Alterations™ Mixed Media Die
Tim Holtz® Alterations Frameworks™Die - "Trellis"
Liquitex Acrylic Paints
Inka Gold Metallic Wax Paints

Hope you like the project!
Hugz,
Chana Malkah

Friday, May 11, 2018

Paper Crafting...A Cut Above

Hello, Crafty Peeps!


It has been a minute since I posted anything on my blog.   my husband and I volunteered to teach a few classes and do some study halls for our grandson who is being homeschooled, so,
there has been very little time for crafting.  However,  I became so inspired by self-directed learning that I decided to take a MOCC Graphic Design Course and learn a bit more about elements of design that would help me with future projects.

Our first assignment was to pick a common household item and create 10 representations of that item using different techniques and approaches to design.  Of course, the "real" graphic design students were churning out Illustrator and PS images.  Some twisted and morphed into alluring and captivating shapes.  The problem was, this was a denotative exercise and the key point was to make sure that the object was still recognizable as itself.   I chose the lowly knife and decided to stay true to my paper crafter roots and use the techniques I've learned making cards and other projects.   Well, ladies, just know, I crushed it!

Click Image for larger view.
This is my "Game of Thrones" Knife.  I cut the knife from a piece of chipboard which I then embossed and covered with Aleene's Tacky Glue.   I used the "Burned Glue" method to create a faux metal look.  The blade is accented with Inka-Gold Old Silver and the handle with Rub'n Buff Ruby Rubi metallic finish.  Three flat back crystals on the handle and I was good to go.

Here are some of my other creations.  One of the designs had to be a "blind drawing."  I will spare you that one.
This is my "Roman" Dagger.  I used lots of acrylic paint and crackle to develop the texture and then used Rub'n Buff to convey age and exposure to the elements.   This one received very positive feedback.
This was very simple...just a lot of flat back pearls and crystals in the shape of a knife.

For this design, I used chipboard, glycerine water, and Tim Holtz distress ink to create a faux leather knife.  I embossed the surface and sealed it with Glossy Accents.  This is my favorite...so cool!

The other designs are mostly conceptual and not very interesting for a paper crafting blog.  It was interesting to see how different my submission was from most others.   One thing I know for sure, I need to feel paper in my hands and get ink on my fingers.  Wish me luck!   I will continue to share any of OUR techniques I use in my submissions.  Now, I have to come up with three new images using different techniques.  They are to be connotative and deliver a message.  "We shall see," said the blind man.

Hugz,
Chana Malkah

Wednesday, June 1, 2016

Altered Eclectics - June Challenge - Always Anything Goes -

Hello, Crafty Peeps!
This is my inaugural post as a member of the Altered Eclectics Design Team!   I love Elaine's work and am honored that she finds my projects worthy of her team.  

This Challenge is for 
Mixed Media projects, Altered Art, Upcycling, Recycling Only!   
Cards and ATC's will be deleted!

ART BUD VASE
My most recent passion is exploring ways of altering soft drink bottles.  Occasionally,  The Hubster will purchase a six pack of Red Rock® Ginger Ale.  I think their little bottles are so cute and that they would make an awesome bud vase.
 I wrapped the jar with cheese cloth and that plastic netting that oranges are packaged in.  I glued it all down with Mod Podge® and allowed it to dry overnight.  I randomly applied acrylic and chalk  paint and molding paste to the bottle.  I let everything dry for about two days and then applied several different colors of metallic wax and buffed.

I have tons of loose flowers and butterflies in my stash.  I coated  plant wire with metallic wax paint and created stems for them.  One butterfly was a plain blue, so I used a finger dauber to apply spots of color.  The Hubster was dispatched to the yard to pick greenery.  I think he did a very nice job! 
The clipping from our Yellow Tip Shrub added just the right touch of organic brightness.
 I don't normally use a lot of bling but this piece seemed to cry out for it!  

I was really fascinated by the "cat" faces that appeared with the placement of the pearls.  The Hubster says the one at the bottom of the jar is an owl, not a cat.   I like the huge black cat face at the top.  Don't worry if you can't see them.  

I thought my bud vase might be a bit too esoteric for The Hubster but he really seems to like it!

I am saving up orange packaging because I think it will look neat on a canvas.

My teammates have created some fabulous projects.  We look forward to seeing your creations!


THANKS FOR STOPPING BY!
HUGZ,
CHANA


Challenges Entered
Rhedd's Creative Spirit - Always Anything Goes - Mixed Media and Altered Art Only

Wednesday, May 25, 2016

Shopping Our Stash - Square Roots - Anything But A Card

Hello, Crafty Peeples!
 The root of cardmaking is the square card but paper crafting has evolved and moved far beyond its humble origins.   I am always intrigued by the fascinating projects paper artist are able to fashion with scraps of paper and common household items.  

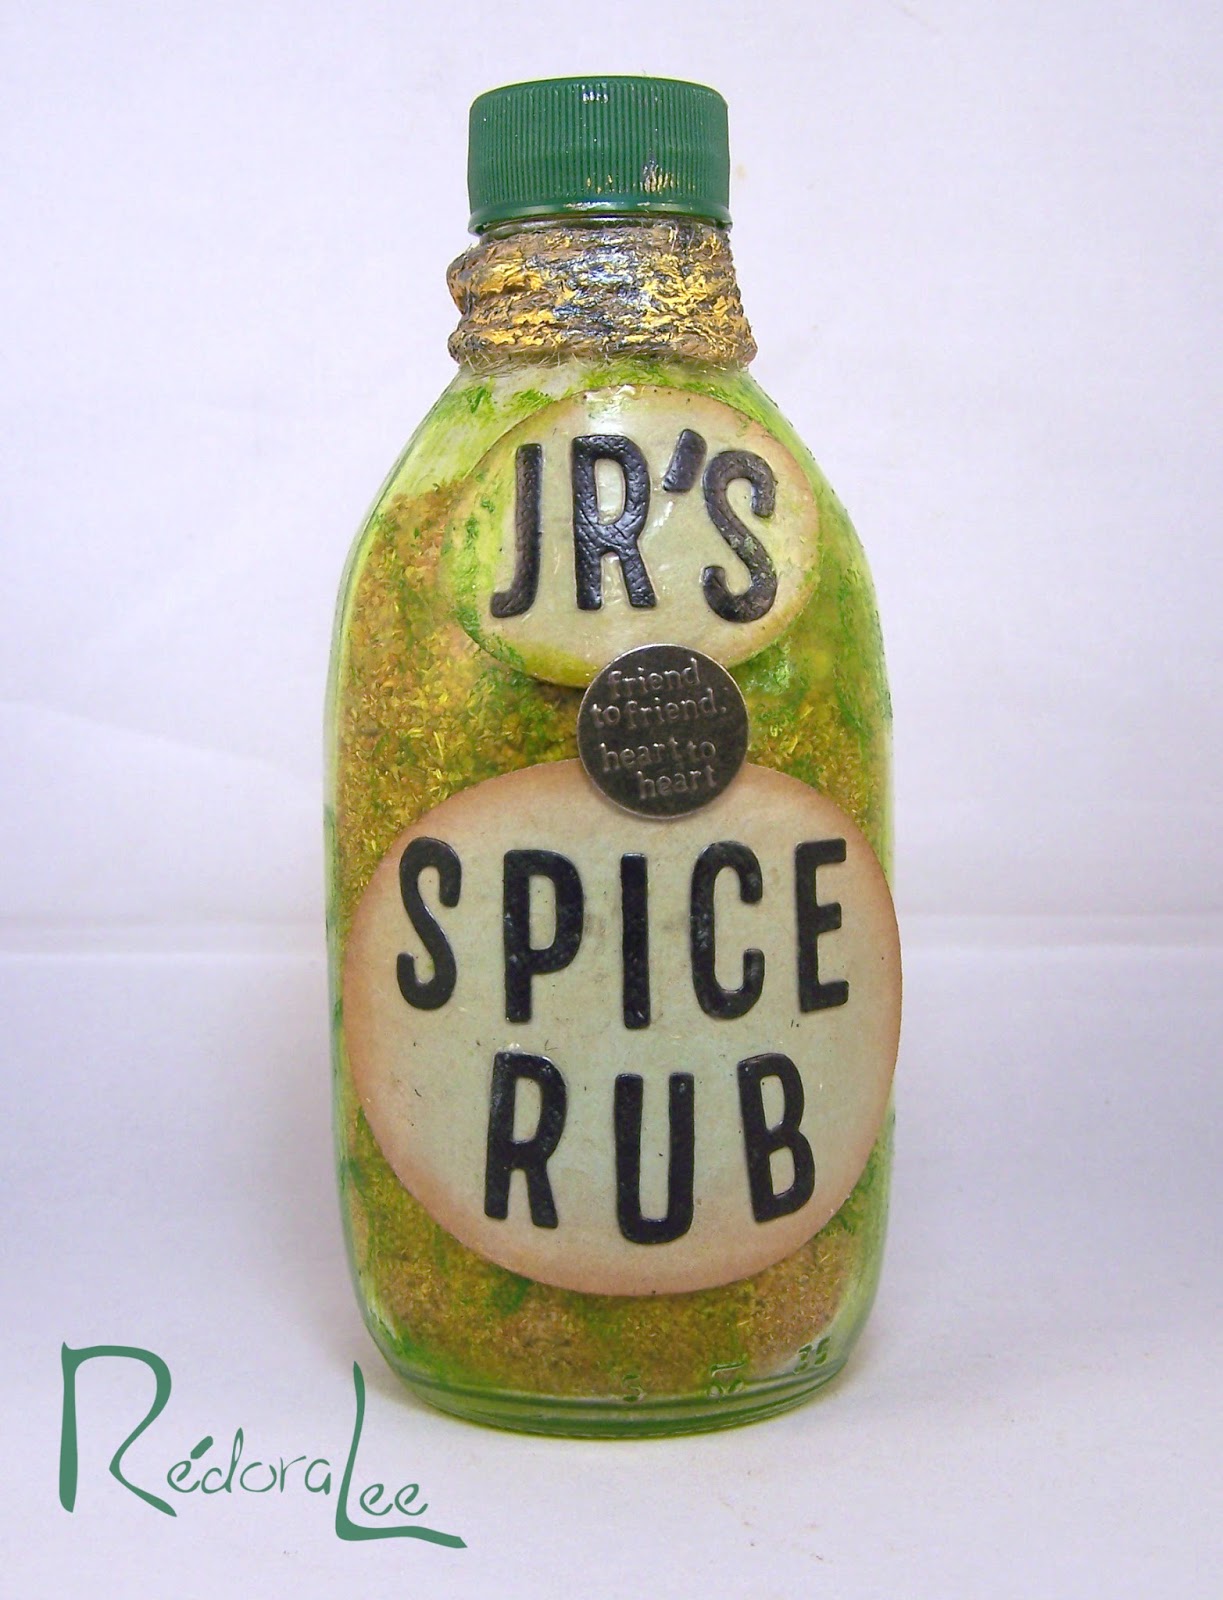
In addition to his amazing Goodwill "Picking Powers," The Hubster is an amateur Chef.  He created a spice rub for beef, fish, chicken.  This rub even makes baked beans taste better.  I have no idea what's in it but I love how it amps up natural flavors.

His sister, Portia, calls him JR (like JR Ewing.)  
I designed this bottle bearing that special  moniker just for her!

The Hubster's Family Famous, Friend Friendly Spice Rub!
The Hubster will not share the recipe but freely shares the rub. 
   
I started with a clean bottle.  I keep a stash of bottles in my studio. I must have ten or twelve of these Red Rock Gingerale® bottles.  They make incredible bud vases.
I used ColorBox@  Glass Graffiti™ to color the bottle green.  I sealed the Glass Graffiti™ with Aleene's ® Acrylic Spray Sealer. 

The labels were colored with ColorBox® Seaglass Pigment Ink and the edges distressed using ColorBox® Crafter's™Ink by Ann Butler - Desert Sand.    The Hubster made a device that allows me to punch holes in almost anything (his real profession is engineering) and I  created my own shaker top from the original bottle cap.   To keep the contents from spilling,  I used my 1" circle punch to create a chipboard cover to fit inside the cap.
 The collar was created by wrapping twine around the neck of the bottle and sealing it with decoupage glue.   Then I applied Inka Gold - Hämatite and Gold wax and buffed to a high shine.  IRL the effect is pretty cool.   

Supply List:
The Hubster's Secret Spice Rub
Red Rock® GingerAle Bottle 
ColorBox® Glass Graffiti™ - Green
ColorBox® Pigment Ink - Seaglass
ColorBox® Crafter's® by Ann Butler Designs™
ColorBox® Stylus Handle and Tip
Spellbinders' Standard Oval - Metal Dies
Sizzix Alphanumeric Dies 3/4 inch
Viva Inka Gold Metallic Waxes - Gold and Hämatit
Marvy Metal Sayings "Friends"
Neenah Black Cover Stock
Medium weight Chipboard
Aleene's 
Twine

Disclosure Statment:
EFFECTIVE DECEMBER 1, 2009, FTC GUIDELINES REQUIRE BLOGGERS TO DISCLOSE ANY TIME THEY ARE COMPENSATED FOR ENDORSING OR REVIEWING PRODUCTS OR SERVICES.

The Project that is demonstrated above contains components I received for free in return for my services and for posts on my blog. I affirm that I have not made, nor would I ever make or endorse, misleading statements regarding any product or service used in the operation of this blog.

IF YOU HAVE QUESTIONS REGARDING ANY PRODUCT OR SERVICE USED ON MY BLOG, PLEASE CONTACT ME AT CMALKAH@YAHOO.COM.

Friday, August 7, 2015

Believe - Quietfire Guest Designer

Hello, Crafty Peeps!
I am so excited to present this project as a Guest Designer for Quietfire Creations!
I was honored to be invited, and trust me, I agonized over what to create!  Eventually,
I created two projects using the  Quietfire "Believe" Die

Project #1   An Upcyled Ping Pong Paddle
Project #2   A Journal Cover

I was inspired by a project from Asmah Abidin.  She had the fabulous idea of upcycling a ping pong paddle.  I thought this would be the perfect showcase for the Quietfire "Believe" Die!
I sent my hubby off to the Goodwill and he returned with 2 paddles, and a Racketball Racket, which he says he purchased in self defense just in case inspiration took a left turn somewhere.
(Translation no more sudden trips to the Goodwill. )

The elegance of this Quietfire "Believe Die"  really draws the eye into this design, I think!   
Quietfire offers a Believe Stamp Set that could be used to complement the die. 
Paper piecing has become a true port of refuge for me on the days my hands don't work well enough for me to color.  I drew the colors for my paddle from her jacket!.
 The dark wood stain, really brought out the earth colors.   To brighten the palette a little,  I added the orange-red flowers and a smathering of TH Abandoned Coral DI on the flourishes.
PROJECT #2 - JOURNAL
I resisted the temptation to make the spine and back more elaborate!  I decided to leave both black and add only random swipes of gold!  I covered the entire project with three coats of  Liquitex Professional Gloss Varnish...the effect is quiet lovely!


Tuesday, February 10, 2015

TP OR NOT TP - CHALLENGE # 188 SHOPPING OUR STASH


Hello, Crafty Peeps!

The Design Team at Shopping Our Stash has a fun challenge for you this week:

Create a project using Toilet Paper or Not Toilet Paper
Use the patterns from your paper towels or your toilet paper as inspiration -OR- use paper towels or TP to add texture -OR- actually use one of them on your project. 


To Tell The Truth, when I saw this theme, my first thought was, "Leslie has a most torturous mind.  She must spend a lot time just sitting around thinking up this crazy stuff!"  Well, since I'm telling the truth, I was not thinking "Stuff!"  I prayed for inspiration and also forgiveness for thinking that other word, you know, the one that isn't "stuff."
Paper Towel Panel #1
Paper Towel Panel #2
 I suppose, just suppose, that I owe Leslie an apology because I had a BLAST working with toilet paper and also with paper towels that can scrub counters and stoves and everything else in my kitchen, but disintegrates with one brush of Mod Podge.

I was so carried away with myself, and all the things I wanted to say to Leslie, that I created three projects, two wall hangings using a paper towel square, and one using several squares of toilet paper and the toilet paper core.
This is my Toilet Paper Tag Project, I used both the toilet paper and the core.
My first step was to apply Mod Podge to both sides and the edges of the core.  Before  the Mod Podge completly dried, I folded a single sheet of 2-ply toilet paper over the core and gently pressed it onto the core.   More Mod Podge was added to the edge to seal the paper.  Once the glue dried, I lightly sponged the toilet paper with Vintage Photo and Bundled Sage Distress Inks and applied another coat of Mod Podge.   I let the project dry overnight.   Dimensional Inks were used to color the flowers and leaves.  Inka Gold was used on the vines.  The edges were sponged with Vintage Photo Distress Ink.


HOW IT WAS DONE!

PAPER TOWEL PANEL FOR WALL / DOOR HANGER
As per usual, I started out by recycling an old amazon box
Hubby said, if I really want to help the environment, I should stop ordering craft supplies. 
STEP ONE
Cut a piece of paper towel to the desired size
I used quarter of a PT sheet
My burlap paper is 6" x 6 1/4"
Cut a piece of cardboard to a slightly smaller size
 Adhere the PT to the cardboard
Dry using a heat gun or air dry 
STEP TWO
Sponge Distress Ink onto Paper Towel
Apply a coat of Mod Podge or  Studio Matte Medium to the Paper Towel.  
If you are attempting to perserve the PT design, take  care not to tear or bruise the PT. 
Drying with a heat gun will lighten your colors. 
Apply other colors of Distress Inks or other mediums
Apply another coat of Mod Podge.  
It may be necessary to touch up your colors after applying the Mod Podge
I used Ranger's Ripe Persimmon
I used Viva Ink Gold - Old Gold and Old Silver

It may be necessary to touch up your colors after applying the Mod Podge
STEP THREE

Composition - Determine the compostion of your project
To add texture to my project, I used the negative of  the Sizzix 
Frameworks Chevron Die and some Texture Paste
I wanted to keep the design clean, so I use only a few embellishments
Gently tear away the excess paper towel.
STEP FOUR
CONSTRUCTION


Adhere Burlap Paper to a piece of Heavy Weight Chipboard
I embossed a piece of grey cardstock to use as a layer.


THANKS FOR STOPPING BY!
LOOKING FORWARD TO SEEING YOUR TP PROJECTS IN THE SOS CHALLENGE