Tuesday, November 24, 2015

Shopping Our Stash - Challenge #229 - NO STAMPING!

Hello, Crafty Peeples!
The Shopping Our Stash Team would love to see a "STAMPLESS" creation from you!
This is a two week opportunity to get rid of some paper and stuff!
This is a two week challenge, so I will post a new project next Tuesday!
NO STAMPING
WONDERFUL DISTRESS INK BLENDS
I chose to play around with blending distress inks. Using dies, embellishments, rub ons, flowers, etc., is an interesting way to stimulate the creative juices.
THE FlAMINGO BEACH TAG
Distress Inks:  Stormy Sky, Scattered Straw, Broken China, Dusty Concord, Embossing Ink
The Stork Beach Tag - Supplies Used:
Distress Inks:  Stormy Sky, Scattered Straw, Broken China, Dusty Concord, Embossing Ink
Die Cuts:  Echo Park Designer Dies - Flamingo Die Set
Craft Tag 6 1/4" x 3 1/4
Donna Downey Stencils - Blooming Floral
Darice Embossing Folder - Flowers and Vines Pattern
Ken Oliver Craft Paper - Studio, Graphic 45 - Tropical Travelogue
Clear embossing powder

 Blended Background
Apply Distress Inks to tag.  Blend colors until you have the pattern you desire. 
Flick water onto the tag to create water spots or you can lightly mist the tag. Use heat tool.
Place your stencil on the tag and apply embossing ink.  
Sprinkle clear embossing powder over the tag, shake off and use heat tool to emboss.
Apply Distress ink color of your choice.  Allow ink to dry.
Emboss tag using embossing folder.  Add additional distress inks, as desired or needed.
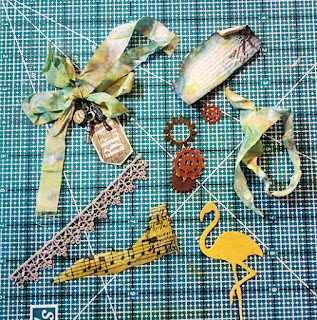
Used Distress Inks to color a strip of seam binding.  Using a Charm Pin, I attached a few charms and a piece of ephemera from the G45 Tropical Travels Collection.  To create the small clock, I used a small circle punch to cut out a clock face from the G45 Steampunk Spells Collection and glued it to the front of a round mirror charm.  I used Tammy Tutterrow's bow template to create my fluffy bow. This little baby works and I don't have to break out my Bow It All™.
I tore a piece of tissue paper(no pattern in mind) and colored it with Fossilized Amber DI.  
Lightly distressed the edgess with Gathered Twigs.
I also made a random tear in a piece of dp from Ken Oliver's "Studio" Paper Pack, distressed the edges and gave it a few gentle swipes of  Fossilized Ameber.   The Flamingo was also colored with Fossilized Amber.
I always do a mock up, take a photo and then use that to get items back in place.  I may make some minor changes( I changed the arrangement of my gears and distressed the edges of my Stork with Vintage Photo DI,) Once satisfied, I glue everything down.

Thanks for Stopping by!
Please visit Shopping Our Stash! My Teammates rocked this challenge!
Hugz,
Chana


Friday, November 20, 2015

Starry Night Steampunk Clock Plate - Earth Safe Finishes

Hello, Crafty Peeps, today I am sharing 

"Starry Night" Steampunk Clock Plate.  
I am thoroughly enjoying my time on the Earth Safe Finishes ® DT!  This week, I focus on Ann Butler Designs™ Iridescents "Lagoon."  This Lagoon color is rich and elegant.  I am already looking for new ways to use it.  The pearls on this plate were originally bright white but a light coat of Iridescents "Sheer Gold" helps them blend into the palette.
Once again, my hubster was my hero!  During dinner, I mentioned that I wanted to attempt to create a steampunk clock.  He went to the Goodwill, came back with this plate and asked: "Well, can you use this to make a clock?"  It's nice to know that he actually listens to all my craft blab! I have also included two of those fabulous glass beads he picked up for me a few weeks ago. .

SUPPLIES USED:
Earth Safe Finishes® Chalk It Up™: Licorice, English Tea Cake
Earth Safe Finishes® Gesso
Earth Safe Finishes® Pigments: Organic Yellow, Permanent Red
Embellishments:  Pearls, Flowers, metal clocks, gears (From my stash)
Die Cuts:  Tim Holtz® Alterations "Weathered Clock" and Marianne Design® Craftable Die "Clock Work"
HOW I DID THIS
STEP ONE:
Bore hubster to death at dinner talking about your project.  Maybe he will visit the local Goodwill Store and come back with a great idea. The plate cost $.39 at the Goodwill (5 min drive from my house.)
Cover plate with two coats of Gesso.
WhitePlate:Steampunk Plate w gesso
STEP 2:  
Select the Ann Butler Designs™ Iridescents color (I used Lagoon.) I did two coats, drying between each coat.  After the paint dried, I used Earth Safe Finishes® Chalk It Up™ to trim the outer and inner edges of the plate lip.  I added my "stars" using a Sharpie Fine Point Marker.  Note: This is the water based poster marker.  You can use a flicker brush, but you have better design control using the marker.  Gesso on the tip of a cotton swab also works.
IMG_20151108_143438_hdr IMG_20151109_135021_hdrIMG_20151109_135030_hdrIMG_20151108_143509_hdr IMG_20151108_145958_hdr
STEP 3:
Add your contrasting "Moon Color" around the inside edges.  Here I mixed Organic Yellow, Permanent Red and White.  I smeared/blotted the paint with a moist paper towel.  Determine the best focal arrangement, adhere to plate and spray entire project with sealant( 2-3 applications.)
IMG_20151111_015056_hdrIMG_20151111_093930_hdr
STEP FOUR:  DISPLAY
So now, this plate joins my collection on the fireplace mantel
SteampunkonMantel


Thanks for Stopping by!
Please visit our store Earth Safe Finishes®


Tuesday, November 17, 2015

Shopping Our Stash - Challenge #228 - Thanks

Hello, Crafty Folks!
This week at Shopping Our Stash, we are looking for THANKS projects!   
Every October and November, I load up on napkins and paper plates with pumpkins and leaves...all the fall themed stuff.   Every year I use a few and then pack the rest away for next year.  So, when I saw the theme for this challenge, I figured I would go through my stash of THANKSGIVING napkins and try to create a tag project.

THE GREAT TAG AND BASKET NAPKIN CLEARING OUT PROJECT!
Here is the napkin I chose to use.  Well, this one is a little wrinkled.
I traced a large tag onto a piece of chipboard, applied mod podge and allowed it to dry.  This was a two ply napkin, so I peeled away the white layer and worked only with the printed layer.  I placed the napkin on the chipboard tag, covered it with a piece of parchment paper and used my small craft iron to adhere the napkin to the tag.  It is important to keep the iron moving.

THIS IS HOW PROJECTS GET OUT OF CONTROL IN MY STUDIO!
Needless to say, I still had a boat load of napkins left, so I started looking around for something else to cover.  My eyes feel on this cute empty basket.
I kinda traced the shape of the interior
Using the same decoupage technique, I applied napkins to both sides.  
Before placing the bottom insert, I draped napkins over the sides of the basket!  
We are all coordinated!
Now, you know all that ribbon wasn't just there to be there!  
I had to sew some little bows on to the sides of my basket!

A TISKIT A TASKIT, WHAT SHOULD I PUT IN MY BASKET?
Why fruit, of course!  BUT I needed PAPER to wrap the fruit .  I grabbed a few stamps
Voila!  Wrapping paper!  I made three different wrapping papers!
 And then I decorated my basket with a bunch of stuff from my stash!
HAVE A HAPPY THANKSGIVING!  FROM MY HOUSE TO YOURS!
Hugz,
CHANA MALKAH


Tuesday, November 10, 2015

Gift Card Tag - Shopping Our Stash Challenge #227 Howdy Partner!


Hello, Crafty Peeps!
 Shopping Our Stash would love to see your Western Themed Creations!

 (Western (US) theme -- (horses, cowboy, cowboy boots, Native Indians)


Howdy Partner - Gift Card Tag

  My birthday is on the 20th, so naturally GIFTS are on my mind! 
When I started this project, the only thing I knew for sure was that I wanted to use faux wood paper to cover the tag.  I spent about twenty minutes going through my paper pads and scraps (whew), before I found the papers I though would work best together. 

Forgive the coloring!  My nibs were mostly dry.  It has been a long time!
  Another 15 minutes was consumed in looking through my ephemera.  Finally, I decided to use the bottom edge of a piece of 6"x 6" paper. The grouping was nice and established the color theme for the tag!  The rest was easy peasy.  I used a Sizzix rub on for the face!


Supplies Used:
Tag:  I traced the shape of a  G45 Regular tag album onto a sheet of faux wood dp from MME's Pretty Things. I applied one coat of gesso and one coat of varnish.  Looks like real wood!

Image:  Prima Doll (Becky), I used Sizzix's Dress Up Faces Rub On to add a face.  The paper pieced clothing is from MME's  Lost and Found3  "Oliver."

Paints:  Ann Butler Designs™Iridescents : Lagoon and Sheer Silver


Thursday, November 5, 2015

Earth Safe Finishes - Reverse Canvas Mixed Media Shadow Box Project

Hello, Crafty Peeps!
Wow!  It is so nice to be back in my studio! 
Today,  I am sharing my DT project for Earth Safe Finishes.  If you are not familiar with this company, please visit our site and find out who we are.  
For those of us with compromised immune systems, VOC*** free products are a crafting godsend.   

A ROMANTIC THANKS TO MY HUBBY!

This is my first Reverse Canvas Shadow Box Design project!   I wanted to showcase the Ann Butler™ Iridescent line and a shadow box frame seemed the ideal vehicle. 
Hubby was at the Goodwill store, again!  He came home with a bag full of these wonderful glass beads.  He was so excited to once again assume his role as my chief enabler, I simply had to build a project around his latest purchase.  Hubby even brought in a small branch from the back yard!  What A man!
BEFORE

DURING

DONE
 I love the lighting on this shot, it shows the beauty of the Ann Butler™Iridescent paints and powders.  Iridescents enhance projects and surfaces, are versatile and easy to use. Use one color or several colors for an interesting shimmer effect. 

Paints/Glazes:  Ann Butler Designs™ Iridescents
Earth Safe Finishes® Chalk it Up™ - Blood Orange Sorbet (used on sentiment)
Dies:  Sizzix Thinlits™ 4 Pc Mixed Media,  Memory Box® "Thanks"
Stencils: Prima Marketing®
Embossing Folder:  Tim Holtz® Texture Fades™ Post Card and Sheet Music Set
Ephemera: Tim Holtz® Idea-ology™ Thrift Shop

~ ~ ~ ~
***VOCs are solvents that are released into the air as paint dries. Known as offgassing, this process may continue for months or even years after the liquid products have dried.  VOC stands for Volatile Organic Compound. VOC’s are present in many home products including:  paints, paint strippers, and other solvents; wood preservatives; aerosol sprays; cleansers and disinfectants; moth repellents and air fresheners; hobby supplies; mineral spirits, alcohol, nail polish and more. 
(excerpt from the ESF web page)

Thanks for Stopping by!