Showing posts with label My Mind's Eye. Show all posts

Tuesday, November 10, 2015

Gift Card Tag - Shopping Our Stash Challenge #227 Howdy Partner!


Hello, Crafty Peeps!
 Shopping Our Stash would love to see your Western Themed Creations!

 (Western (US) theme -- (horses, cowboy, cowboy boots, Native Indians)


Howdy Partner - Gift Card Tag

  My birthday is on the 20th, so naturally GIFTS are on my mind! 
When I started this project, the only thing I knew for sure was that I wanted to use faux wood paper to cover the tag.  I spent about twenty minutes going through my paper pads and scraps (whew), before I found the papers I though would work best together. 

Forgive the coloring!  My nibs were mostly dry.  It has been a long time!
  Another 15 minutes was consumed in looking through my ephemera.  Finally, I decided to use the bottom edge of a piece of 6"x 6" paper. The grouping was nice and established the color theme for the tag!  The rest was easy peasy.  I used a Sizzix rub on for the face!


Supplies Used:
Tag:  I traced the shape of a  G45 Regular tag album onto a sheet of faux wood dp from MME's Pretty Things. I applied one coat of gesso and one coat of varnish.  Looks like real wood!

Image:  Prima Doll (Becky), I used Sizzix's Dress Up Faces Rub On to add a face.  The paper pieced clothing is from MME's  Lost and Found3  "Oliver."

Paints:  Ann Butler Designs™Iridescents : Lagoon and Sheer Silver


Monday, March 30, 2015

OUTLAWZ GREETINGS CHALLENGE - ANYTHING GOES!

Hello, Crafty Peeps!   
As I have said in the past, I love using brown lunch bags to make cards and tag holders.  This past week I decided to return to that old favorite to create my DT projects.  
I was also inspired by the coming of Passover and the gentle stirring of Spring.
This was a fun, quick, and easy project that utilizes a small bag.  
I did not do a step out tutorial for this project but probably will photograph the next one.
Thanks for stopping by, I look forward to seeing your project in the challenge.
I love the ease of creating pockets with the brown paper bags!  The secret is in the folding!
To save on crafting costs, I keep all the cardboard backing from embellishments and use those for my tags.  These two tags were create using the carding from a Graphic 45 Staples purchase and  from some Bo Bunny Brads.

Hint: Once your brown bag is folded, run it through your Big Shot.  This will smooth out any wrinkles in the bag and reinforce your folds.

Supplies Used:
Papers:  My Mind's Eye - Miss Caroline - Howdy Doody
Inks:  Broken China, Vintage Photo, Spun Sugar and Scattered Straw Distress Inks


Tuesday, September 30, 2014

Sunshine On A Cloudy Day - Shopping Our Stash - Another Brown Lunch Bag Card

Good Morning, Crafty Peeples
The Theme this week at Shopping Our Stash is 
"Sunshine On A Cloudy Day!"
I was born at the tail end of 1949, came of age in the 1960's, and lived in Philadelphia, PA.  You say to me "I've Got Sunshine On A Cloudy Day"  I say to you " MY GIRL!  The TEMPS!"
Philadelphia, in the mid to late 60's, where on any given Friday night, on any corner, one could find boy groups, girl groups, mixed groups, and some odd groups, all gathered together in the name of Barry Gordy and Motown.  Everyone could sing, everyone could dance and everyone wanted to be a star.  Except, my father, who mostly just wanted everyone to shut up, go home and stop using the front stoop of his business as an audition studio.  

My father would yell, "why don't you go sing in front of your house?" and my sister, Pat, who I always felt harbored some kind of death wish, would answer smugly, "I am singing in front of my house, Pops!" 

Adding to Dad's frustration was the knowledge that there were always a couple of cops there, leaning against their patrol cars, making song requests (instead of clearing the sidewalk) and eating the Philly Cheese Steaks they had purchased from HIM (my ungrateful father).


One wonderful weekend each month, The Block Party Talent Show took possession of the dead end street that ran along side my father's restaurant.   Most of the male groups imitated "The Temps." Dad made money hand over fist. Pat and I served customers between our stints as backup singers for various groups.  My Stepmoms and her church friends played Wisk, kept their eyes on the "fast" girls and generally made sure the "heathens" didn't get out of control.  It was planned, impromptu theatre.
As fortune would have it, I met and married a man who had an extensive "mint condition" album collection which included every album and 45 rpm ever released by "The Temps."   Half of which he sold to pay for our dates.  When Jim's Best Friend told me about the sale of the albums, I was able to buy them back... from said Best Friend, who, woefully short of cash, could smell my desperation and managed a nice profit.
At the reception, after I presented the gift of his  "Redeemed Beloved Temps," my husband and a bunch of other very drunken soldiers sang "My Girl" and performed the worst Temptations dance routine in the long, sad history of bad..really bad dance routines.  What A Man, What A Man, What A Mighty Good Man!

This was a fun challenge. Hubby and I had a blast reminiscing about our time in the military, our wedding, and all the albums he sold to keep me in chili dogs and Pepsi at "Sue and Herb's Drive In Diner" at Fort Hauchuca, Arizona.
 Somebody owes somebody a trip to Paris!
Answer (August 2, 2014 marked 45 years)


Thanks for stopping by.  Check out my teammates creations HERE


Wednesday, September 3, 2014

Make A Wish - Project #2 of 2 - Shopping Our Stash - Don't Crimp My Style

Hello, Crafty Peeples,
I was really motivated by our "Don't Crimp My Style" challenge this week.  So inspired that I actually created two projects, hopefully you will find inspiration in one of them!  

WRITE YOUR STORY/ MAKE A WISH!
This is another of those wonderful brown paper bag cards. 

 These gorgeous papers are from the My Mind's Eye Lost and Found 3 - Oliver Collection.
I used the last and I am having a hard time finding all single sheets because it has been retired.
 Using a single strip of crimped cardboard for my belly button adds drama, texture and depth.  The focal of this piece is the center medallion, but the crimped strip elevates the design.
Pocket #1 - Crimped Tags
Pocket #2 - Heart Shaped Tag
Pocket #3 - Large Photo Tag
 To preserve the continuity and cohesiveness of the design, I used crimped handles for the tags and added a crimped strip to form a pocket.  The petal looking curves at the bottom is actually a heart tag...inadvertently left out of the photo shoot.  Hubby was tired.
 The photo tag is backed with corresponding swiss dot paper, you can see it through the thumb pull.

Stamps used in this project: Unity Stamp Company - Charming Gardners (Grateful)
                                              Graphic 45 - Typography and Couture

Thanks so much for stopping by.  I hope something here inspired you!
Still need inspiration?  Visit my teammates at SOS!


Hugz,

Sunday, August 31, 2014

So Grateful Gift Collection The Final Installment

Good Morning, Crafty Peeples!
So Grateful Gift Collection - "Tamara"
 I have completed the Gift Set for my Neurologist.
 I plan to give it to her at my appointment on Tuesday.

To make the collection complete, I included a very nice pen set in colors that complement the papers used in the project.  Forgot to take photo and box is now sealed. Oops!

The final component in the collection is this small note carrier.
The ribbon handle allows it to be easily carried or hung on a doorknob or wall hook.
The base of the carrier is Medium weight chipboard.  
The pocket is a sponged and stamped 5"x7" Kraft Paper bag. 

THE BOX
To create my box, I used a plain white gift box. 
 Painted with Gesso (both sides) and let it air dry over night.
  Alternate layers of distress inks and stains:
Vintage Photo, Peacock Feathers, Rusty Hinge, Mowed Lawn, Picket Fence
In between the layers of inks and stains, I used various script stamps.  
Allowed the top to dry overnight and then cover with clear shelf liner.  
It produces a rich satin sheen.

Thanks so much for stopping by!
Hugz,
Chana Malkah

Challenges Entered:
Addicted To Stamps - Soft Colors/Pastels - Must use stamps.  I used word stamps, no images
Anything But A Card -  Anything But A Card


Tuesday, August 19, 2014

Stationery Gift Set - So Very Grateful - Item #1-Gift Tag


Good Morning, Crafty Peeples

THE CHALLENGE this week at Shopping Our Stash is "Chipping Away".  
Chipboard projects are lots of fun and great for getting the old creative juices flowing.   I cut up old cereal boxes, gum packages, washing detergent boxes, etc., and then use the little pieces to cut out buttons, and other shapes for embellishments.  Don't think you have to purchase chipboard.  
Check out your pantry and your laundry room!
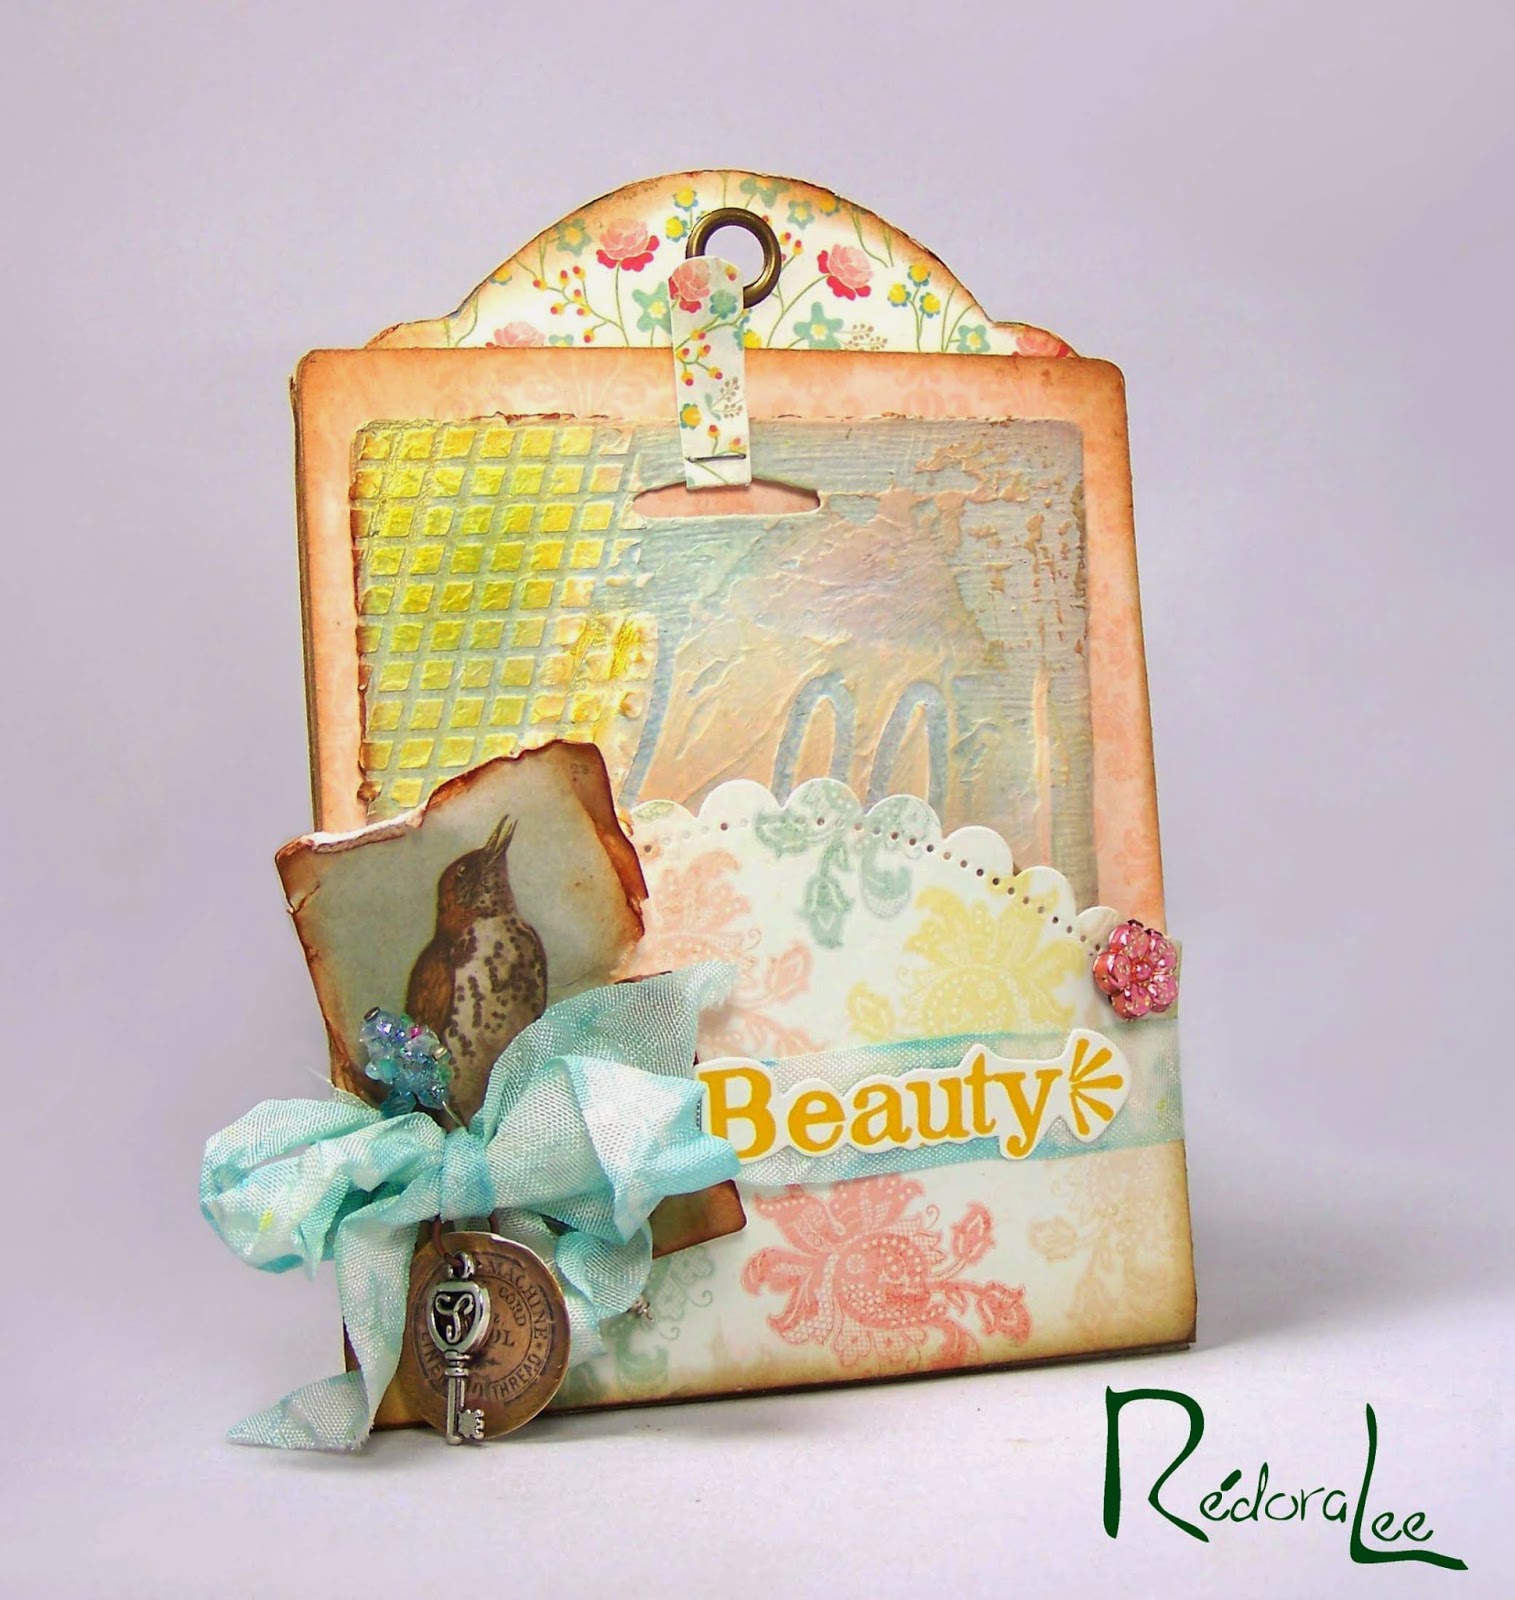
GIFT TAG
I am creating a Stationery Gift Set for my Neurologist, whom I affectionately call, Dr. House.  She has none of his bad attitude, but is blessed with all of his diagnostic brilliance and I want to thank her in a special way.   I will post the additional pieces as they are completed.  This is a large project and will take a month or more.
Next up:  Gift Item #2 - Slim Book Marks

PROJECT DETAILS

(HINTS for BEGINNERS)
 Choose your papers and embellishments BEFORE you color the tag base. 
Both sides of the tag are decorated.
Arrange the components of your card face.  
Try several configurations to make sure you end up with the tightest presentation.

To create the base: 
Cut a piece of medium weight chipboard to 4.25" x 5.50".
Sponge the base, alternating layers of Tim Holtz Vintage Photo and Peacock Feathers DI
 until desired color is achieved.  Sponge both sides of the base.
Cut two designer papers to 3.75" x 5.0" and apply to base.
I used the scrap portions for my torn paper elements.

 To create the sentiment panel:
Cut the sentiment panel from a scrap of light weight chipboard.  
Sponge using the same DI used on the base. 
I layered my sentiment on gold cover cut from the same die.

Decorate the back of the tag:
Cut another small piece of chipboard and sponge to match base and sentiment panels.
Keep the decorations to a minimum so that the tag is not bulky! 
Leave ample room for handwritten or stamped text!
Add a bold ribbon to give your project a little zip!

Still need inspiration?  Visit my teammates...they have some wonderful DT Makes!

~~~~~~~~~~~~~~~~~~~~~

Thanks for stopping by!  Here is a listing of the materials I used for this project.

Products:
Chipboard: Medium weight - 4.5" x 5.50" 
(Can be smaller, but leave a 1/2" margin so that you base color remains an integral part of your design.) Use lightweight for sentiment and embellishments.

Designer Papers: 
Pretty Things (Record It by My Mind's Eye)
#110 Gold Cover Stock 

Dies:
Spellbinders' Shapeabilities - Die D-Lites
Frame One

Stamps:
Stampin' Up - "Hand Made By"
Unity Stamps - Itty Bitty Stamps- "Thank You For Being So Thoughtful"

Inks:
Tim Holtz Distress Inks
Peacock Feathers and Vintage Photo

Butterflies:
Petaloo
 Printed Darjeeling Collection

Flowers:
Really Reasonable Ribbon
Various mini bouquets

Ribbon:
Really Reasonable Ribbon 
 August 2014 Monthly Club Collection

 Pearls and Pendant
Pendant: My Loose Stash - Manufacturer packaging--long gone.
 Pearls: Making Memories -Bravissimo Collection.  


Monday, November 25, 2013

Growing - You Make Me Smile

Hello, Crafty Peeps!
This week is Anything Goes Week at The Outlawz Greetings Challenge.  
One of our sponsors this month is I Brake For Stamps and I have used one of their images for this project.  IBS has over 3,000 digital images, including an exclusive line of Rick St. Dennis Images .

I chose this adorable image for it's versatility.  It will be easy to place a chair or step stool image beneath the image a build an entire scene.  The idea here was to address growth.  
I have been marveling, lately, at how quickly my grandchildren have grown.  My youngest GRAND will be one year old next month.  Seems only yesterday I received the call from my happy, groggy, and slightly disoriented son! 

I don't know why this photographs as green, it is actually the same shade as the dp on the front, but my flowers and leaves photographed weird, too!

The Back Story
Image:  I Brake For Stamps: Child Reaching
Cardstock: Neenah Classic Crest Baronial Ivory,  80# Smooth
Designer Papers: Graphic 45 - Lil Darlings,  My Mind's Eye - Meadow
Stash:  Prima Lace, Buttons, Prima Mini Clothes Pin, Ribbon, Heart Trinket

Tuesday, October 22, 2013

Peter, Peter, Pumpkin Eater - Outlawz Greetings Challenge

Hello, Crafty Peeples!  It has been a minute since I posted a challenge.  It feels good to be able to create again.  Okay, so this week at The Outlawz Challenges, The Greetings Team is challenging you to create a project that includes a pumpkin!
Since I do not celebrate Halloween or Christmas, this time of year is always interesting for me.  I usually end up doing a lot of fall themed projects or a lot of Thanksgiving cards.

This challenge gave me the opportunity to use a favorite image from my ever increasing supply of digis.  One of the few images I have colored and actually liked the outcome.  Hope you like it as well!

Thanks for dropping by!
Hugz, Chana
 Correction:  This lovely image is by Squigglefly,  I have used it several times, because I enjoy coloring it,  I think it is the wonderful balance that really draws me! 
I was so pleased to find the little brad with the pumpkin in the center!  And I just loved using this paper that I have had for over a year.  My current focus is mixing papers which has lead to me making some wonderful discoveries in my (Extremely Large and Exceedingly Fast Growing) 6"x 6" Pads collection.
These wonderful leaves were made using vellum and TH Distress Inks.  There is a link at the bottom of this post to the Tammy Tutterow Tutorial.  I had the leaves straightened, but they began to curl again as we were setting up the photo shoot.  I love this technique and plan to use it for other embellishments.

I just received this little Acorn Stamp last week, so timely!

THE BACK STORY
Front Image: Squigglefly
Colored with: Copics
Back Image: Unity Stamp Co. Itty Bitty Stamp
Stamped with: Momento Rich Cocoa Dye Ink
Card Stock: Neenah Red Hot Pepper - Linen; Neenah Classic Crest
 Neenah Natural White - Smooth
Designer Papers: My Mind's Eye: Kraft FUNDAY 6x6 Designer Pad
Brad:  Bo Bunny
Leaves: Handmade (the tutorial is HERE)
*Note:  I used the TH Alterations - Tattered Leaves Die 
**I also only used the Rock Candy Crackle.  I did not add the distress stickles.
**I do not own the stamp or the stickles**


So Blessed:  This project was recognized by these blogs:


Sunday, May 12, 2013

613 Avenue Create - Make A Shaped Card - "Isn't She Lovely? Isn't She Beautiful"

Hi, Crafty Peeples!  How would you like to win 3 Free Rick St. Dennis Images? 


This week at Avenue 613 Create, we are challenging you to make a shaped card.  Because of all the wonderful Decorative Dies, shaped cards have now become more and more popular!  Rick St. Dennis gave me this awesome image as a gift! I had several ideas on how to present this image, and, as usual, my final design does not reflect any of those ideas.  Ah, Creativity, thy name is Uncertainty!

 "Sunflower" by Rick St. Dennis
I don't use a lot of crystal, but I have lately been drawn to the wonderful border bling at Want2Scrap.  I was so disappointed that I had spent my craft budget for the month by the time I found out W2S was having a 50% off sale.  I like to keep a fairly large inventory of pearls and rhinestones on hand.  Sometimes just flipping through my inventory, I will be inspired

The Center Step Cut is the perfect easel for many of the Fancy Dies.  Not only do they provide wonderfully decorative edges for your frame, but also you can layer them, insert fabric/textures behind them, and you can use different orientations.

Supplies:  
Designer Papers:  G45 A Ladies' Diary, My Mind's Eye - Indie Chic "Saffron" 
CS-Bazill - Textured Peach, The Paper Company Kraft CS Sheets.  
Embellishments: Prima Flowers - Engraver Collection;  Brads: Bo Bunny - Timepiece; Ticket: Prima Wood Tickets - Cherished Moments
Large Tag:  Office Depot Regular Item Tag (Distress Paints: Tarnished Brass, Brushed Pewter, Antiqued Bronze; Small Tag: G45 A Place In Time (the tag was swiped with Tim Holtz Vintage Photo Distress Ink)
Violin/Script Stamp: LaBlanche Stamps. (The image was stamped on a piece of Neenah Classic Cream CS using Vintage Photo Distress Ink. I then tapped lightly and randomly with Vintage Photo DI
Bling: Want2scrap Beautiful Bling-Chevron, Stickles
Fabric: Cheesecloth

Challenges:  
LacySunshine Challenge - Anything But A Square
Scrappy Frog Challenge - Free Choice (Anything Goes)
Cupcake Craft Challenge - Lots of Layers
Fashionista Challenge - Vintage or Shabby
Lawnscaping Challenge - Bling
Make It Monday - Always Anything Goes
Penny's Paper-Crafty Challenge - Step or Easel Card
The Paper Shelter - Anything Goes
Stampotique Designer's Challenge - Anything Goes
Stamp n' Doodle - Anything Goes