Showing posts with label Heidi Swapp Stencils. Show all posts

Friday, June 19, 2020

2020 Stash Party #24 - I Wish

Hello, Crafty Peeps!
This week, I opened a gift bag that I won at Bella Crafts.  There were a bunch of stamps in the bag and two became immediate favorites.  The "Best Day Ever" stamp that I used earlier in the week and the stamp I am using on this project.
~~~~~
 "I WISH!"
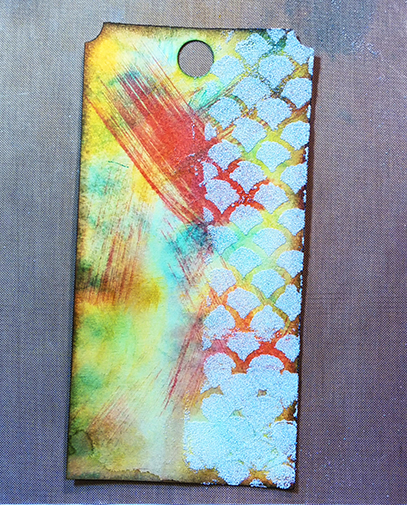
This project is another one of my blending practice sheets.  To create this panel, I actually applied gesso to the CS before adding the inks.  I had created the panels to use with my Gelatos but it occurred to me that the technique might work with oxide inks as well.   I wanted so badly to use this simple stacked stamp and after this practice sheet was done, I thought it would be perfect.

Working on blending and stenciling has also given me the opportunity to work on my "splattering" techniques.  I used Ranger's Picket Fence Paint for my white spatters!  In the next week, I plan to drag out all my metallic paints and have myself a spattering good time. I also mixed up my sequins on this using both berry and iridescent.  I was also looking for a different way to use up some of the gold cord I have amassed over the years.  Do you agree that my gold scribble is a nice addition?

I have more practice panels so you may see a lot of these in the coming days!
Hugz,
TCW Mini Viva La Art             TCW Mini Window Screen
Crafter's Workshop Template 6"x6"-viva La Art - Walmart.comJoan's Gardens: New Crafters Workshop Templates

Thursday, March 26, 2020

STASH PARTY #8 - Especially For You!

Hello, Crafty Makers!
This fun little card is another product of my stash bash!  I was looking through my stencil drawer and, low and behold, I found unopened packages of Heidi Swapp Stencils. Back some years ago, an online store was going out of business and they were selling everything for a fraction of the regular price.  I must have purchased about 10-15 Heidi Swapp Stencils, some of which included three pieces, a background stencil, a decorative stencil, and a mask for the decorative stencil.
I think it turned out great!  I used Ranger Distress Inks and an Inkadinkadoo Washable ink.  Added stickles to my little bird and I was done.   I also opened a ribbon set that has been in my ribbon drawer for almost three years.  This stash bash has been fun. Now I am off to make flowers!

Thanks For Stopping By!
HUGZ,

Thursday, February 20, 2020

2020 Stash Party #7 - You Are Unforgettable - Birthday Card

Hello, Crafty Peeps!
Ann Butler and Jennifer McGuire are two of my favorites designers!  I was able to combine techniques from both of them to create this birthday card for a very special lady.
If you have been following me, you know that I have become addicted to the Split Card design 
created by Jennifer McGuire.
I have now fallen in love with the stenciled background technique that Ann Butler shared last week.
I used a combination of inks (Chalk, Dye, Washable, and Distress Oxide) to create this background.  The Chalk, Dye and Washable Inks were Inkadinkado inks that have been in my stash since 2010.  The stencil is a Heidi Swapp.  I have had it for about 8 years.
I used another 10-year-old ink product to stamp the sentiment and the cute little baby elephant!

Tomorrow, I plan to spend the day experimenting with my stencils and my orphaned inks to see what kind of fun backgrounds I can create!  You should try it!
Thanks, Ann!
Thanks, Jennifer!
and
Thank You, Crafty Peeps, for stopping by!
HUGZ,


Friday, June 7, 2019

Even Bad Days! Blending, Stamps, and Stencils

Hi, Crafty Card Peeps!
The insomnia bug hit me pretty hard last night!  Cleaning my studio didn't tire me out so I decided to do some crafting.  Two of my DT projects this week required the use of stencils and I still had a bunch of stencils on my side table.  As I looked at all the disparate elements, that age-old crafting mantra came to mind, "Why not?"
"Even Bad Days"
I do not color well.  That has not, however, stopped me from purchasing stamps based on how beautifully they were colored by other crafters.  I have shied away from using this stamp but I guess a lack of sleep and a need to create overshadowed my fear of Copics and I just dove in.  A combination of Stamps, stencils, and Distress Oxide blending finally got me to a comfortable place with this project.
The image is stamped and colored with Copic markers.  I created a mask and then used my mermaid makeup brush to blend my background.   I removed the mask and used various size brushes to fill white spaces in the image.  Next, I stenciled in the umbrella.  The umbrella color is a combination of Faded Jeans and Squeezed Lemonade.  The photo does not do it justice.  IRL it is a fabulously delicious color that looks like denim fabric.
The puppy was on the same stencil sheet with the umbrella.  To stencil him I used Vintage Photo ink.  I added Mowed Lawn and Cracked Pistachio to ground the images.

I used my circle and tornado stencils to add a little interest to the umbrella and the top of the card.  I added Stickles to the umbrella and a few sequins to complete the face of the card. 

In my stash, I found a pretty, soft brown and beige small gingham paper.  I mounted this onto a piece of olive green cardstock.

In the end, I was pleased with my work.  I know that far more talented people have colored this image to a level of perfection I will never know.  But for this card, which I plan to give to a friend who is in a bad place right now, I think I captured the mood.

Thanks for Stopping By!
HUGZ,

Challenges Entered
Stamping Sensations - Show Your True Colors


Tuesday, January 5, 2016

Color Me Monochromatic - Shopping Our Stash #233 - Tag #1


Hello, Crafty Peeples!
Welcome to the First Challenge of 2016 at Shopping Our Stash.  We made it easy for you this week!  NOT!
Create a Monochromatic Design (Use Your Favorite Color)

Black is one of my favorite colors, Pink is not!  But for this week, we had a challenge within a challenge.  The design team voted to make this challenge our final tribute to, Leslie Hanna, our founder and "fearless" leader, who we lost on Christmas day.  Leslie DID NOT like (gah) pink.  She always wrote it that way, (gah) pink.  After this challenge, I am not so crazy about it myself.  Anymahoo,  our challenge was to use pink as our color.  

Two Tags in One.
This tag was created using an idea from a tutorial by Tammy Tutterow,  Tammy used two tags for her project, but I only used one tag and a piece of designer paper. 
Pink is the main color here, but black is a strong color and when used as a neutral, care has to be exercised.  I was hoping the little pink hearts would add the needed balance...don't know!  I do, however like the tag and the design.


Heavy"Faux" Metal
I created this second tag using black as my favorite color and silver as my neutral color.   There is a little brown on my chalkboard, but kraft is a neutral, in my world, anyway


Thanks for stopping by!  My Team Mates  have created some fabulous projects. 
Enter our challenge and then stop by and leave a little love on their blogs!

Hugz,
Chana Malkah


Tuesday, December 1, 2015

Shopping Our Stash Challenge #229 - NO STAMPING - HELLO TAG

Hello Crafty Peeps!
Welcome to Week Two of our NO STAMPING Challenge at Shopping Our Stash

Here is another tag creation using blended distress inks to create my background.  I also made use of my Tim Holtz Postal Tissue Paper.  Rub Ons and Tissue paper are a quick way to add visual interest and depth to your project.  
I made my own tag using Neenah's Classic Crest Cover Stock

Using the first set of mini from the new collection(Mini Distress Set #13) worked out well for this project.  Using colors like Gathered Twigs and Vintage Photo add softens this very strong palette! 

The Hello Tag - Supplies Used  
Distress Inks:  Fossilized Amber, Cracked Pistachio, Abandoned Coral, Mermaid Lagoon, Gathered Twigs, Embossing Ink
Metallic Wax:  Inka Gold Oldgold, Oldsilver, Greenyellow; Rub 'n Buff Antique Gold & Patina
Die Cuts:  Tim Holtz Mover & Shaper Mini Hearts, Spellbinders Classic Heart, Quietfire Believe
Heidi Swapp Stencil - 3 pc Set - Butterfly
Sizzix Textured Impressions - Damask
Tim Holtz Tissue Paper - Postal
DCWV Burlap Paper
Seam binding, ephemera, metal gears, tissue paper, embossing powder, Craft Tag 

 Blend Distress Inks to create your background


Apply highlights (I used Vintage Photo and Gathered Twigs.  Dry Emboss.  Apply additional colors (I used Inka Gold Metallic Wax - Oldgold, Oldsilver, and Greenyellow) to the stenciled side of the tag.
Apply tissue paper ( I applied the paper over my ribbon)
 Add Embellishments.  The Burlap hearts were cut from DCWV Burlap paper.  The seam binding was colored with the Distress Inks used in the Tag.

Thanks for Stopping By!
Hugz,
Chana


Wednesday, August 5, 2015

Earth Safe Finishes - Notecard Folder

Hello, Crafty Peeples!

One of my favorite gifts to give my friends are these wonderful Notecard Folders!  The inside can be configured for so many uses.  I have used them to create coupon holders, business card holders, and of course, post it notes and memo pads.

This project was created for my DT posting this week at Earth Safe Finishes.   The complete supply list and brief instructions for creating the folder can be found at the Earth Safe Finishes Artists Blog.
All ESF Products are VOC free and made right here in the U.S.A.

The Ann Butler Sheer Silver Iridescents is my new favorite medium!  I used a toothbrush (thanks, Tammy Tutterow) to spread it over the base coat of Chalk It Up Blood Orange Sorbert.  The shimmer on the folder is absolutely gorgeous and I wish it had photographed better.  You can see the shimmer on the stenciled design.
This folder is my attempt to break out of my usuals color palettes (greens, blues...earth tones) and use some brighter colors.

To find out more about Earth Safe Finishes Paints, visit us here!