Thursday, April 30, 2020

Stash Party # 14 - Day One - Use One Stamp in Five Ways - A Five Day Challenge

Hello, Crafty Peeps!
My crafting buddy was so impressed with the results of our 5-minute card challenge she decided we should do another one on one stash reduction challenge.  This time her devious mind came up with the idea of using one stamp to create at least five cards.  (1)Each card has to be different and we have to post at least one card a day over five days.  And, because she likes to torture me, she said we had to (2) use a stamp that was already on our work table.  If there was no stamp on the work table, we had to use the first stamp we touched.  I decided I would get some of my own back this time so I added the stipulation that (3) The card designs must be progressive.
2020 In A Nutshell
I have had this Unity Itty Bitty stamp in my stash since 2010.  Last night was the first time I ever used it.  I guess the idiom "all things in their time" is true.
Card #1
Have Faith In What Will Be
I decided to create a CAS card for my first project in this challenge.  Block stamps are pretty static and I was concerned about my ability to find creative ways to use this puppy.  When I added the "progression" element to the challenge, it never crossed my mind that I would be using a block stamp.  But, this stamp was on my mixed media work table and I remembered too late that it was there.

Thanks so much for stopping by! 


Thursday, April 23, 2020

Stash Party # 13 - Not A 5 Minute Designer! - Thank You Card

HELLO, CRAFTY PEEPS!

I will be the first to admit that I am a "deliberate" card maker.  Okay, deliberate equals "slow."  I usually have to spend a few days with a concept before I ordain it finished.  So when a crafty friend of mine challenged me to a five-minute card creation challenge, I was less than enthusiastic.  I cannot create a card in a day, let alone five minutes but, as she eagerly pointed out, "that is what makes it a challenge!"  The rules were simple: using only the stamps, dies, and papers that currently are on your desk/table, create a thank you card.  The card must include sentiment and at least one embellishment.  Since I do not have a smartphone, she gave me an extra five minutes to photograph and upload my project.  I used seven minutes.

 YOU ARE SO SWEET
I took this picture for the blog post!

This is the picture I sent her for the challenge.  I used the background that was already set up on my table!

Stuff I Used:
Stamps: Heidi Swapp
Dies: Spellbinders
Papers:  Bazzill (Sea Glass) Neenah Solar White 110lb

Thanks for Visiting
Hugz


Saturday, April 18, 2020

Stash Party #12 - Believe

Hello, Crafty Peeps!
~~~~~
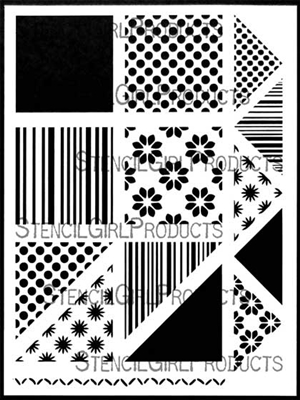
This is my second card using Perfect Pearls and Ann Butler's Squares and Triangles Stencil.  I guess if ever there was a time that we needed to walk in faith, this would be that time.
It is amazing how just changing the color of my paper (in my previous project the flowers were embossed on black paper) makes a huge difference in the personality of a project.

The major stash reducers in this project were the Butterfly and the satin ribbon.  Both have been in my stash for over five years!

The Quietfire "Believe" sentiment was given to me as a Guest Designer for the company about six years ago!

THANKS FOR STOPPING BY!
HUGZ!

Stuff I Used:
Squares and Tris Set 1 Stencil by Ann Butler Believe - Metal Cutting Die
3/8" Satin with Silver Metallic Edges Grape

Friday, April 17, 2020

Stash Party #11 - Stencils and Perfect Pearls!

Hello, Crafty People!

I am continuing with my personal stash party.  I completed two projects that allowed me to use a stencil created by my friend Ann Butler.
I fell in love with Ann Butler's Squares and Triangles stencil when she introduced it and shared a tutorial for creating a fun pincushion using the stencil and muslin fabric. You can see my project HERE.  My favorite pattern is what I call the "pansy square" and I wanted to use it on a card face.

I created the card face, but as it so often happens in card making, I couldn't pull the project together to match what I saw in my head.  I decided to cut the design paper I created into panels.
   
To create my paper design, I positioned the stencil and applied VersaMark Embossing Ink.  I had to apply extra pressure to ensure full coverage of the open areas on the stencil.  I worked in sections and I worked very quickly. 

Once I had my pattern established, I brushed on the Perfect Pearls.  I actually used two colors but the delineation is so subtle it is difficult to see it in the photo.  I also inked and colored the border strip found at the bottom of the stencil to be used as an accent piece.  The pattern was irregular but I found that I liked the artsy look.  The green splatter was added to pull in the color from my top layer.
   
I had the most wonderful debate with myself about the sentiment.  Originally it was cut from the Sea Glass card that I used for my top layer.  It was nice but the gold just seems to be more elevating.

I truly love how this card came together.  I don't think my photography does it justice.  IRL it has a very beautiful understated elegance.  I am tempted to keep it but it is already promised to someone, so...

Thanks for stopping by.  I hope you were able to find some inspiration here!

HUGZ!
Stuff I Used:
Squares and Tris Set 1 Stencil by Ann Butler 

Monday, April 13, 2020

Stash Party #10 - My First Starburst Card

Hello, Crafty Makers!
Starburst Cards have been around for a long, long time.  I always intended to make one but I have the crafting version of ADHD so it never happened.  This card style is perfect for stash reduction!
Crafty Kraft
I am a big fan of kraft card.  I made this card with my final piece of kraft card.  I purchased about 50 packs of kraft card (25 sheets/pkg) back in 2010 at Big Lots.  They were selling them for $5.00/pkg.  I purchased 5 per visit and now wish I had bought them out! The lace is also a stash item.  I have this lace in three colors and I use them sparingly because I cannot find this particular pattern any longer.  The papers are from a Teresa Collins "Save The Date" 6"x6" pad that I have had for a few years.  
My flower was made about a month ago and was a reject from one of my vellum flower making practice sessions.  It has been sitting on my board and today it became the inspiration for my card.
I covered my design paper panel with Perfect Pearls.  IRL, the panel looks like satin and has a soft, pretty sheen!
The effect is created by simply applying VersaMark Embossing ink to the front of the panel and then brushing on Perfect Pearls.  I removed the excess PP by wiping it down with a microfiber cloth.  I actually buffed my panel to get the look and feel I wanted!

STEP TUTORIAL
There are dozens of tutorials on YT but I like to create these written tutorials for those who prefer them over videos.

Materials Needed:
White CS, Patterned Paper, Colored CS (Optional, depends on your design)
Embellishments, Sentiment Stamp.

Tools:
Paper Trimmer, Scissors, Glue Runner
  • 3 or 4 pieces of card stock cut to 4" x 1-1/2".
  • Cut them diagonally (corner to corner) to create a triangular shape.
  • (I added a fourth strip to my project to add more interest.)

  • Cut a piece of white CS (use scraps as this will be covered up.)
  • If you are using the Tim Holtz Glass mat, it is easy to find the center of your panel.  Line your panel up on the lined cross, as shown below.  Count over seven 1/4" squares and mark center on the top and bottom. 


  • Adhere the first patterned triangle to as shown below.  Line the strip up with the centerline.  Apply your second strip on the other side using your centerline mark as your guide.  Continue adding strips in your desired patterns. It will be necessary to adjust the position of the strips.  After your strips have been glued down, the two bottom corners will not be covered.  Trim the overhanging strips and use two of those to cover the corners.
  • I cut a piece of craft foam slightly smaller than the size of my decorated panel and attached it to the back for dimension.
  • Cut a piece of white CS to a size that is slightly larger than your decorated panel 4" x 5-1/4".
  • If you are planning to stamp your sentiment at the bottom, as I have done in my project, stamp the sentiment now before beginning your card assembly.
  • Cut a size A2 card base (4-1/4" x 5-1/2")
  • Gather your embellishments.  I changed my mind after I took the photos and decided to use smaller lace and to eliminate the aqua layer.  This gave my card a slightly larger border but I like it.  I also decided to ink the edges of my panel with Vintage Photo Distress Oxide Ink.

  • Assemble your card.
  • I created a second A2 card base using white card stock.  I trimmed the edges so that it was 1/4" smaller than my kraft card base and used a glue runner to adhere it to the inside of my card. 
    I tied a piece of twine around the card and made a cute little bow.
    The twine shows on the inside of the card.  I use a jump ring to attach a charm to the twine on the inside. The charm can be removed by the recipient!

    THANKS, SO MUCH FOR STOPPING BY!
    HUGZ,
    Stuff I Used:

    Monday, April 6, 2020

    A Place To Start - April 2020 Challenge - Use a Ribbon or Bow

    Happy April!
    Time for a new monthly challenge at A Place To Start! 
    We have a sponsor this month
    Stamper's Delight
    (formerly Scrappers's Delight)
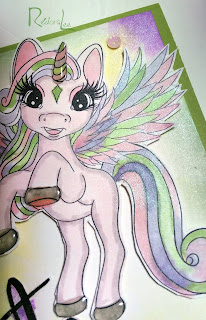
    I was so focused on trying to color this unicorn that I forgot to add my bow.  It wasn't until I had everything glued down that I saw my omission.  Technically,  I did not complete the challenge but I did use the sponsor's image so I am sharing the card!
    This project presented another opportunity to play around with my Perfect Pearls™.  I wanted to add a little shimmer so after I colored my unicorn, I brushed on a light layer of "Pearl" Perfect Pearls™.  I also applied it to the background panel after I sponged the edges with Distress inks.  Although it is difficult to see in the picture, the card has a soft, satiny sheen that is so pretty IRL!
     If you click on these close-ups, you can see the shimmer!
    I used Glossy Accents on her horn and hoves to add just a little more dimension and texture.  I ad a few technical issues with the card but since it is staying with me...I decided not to redo it!  I did, however, go back to shade in the white spaces on her hair.

    Thanks so much for stopping by
    Hugz,
    Supplies:
    Image: Stamper's Delight - Pegasus
    Sentiment: Heidi Swapp Clear Stamps

    Sunday, April 5, 2020

    613 Avenue Create - Challenge #232 - Anything Goes w/ Optional Twist: Use Geometric Papers

    Hello, Crafty Makers!
    I hope that your April is off to a great start!
    Stay Home! Stay Safe! Stay Well!
    ~~~~~~
    This month's Optional Twist: Use Geometric Papers - 
    at 613 Avenue Create
    Our current challenge is sponsored by
    Bugaboo Stamps

    ~~~~~~~~
    This challenge provided another opportunity for me to use some untouched items in my stash.  Paper, Ribbons, and Chipboard die cuts!
    The bold and fabulous paper used in this project was sent in a Design Team package a few years back when I was on the Design Team of Canvas Corp (Tattered Angels, 7 Gypsies.)  The papers were so pretty, I decided I would save them for a special project.  Well, that was over five years ago and that special project is only now being realized!
    The colors on my card face were so bold I decided it would be more visually interesting to use muted geometric papers on the inside. To keep the papers from being too distracting to the eye, I cut a piece of white card about one-fourth of an inch smaller on all sides to create a border. 
    The best find for me during my stash scavenger hunt was this perfect dotted ribbon.  That ribbon simply elevates the project in a way no other embellishment could!

    I hope to see your project submitted to the challenge.
    You may play the Option or Anything Goes!
    HUGZ!
    SUPPLIES
    Yellow and Gray Confetti Dots Grosgrain Ribbon