Showing posts with label Distress Oxides. Show all posts

Monday, March 1, 2021

A PLACE TO START - MARCH CHALLENGE #3 - PICK A SHAPE

 Hello, Crafty Peeps!
This month at A Place To Start we are challenging you to show us your clever use of shapes.  The shape can be the shape of your card, your embellishment, your sentiment, or all of the above.  You may use one or as many shapes as you like.  Have Fun!

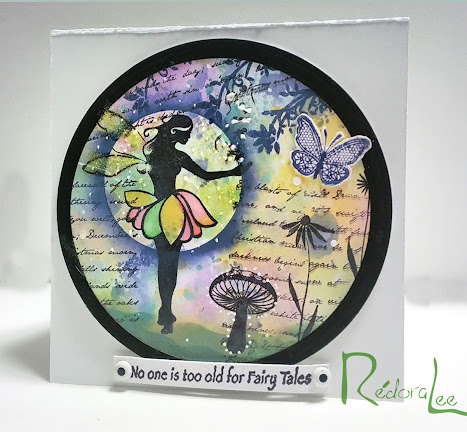
FAIRY TALES
I chose to create a square card (5"x 5") base. 
 I also chose to use circles to create my fairy garden!
~  ~  ~  ~  ~
PICK A SHAPE CHOICES

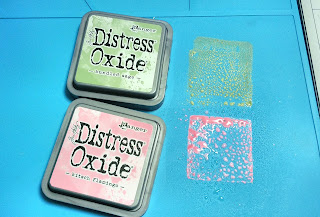
My background was created by layering Distress Oxide Inks.  I used the smoosh technique to add the inks to my base. 
I smooshed the ink onto my silicone mat, sprayed it with water, and then dragged my card through it.  I would look at the result and press the card into the ink color that I wanted in a particular area.   Distress Oxides don't get muddy like regular distress inks, but I would still advise caution in choosing colors.
I used two colors at a time, using my heat tool to dry the inks between layers.  I did not have a particular color scheme in mind so I just kept adding inks until I had a blend that I liked.  I knew I would be using a 5"x5" base, so I used a 5-1/2"x5-1/2" piece of cardstock to create my background.

Once I was satisfied with my blend, I positioned my images (I used removable tape to position my circle die on the area I wanted to use) and stamped them using my stamp platform.  After that, I stamped text in selected areas The highlighting around the fairy was created by masking her upper body with a scrap circle piece and brushing the ink from the center outward.
  
The fairy's petals were colored with Arteza brush markers and water.  Liquid Pearls™ was added and sprayed with glitter to create sparkle around the fairy. I added glitter glue to the fairy's wings.  I also used my Sharpie paint marker to add white dots in selected places.

Thanks so much for stopping by!  I hope to see your projects in the challenge at A Place To Start!

Hugz,
Chana Malkah
Stuff I Used:
  Stamps:
Recollections Clear Stamp: "Fairies"
Bo Bunny Clear Stamps: "Snow Day"
Martha Stewart Crafts: "Doily Lace Butterflies"
Sweet 'n Sassy Stamps: "Light of Christmas" (script text)

Sunday, November 22, 2020

Stash Party 2020 #49 - Tis The Season


I was on YouTube looking for Christmas card inspiration projects when I came across a video by Prairie Paper and Ink (AmyR)   The general rule of CASE is that you should change at least three (3) things from the original design.  For this project I changed:
1.  I used whimsical characters (the original project used trees as the focal elements.)
2. I added the holly berry canopy (not in the original.)
3.  I used a different sentiment style and I stamped directly onto my snowdrifts!
~~~~~
As is often the case when following a tutorial, I did not have the same products that Amy used, so I improvised.  Here are the substitutions:
1.  To create my starry sky, I used my TCW Cookie/Cakes snow stencil. (Amy used the Simon Says Large Falling Snow Slimline Stencil.)  I did order the stencil because it is easier to use.
2.  In the tutorial, the falling snow is created using Nuvo Glacier Paste (White.)  To create my falling snow, I used regular acrylic medium (modeling paste) and I used a white Cedar Marker to make my snow white.  (The regular paste takes on the color of the inks beneath it and mutes the snow.)
3.  Amy used Neenah Desert Storm cardstock (pricey.)  I used Cardstock Warehouse "Brown Box" 100lb Cover.
4.  I don't own Chipped Sapphire Distress Oxide, so I used the regular Chipped Sapphire Distress Ink.
5.  To create my snowdrifts, I used my Spellbinders
Curved Borders 2 Dies.

I have started my second iteration of this card for my grandson.  He saw it and wanted one for his collection.  I really wish my camera was working properly.  This card is so cute IRL!

Thanks for stopping by!
Hugz,
Chana Malkah

Stuff I Used:

Wednesday, September 9, 2020

2020 Stash Party #46 -Best Day Ever - Off The Wall Card #2

Hello, Crafty Makers!
This is the second card in my"Off The Wall" series. I am really trying to make it easier for my clients to order cards.  Creating and naming series is a major first step.

As soon as I finished the background, I knew there was only one sentiment that would work.  I don't have a lot of bold sentiments so I think this "Best Day Ever" stamp will get a lot of use!

I went a little crazy with my stencils and inks but it was crazy good fun!  I truly am having a love affair with Ranger's Speckled Egg Distress Oxide and Regular Distress inks.  Those two colors mixed with Iced Spruce Oxide and Tumbled Glass regular Distress Ink results in a beautiful and dramatic tone on tone fade-out!

Thanks so much for stopping by!
Hugz,
Stuff I Used:
Cas-ual Fridays - Best Day Ever - (retired)

Monday, September 7, 2020

A Place To Start - Create A Children's Card - September 2020 Challenge

Hello, Crafty Makers!
It is time for a new challenge at 
This month, we are interested in seeing the kinds of cards you would create for children!
In this case, a child is anyone from 0-18 years old so you do not have to limit yourself to "cute" kiddie creations.

Unexpected Friendships
If only we could get the entire world to believe this!  When my kids were growing up, the one phrase they were not allowed to use was, "because it has always been like this!"  We wanted them to learn that while there are many things in life that don't need improvement, most things in life can benefit from a slight tweaking every now and then.  As a result, they grew up learning to enjoy a diverse array of music, dance, literature, sports, and most especially, people.  

For two years, my grandson attended a private international school and we were amazed by his knowledge and acceptance of other cultures!  This past year, he attended a private homeschool academy located in a super-wealthy community!  I was terrified that he would be bullied not only because of his skin color but also because although he is from an upper-middle-class home,  you could put ten of my daughter's home into one of the homes of some of his classmates.  It took exactly one week for this child to develop friendships that have continued to this day.  Because my daughter chose to not have him return to a brick and mortar environment, he is back to full-time homeschooling in a Cyber Academy, however, he and his friends have "bullied" their parents into allowing them to have a "fully masked, socially distanced" Art Meet Up!  The thing that convinced my daughter was a comment from one of his former classmates, "Please, Mrs. Brooks!  It simply would not make sense to do this if Joshua cannot be there...we miss him!"   I really believe the next two generations will teach us old fogeys quite a bit about friendship and inclusion! 

Thanks for Visiting!
I hope to see an entry from you in our challenge!

I am entering this project into the 
#372 "Includes an Animal"


Sunday, June 21, 2020

2020 Stash Party #25 - A Simple Hello

Hello, Crafty Peeps!
This practice sheet was actually my first.  I put it aside to allow the Glossy Accents™ on the flowers to dry and then promptly forgot about it.  Today, when I went to box up some completed cards I rediscovered my little orphan practice panel.


THIS IS A HAPPY, CRAFTY HELLO TO
CRAFTING QUEEN
DAFFODIL CARDS
MARIA
Thanks, Ladies, for keeping me encouraged!
Chana Malkah
~~~~~
I used a smokey ink to stamp a shadow image of my flowers.  It is very faint but makes a great impact, I think.  Trying to color my flowers with my oil crayons proved to be something of an adventure.  Of course, had I just used my watercolor crayons my task would have been less frustrating.  In the end, I decided to use the Glossy Accents™ to cover up the uneven coloring.  It sorta kinda worked!  My SIL loves it and so it is now included in an order she just placed with me.  That woman is my best customer and so easy to please.  I love her!
I purposely colored the flowers on the inside in different hues than the flowers on the outside.  The card front is a bit dark and I thought the brightly colored flowers on the inside would lighten the feel of the overall project!
Stuff I Used:
Inks:  
Distress Oxides: Wilted Violet, Evergreen Bough
Die: Hero Arts


Thursday, June 18, 2020

2020 Stash Party #23 - Thinking of You - More Stencil Fun!

Hello, Crafty Peeps!
Well, I am having more fun than I ever imagined I could have as I work with stencils and practice blending inks and other mediums.  And, huge surprise, The Hubster was in Dollar Tree and noticed that they had a newly renovated craft section.  He came home with paints, paintbrushes, and planner stickers.  He is going back to grab some gelatos (he had no idea what they were) and a few more tubes of paint.  This, from a man who each time Amazon shows up asks, "Don't you think you already have enough stuff?"

DO YOU FLAMINGO?
This practice session was really all about my Lotus flower stencil.  It has been in my stash for over six years and this is the first time I have used it.  I was also practicing my fade out background stenciling.  I added Glossy Accents ™ to the beak and eye of my flamingo.  It is a little rough but it was a practice sheet so I was pleased with the result. 

Once the practice panel was completed, I decided it would be okay to use it as a card front.  I have a number of Flamingo stamp and die sets and I knew I didn't want to use a layered set because I felt it would distract from the flower.  In the end, I went with the Echo Park Flamingo Die and sentiment stamps by Heidi Swapp.  A few sequins finished off the design!

HUGZ,
Stuff I Used:
Heide Swapp Stencil (2 stencils and 1 mask)

Friday, June 7, 2019

Even Bad Days! Blending, Stamps, and Stencils

Hi, Crafty Card Peeps!
The insomnia bug hit me pretty hard last night!  Cleaning my studio didn't tire me out so I decided to do some crafting.  Two of my DT projects this week required the use of stencils and I still had a bunch of stencils on my side table.  As I looked at all the disparate elements, that age-old crafting mantra came to mind, "Why not?"
"Even Bad Days"
I do not color well.  That has not, however, stopped me from purchasing stamps based on how beautifully they were colored by other crafters.  I have shied away from using this stamp but I guess a lack of sleep and a need to create overshadowed my fear of Copics and I just dove in.  A combination of Stamps, stencils, and Distress Oxide blending finally got me to a comfortable place with this project.
The image is stamped and colored with Copic markers.  I created a mask and then used my mermaid makeup brush to blend my background.   I removed the mask and used various size brushes to fill white spaces in the image.  Next, I stenciled in the umbrella.  The umbrella color is a combination of Faded Jeans and Squeezed Lemonade.  The photo does not do it justice.  IRL it is a fabulously delicious color that looks like denim fabric.
The puppy was on the same stencil sheet with the umbrella.  To stencil him I used Vintage Photo ink.  I added Mowed Lawn and Cracked Pistachio to ground the images.

I used my circle and tornado stencils to add a little interest to the umbrella and the top of the card.  I added Stickles to the umbrella and a few sequins to complete the face of the card. 

In my stash, I found a pretty, soft brown and beige small gingham paper.  I mounted this onto a piece of olive green cardstock.

In the end, I was pleased with my work.  I know that far more talented people have colored this image to a level of perfection I will never know.  But for this card, which I plan to give to a friend who is in a bad place right now, I think I captured the mood.

Thanks for Stopping By!
HUGZ,

Challenges Entered
Stamping Sensations - Show Your True Colors


Tuesday, February 26, 2019

Shopping Our Stash Challenge #390 : Fabulous February

Hello, Crafty Peeps!
The fortnight (two weeks) challenge at Shopping Our Stash is:
Fabulous February.  
Make something inspired by February's stone (amethyst) or February's flowers (violet or iris)
~~~~~~~
 I realized long ago that there were many fabulous card designers out there creating "floral" cards and it seemed dumb to even try to do the flower thing. 
That was then, this is now.  Facing serious health issues changes how one sees so many things in life.  For the past four years, crafting has been a port in the storm for me. It has been my family's barometer for measuring how well I was doing on any given day. I have returned to the passion that made me fall in love with this hobby in the first place. I create for the pure joy of creating! 
Violet Passion
I don't know why I haven't used this Sizzix Die over the years because it is one of my absolute favorites.   For this challenge, however, I decided to continue my personal challenge of creating CAS projects, using "ancient" stamps and dies and learning at least one new technique each week.  Using old stuff is the essence of SOS Challenges. 

Personal Challenges Met:
1.  CAS Design
2.  New Technique: Splattering
3.  Ancient Supplies:  Sizzix Die, Hampton Arts Stamp, Vellum Paper, Purple Heart, Bling.

What I Did
1.  Cut a piece of heavy-weight white cardstock to 4.25"x11.50" (A2 card base)
2.  Make a banner cut at one end of the paper.  
3.  Score at 5.50" and fold.  Burnish with a bone folder.
4.  Cut a piece of white cardstock to 4.25" x 5.50".  Place this inside your folded base and trace the banner.  Use your trimmer or scissors to cut out the triangle shape.
5.  Emboss or use a background cut plate on the banner end only of your base.
6.  Repeat the embossing or die cutting on the small banner piece.  Use double-sided tape to adhere the small banner to the back of the banner shape on your base.  Make sure the embossed/die cut design is facing out.  If you want to wrap ribbon or twine, attach it before you glue the banner panels together.


7.  Cut a piece of vellum to 4.00" x 5.25".  Stamp your sentiment and heat set.  Place aside to dry.
8.  Cut a piece of white cs to a size that will allow you to place and cut your dies.  Blend your inks to achieve an ombre effect.   Splatter ink on opposing colors.  I also added gold splatter.  Arrange your dies on the sheet and cut.
 9.  Form your flowers and assemble.  I used double-sided foam tape between each layer except the bottom flower that is to be attached to the card base with double-sided tape and wet glue.
I created a card box to avoid crushing my flower!

Thanks for stopping by!
Hugz!