Showing posts with label Memory Box Die Cuts. Show all posts

Tuesday, February 12, 2019

Shopping Our Stash #389 - Make Your Mark - Color Anything Using Markers

Hello, Crafty Makers!
My quest to conquer CAS design continues.  
Shopping Our Stash Challenge is now a fortnight challenge. Thus, I had lots of time to ponder how to meet this challenge and my personal goal which is to create as many CAS projects as I can this year. 
I can live with this result.  My only regret is that the silver embossing did not photograph as well as I would have liked.
~~~~~~~~~~
FOREVER
An Embossed, Copic Colored, CAS Heart Project
In the spirit of "less is more," I chose not to color an image.  I have rediscovered the joy of wet embossing and decided to combine die cutting, wet embossing, and coloring to create a CAS make.  I have to thank my SOS Teammate, Maria, for making me aware of this wonderful Gina Marie Rectangle Die, I am in love!  
I decided to do a little coloring on the inside, so I added another layer of cardstock and colored it with my Copic.  I have a stash of these panels from cutting frames and I just layered it on top of the colored panel.  Nice look!
~~~~~~~

Thanks for Stopping By!   If you want to create this project, there is a short step tutorial below.
Hugz,
~~~~~~~~
Challenges Entered:

A Little Tutorial
Materials:
White Cardstock: 110lb
1-piece  - 4.25 x 11 (A2 card size)
2-pieces -4.00"x 5.25"
1-piece - Rectangle Die cut frame (4.00" x 5.25") 
1 Scrap piece for stamping image.
Rubber or Clear Stamp (Deep cuts work better for embossing)
Silver Embossing Powder
Markers
Acetate
Rectangle Frame Die
Sentiment Die
Flatback Crystals
Clear Embossing Ink (like Versamark)
Wet Glue, Double-sided tape, Double-sided foam.
Embossing Powder Tool
Tools
Stamping Platform
Heat Tool
Die Cutting Machine
Paper Trimmer

STEPS BY STEP (Sorta-kinda)
1.  Use a piece of scrap white cs or cut a piece of cardstock large enough for your stamp image. 
2.  Determine if you are going to color before or after you stamp.  For this project, I colored the paper first.
3.  Once your paper has dried, wipe the panel with your embossing powder tool.  Position your panel on the stamp platform.  Position your stamp, apply embossing ink and stamp.

4. Apply embossing powder to the image and use your heat tool to emboss. ***Optional: You may, if you wish, return your image to the stamp platform, apply embossing ink to the stamp and the heat emboss again.  I did this for my image to get more detail.
If you decide to double emboss, make sure your paper placement on your platform is exactly the same otherwise you will get this:
5.  Die or fussy cut your image.   Luckily for me, I had an open heart frame die from the same company that fit this stamped image perfectly.  
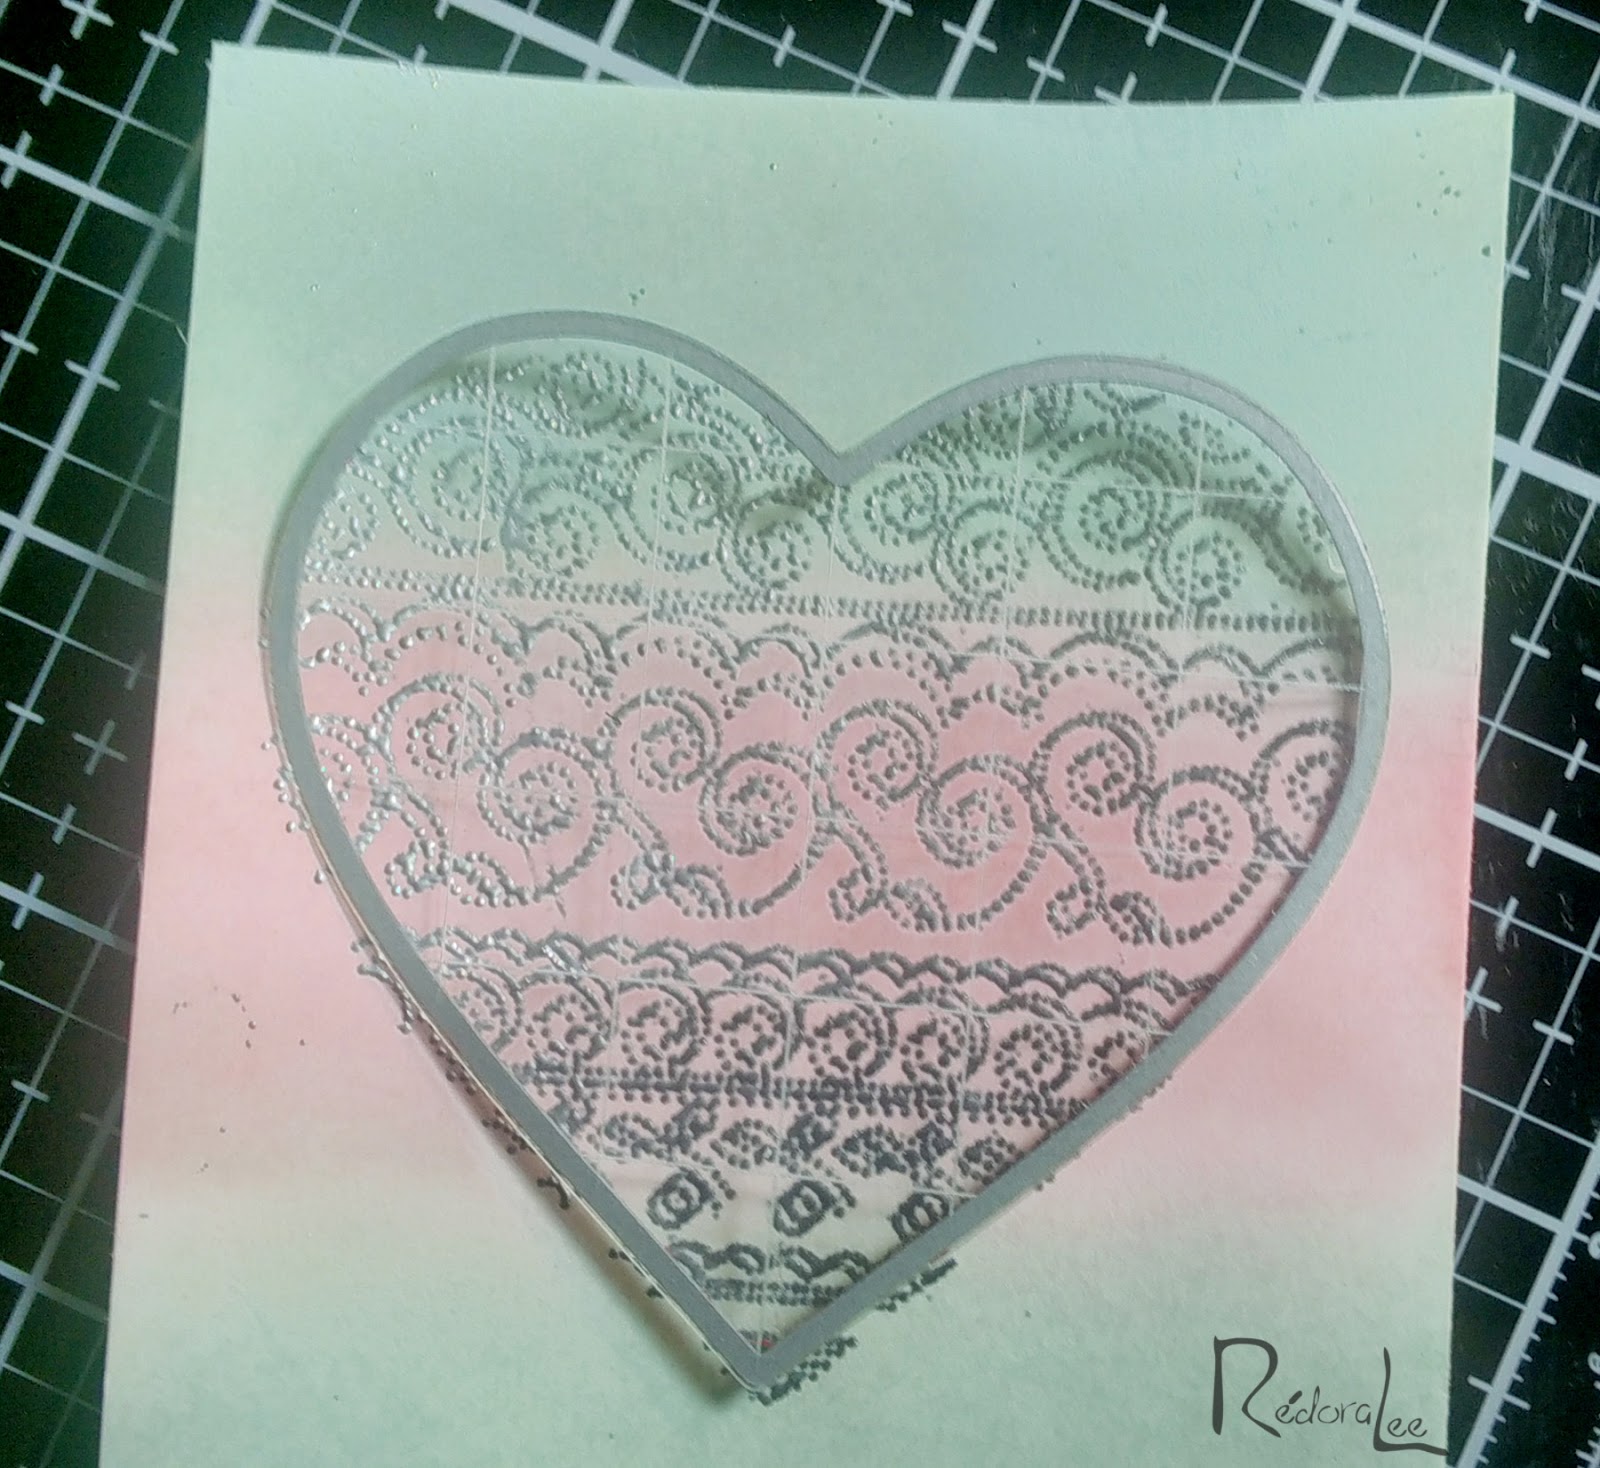
Cut four additional hearts from scraps and glue them to the back of your heart.  This adds dimension to the image.  
6.  Cut a piece of acetate that is the same size or slightly smaller than your frame.
7.  Add double-sided tape to the back of the frame and adhere the acetate sheet.  Once the acetate is in place, add strips of double-sided foam tape to the frame.
8.  Attach your embossed image to one of the 4.00"x 5.25" panels and glue that panel to the front of your card base (A2).  Add your acetate fame to the panel.
9.  Use wet glue to attach your sentiment and crystals to the front of the panel.
Voila!  Your card is ready for an envelope!
~~~~~~
Note: I removed my heart stamp from its block so that I could use it on my stamp platform.

Memory Box Cupid Heart Die (retired)
Memory Box Classic Heart Wood Mounted Stamp (retired)

Thursday, January 12, 2017

Thank You - Gelli Print

Hello, Crafty Peeps!
In accordance with my resolution to try new crafting techniques this year, I have entered the sphere of Gelli Printing and I must admit that I am hooked! 
As a beginner, I am mostly just playing around with colors, stencils, and a few texture pieces.  After a few more YouTube lessons, I might become more daring.

This is a thank you card I am sending to the lady who was the caregiver for my sister.  Last weeks, at age 96, my sister passed away.  Her caregiver shares in my family's grief and I just wanted her to know that her kindness is not overlooked in all of this.
I created this print using a mini Altoid tin.  
My photography does not do the print justice.
I used another scrap of the Gelli Print to anchor my sentiment!

 For my first plate, I used an Interdesign Makeup organizer tray.
This tray produced an 8" x 10"x 1/4" Gelli Plate
This plate has seen a lot of use.  I will melt it down and reset it!
My big new Monster Plate!  I doubled the recipe below to create what should be a 9"x12"x1/2" Gelli Plate when unseated!
You can use a plastic or metal tray.  The bottom must be smooth.
Here is my monster plate unseated!  A few small bubbles but this baby works like a charm. I plan to make one 8"x 8" plate and one 5"x 7" plate. In my OCD mind, if I have more plates, the less wear and tear I will experience on my main plate.

Are you adventurous?  Try making your own, here is the link to The Frugal Crafter.  The recipe is the same but her directions are for using a microwave. 
 I do not own a microwave, so I mixed all my ingredients in a stainless steel pot.

NOTE: Do not use alcohol it will cause your plate to develop mold. Gelatin, Glycerin, and Water are all you need.  Do not refrigerate!
Supplies:
Knox Unflavored Gelatin   Link to Amazon
Vegetable Glycerin  Link to Amazon

Here is the stove top recipe I used for my Monster Gelli Plate:
9"x 12"x 2" Pan
12 Tablespoons gelatin(14 packets)
  3 Cups cold water 
  3 Cups glycerin 
If you want to make the thinner Gelli Plate, divide the recipe in half!
I do not own a microwave, so I mixed all my ingredients in a stainless steel pot. 

STEPS:
Add cold water first then the gelatin, stirring after each packet to avoid lumping. Add glycerine and simmer until the mixture is clear.
If you are less cautious, you can just dump it all in stir it up and put it on your stove top.  I kept my heat low  
Do not over stir as this will cause your mixture to bubble.  
Place your container on a flat surface in a location where it will not be jostled. Pour your gelatine mixture into the receptacle and let set.  Use your finger or a toothpick to pop any small bubbles that may appear after you pour. 

I let my thin plate set up over night.  My thick plate has been setting up for two days (OCD.)

After Care:
If your plate gets too beaten up, cut or scratched (from use) just clean it and melt it for 1 minute in your microwave on high or on your stove top for 5 to 7 minutes (until it completely melts) and reset it. 

Cleaning Your Plate:
You can clean your plate with plain water, but I have found that hand sanitizer works best.  Baby Oil is also very effective for cleaning your plate.  Use a paper towel or baby wipe (cheap ones work best) to wipe away the sanitizer/oil.

HAVE FUN!
HUGZ!
CHANA MALKAH


Tuesday, August 16, 2016

Shopping Our Stash - What's The Good Word

Hello, Crafty Peeps!
Welcome to another fun Tuesday at Shopping Our Stash! 
What's The Good Word - Use a Single Word Die Cut
I actually made two cards for this challenge.  I mis-read the challenge the first time.  I thought we were supposed to use a single word, so I made the kraft "Love" card.  Then when I went to the blog to upload my project I realized I was supposed to use a die cut!  SMH.  
I find myself still playing around with black and white and using the die cut negative seemed the perfect focal for this creation! The ribbon on this project is almost ten years old.  I found it at Michaels during their after X-mas sale.  I planned to use it on a jewelry box, but that project never materialized!  
Everything in this project is stash. I have been exceptionally good about not buying craft supplies. My little savings account is growing! I plan to cancel a few subscriptions and really devote myself to just using what I have.

Stash Materials Used:
Bazzill - White Card Stock:  5 years old
Ribbon - 10 years old
Photo Corners - 6 years old
Chalk Color Sticks - 8 years old
Thanks Die - Memory Box - 5 years old
Flamingo Die - Echo Park Designer Dies - 2 years old
Embossing Folder - WRMK Next Level "Quilted" - 6 months old

Thanks for Stopping By!
Hugz
CHANA MALKAH 


Tuesday, August 9, 2016

Shopping Our Stash - Card Sharks - My Ace in the Hole

Hello, Crafty Peeples!
My teamies at SOS have yet to learn their lesson and have allowed me to host. 
 This week my theme is Card Sharks - Use A Playing Card.  
So Players think all the way outside the box or, in this case, outside the deck!


Here is my "Ace In The Hole" Thank You card!
This is call "forced creativity."  I created another project and when I went to post it, found that a teamie had already posted a project that was almost identical.  PANIC!  I actually like this design better!  Kismet!  
I even had some fun inside!  I must be in my Black and White period! :D)

Materials Used:
Neenah® Solar White Linen Cover Stock
Neenah® Epic Black Linen Cover Stock
Memory Box®  Open Studio™ Stitched Heart Layers
InkaDinkaDoo®  Vintage Expressions - Hello Clear Stamps
Tim Holtz® Idea-ology™Remnant Rubs - Words
Really Reasonable Ribbon
Memento™ Tuxedo Black Dye Ink
Bo Bunny® Brads


Thanks For Stopping By!
Click HERE to go to the challenge!


Tuesday, February 4, 2014

Shopping Our Stash - Something Valentiny

Hello, Crafty Peeples,

This week at SOS, we want you to create something Valentiny!  Yes, this does leave a lot open to interpretation, so your creative mojo can run wild!  Here is where my mojo took me!

 The original sentiment for this cards was "a true love story never ends" but I did not like the way it looked when I stamped it on the heart.  Since I had already committed to the clock and newsprint, I spent 45 minutes looking through my rubber stamps for a sentiment that worked.  This Forever Stamp was in the second stamp bin and, thank goodness, it was the first stamp I touched.  The minute I stamped it onto my scrap paper, I knew it was the ONE!

 I really love Tim's Cabinet Cards and I am glad that he has created one with a smaller footprint,  These large ones require a lot of embellishing.  When I want a cabinet card, I usually make it myself in a smaller size.  It is great that now I can get Tim's with the cool graphics.

Decided I wanted to leave my Roman Numerals in tack, it looked so cool.  The most difficult part of this design was finding the right embellishment to bring balance.  Nesting one of the roses in cheese cloth in the upper right corned was perfect.  I did not make a tag with this cabinet.  The newsprint paper is a glossy stock and the effect(in real life) is pretty cool.

THE BACK STORY
Cabinet Card:  Tim Holtz Cabinet Card Frames
Designer Paper: DCWB The Haberdash Stack
Dies:  Marianne's Craftables "Clock Work"
Memory Box "Cupid Heart"
Memory Box "Twirled Heart"
Fibers, Ribbon and Flower:  Really Reasonable Ribbons
Misc: Ink- Tim Holtz DI "Vintage Photo", Momento "Rich Cocoa"

Sunday, October 27, 2013

Four Letter Words - 613 Avenue Create Challenge

Hello, Crafty Peeps!
This week at 613 Avenue Create our Optional Twist is Paper Piecing. Click HERE for tutorial. What a great way to start off the week!  Our wonderful sponsor is Squigglefly!  They have some fabulous images and I knew immediately which one I wanted to use.

This is only the second time I have done any paper piecing.  It is not a technique that immediately comes to mind when I start working on a project. When I saw this image I knew it would be perfect for the technique.

I will definitely have to use this technique more often.

Hop on over and add your creation.  Remember we are an Anything Goes Challenge, so if you don't paper piece, no problem.  We would love to see your project.  You can submit up to three entries.

Hugz, Chana


The most difficult decision in this design was the placement of the image.  The original plan was to do a shadow box design and to place the image inside.  I was playing around with my memory box frame dies and I realized I could get the effect I was looking for without the hassle of creating a shadow box.


The paper piecing made coloring easy.  I colored the hair and exposed areas of the image but left the washboard and bucket uncolored.  I added a thin layer of Clear Rock Candy Crackle Paint to the tub and the exposed corner of the washboard.  The sentiments are inked with TH DI Vintage Photo.


The hardest element to execute properly was the clothes line.  I wanted it more taunt, but I didn't like the look of the clothes pins directly in front of the Laundry Room sign, so I let it droop a little.  I guess the element with which I had the most fun was creating my suds. Alternating layers of glitter glue, clear gel tacky glue, and Mixed Berries Fairy Dust glitter, creates a 3D effect that is pretty cool.


THE BACK STORY
Image and Sentiments: Squigglefly "Am I Having Fun Yet?"
Die Cut Frame: Memory Box "Twirling Vine Frame"
Tiny Spring Clothes Pins:  Forster Colored Tiny
Printed Papers: Floral Background:  My Stash
Printed Paper: Swiss Dots, Chevrons, and Denim (skirt): 
Recollections' Bright and Basic Paper Pad
Cardstock:  Neenah Natural White Smooth
Colored with Copics
Misc. Supplies:  TH DI : Vintage Photo
Aleene's Clear Gel Tacky Glue
Donna Salazar's FairyDust Glitter - Mixed Berries
Queen & Co. Twinkle Glitter Glue
Pearls, brads, scor-tape, twine

Thanks for Stopping By!  Hope to see you in the 613 Avenue Create Neighborhood!

Challenges Entered:
365 Cards: Day 299 -  Setting The Scene (Must include a stamped Image)


Tuesday, June 11, 2013

You Are The Music - 613 Avenue Create Challenge - Celebration

Hello, Crafty Peeples!

I have spent the past three weeks struggling with daily cluster headaches ( headaches that occur at approximately the same time every day and which last for hours).  Mine wake me up at 4:00 AM each night.  The next three to four hours are spent in pure agony.  The rest of the day is spent trying to recover.  The headaches never really go away,  pain meds simply make them tolerable.   I would take advantage of every pain free minute to try and get some crafting done.  That I was able to complete any projects is amazing even to me.  I guess I must really love my hobby.

This project was supposed to be posted Sunday and I finally managed to get it posted to my challenge blog yesterday.  I started out going in a totally different direction but had to scale back my design ambitions in deference to my suffering! :D)  

Our sponsor this week at 613 Avenue Create is The Paper Shelter.  I had planned to use two of her pre-colored images and then hand color one other, but was unable to complete the projects.  I do love this image.   


Image:  She's A Maniac  Pre-Colored
I used my Glimmer Mist (made with Distress Inks and Perfect Pearls, and Rub and Buff Metallic Wax to create the disco colors on my aluminum foiled background.  The wax provided a toothy surface for glimmer mist.  This is my first time using a pre-colored image.  I may do so more in the future.  Coloring with Copics is not my strong suit.  I am more of a paper crafter.  Anyway, I actually
liked the truncated version of this project!

My doctor has me on a medication that is supposed to break the cycle of my headaches.  I did sleep until 8 AM this morning with no pain.  Now as I sit here typing this, I can feel a twinge so, I am going to take my final meds for the evening, grab a quick shower, and call it a night.  I hope I get over this soon.  I miss being in my studio.

Thanks for stopping by!
Hugz,
Chana

Challenges Entered: