Showing posts with label craft challenges. Show all posts

Friday, March 29, 2019

Double D Challenges - Gingham

Hey, Crafty Makers!
Here is a quick card I made for the Gingham theme over at 
Double D Challenges.   I am using one of my unbranded dies and I love the way this project turned out.  Nothing fancy but I was able to reduce my  6"x6" paper stack by two pieces.  I am working on a tag to enter as well.  Two projects only two sheets of paper.
I am on a roll!  Hopefully, in April, I will create projects that will increase my confidence in layering fancy intricate dies. 
Rustic Love
 I am a great lover of Kraft card.  I think it goes so well with almost any color and is particularly effective if you are going for the 'rustic' country look.  I usually save my gingham paper for paper piecing.  I am glad that I stepped out of that particular little box and tried something different.
My original intention was to leave the white hearts blank but I needed to pull more of the Kraft card into the design so I added the Love sentiment and switched my tag from white to Kraft and added the twine bow.  I plan to make a second card using the gingham frame.  That should be fun.
Stuff I used:
Papers: Kraft Cardstock 
Patterned Papers:  American Crafts "Marine"
Stamp:  Hampton Arts "Just For You" - Wood mounted
Dies: Strip Alphabet Die - Tim Holtz™ Alterations "Alphabetical"


Thanks for stopping by 
and make sure you check out the challenge at 


Tuesday, July 24, 2018

Shopping Our Stash Weekly Challenge: Get Krafty! Use Kraft Paper In Your Design

Hello, Crafty Peeps!
This week, the SOS Design Team challenge is: 
Create a project using Kraft Paper.  
I love kraft paper for creating "faux" leather notebooks and tablet covers.   The cost is low and I can swap covers on my Fire Tablet almost daily.   I am eager to see your makes... 
I am always looking for "Krafty" inspiration.
~~~~~~~
I created one new project for this challenge  
Using the Tim Holtz Die Alterations® Die  "Umbrella Man.
"TRANSFORMATION" 
I used craft foam instead of foam tape to add dimension to my project.  Craft foam is cheap and allows you to die cut cardstock and foam at the same time.
I reversed the "Transition" on my interior image.
Stash Items:  Every item used in this project is 15 months old or older.


 Here are some past faux leather projects using kraft paper.
Hope you find some "krafty Inspiration!" 


Orange You Special
My infusion nurse requested a Traveler's Notebook Cover but she wanted it to be Orange and she wanted me to use the "faux leather" technique.  She was convinced her family and friends would not believe that her planner cover was made from paper.  She took the finished planner before I could get pictures, however, I found two shots on my tablet.
I used Tim Holtz® Carved Pumpkin™ and  Abandoned Coral™ Distress Inks to create the orange undertones desired.  She was very pleased with the result.  
The orange is there but does not overwhelm.

"Itty Bitty Notebooks" 
Using Kraft Paper to Create Faux Leather 
Sunflower
I use the sunflower embossed design quite often when creating notebooks and Planner Covers.  It is the most requested.


"Waves of Grain"
I don't get as many requests for this one, 
but it is still one of my favorite embossed designs.
"Butterflies are Free"
This design is fabulous on a mini planner.
 
"A Pocket Full of Posies"
My five-year-old granddaughter chose this design for
her mini notebook cover.  This summer she is going to do her first planner.
I used Darice folders for these projects but any embossing folder will work just fine. 

 Join us at Shopping Our Stash!  We look forward to seeing what you create with your kraft paper!
Hugz,
Chana Malkah

Tuesday, July 10, 2018

Shopping Our Stash Weekly Challenge - Feed Me! Use Food In Your Design

Hello, Crafty Folks!
This week we are giving you the perfect opportunity to pay creative homage to your favorite food!
My Farmhouse Recipe Album
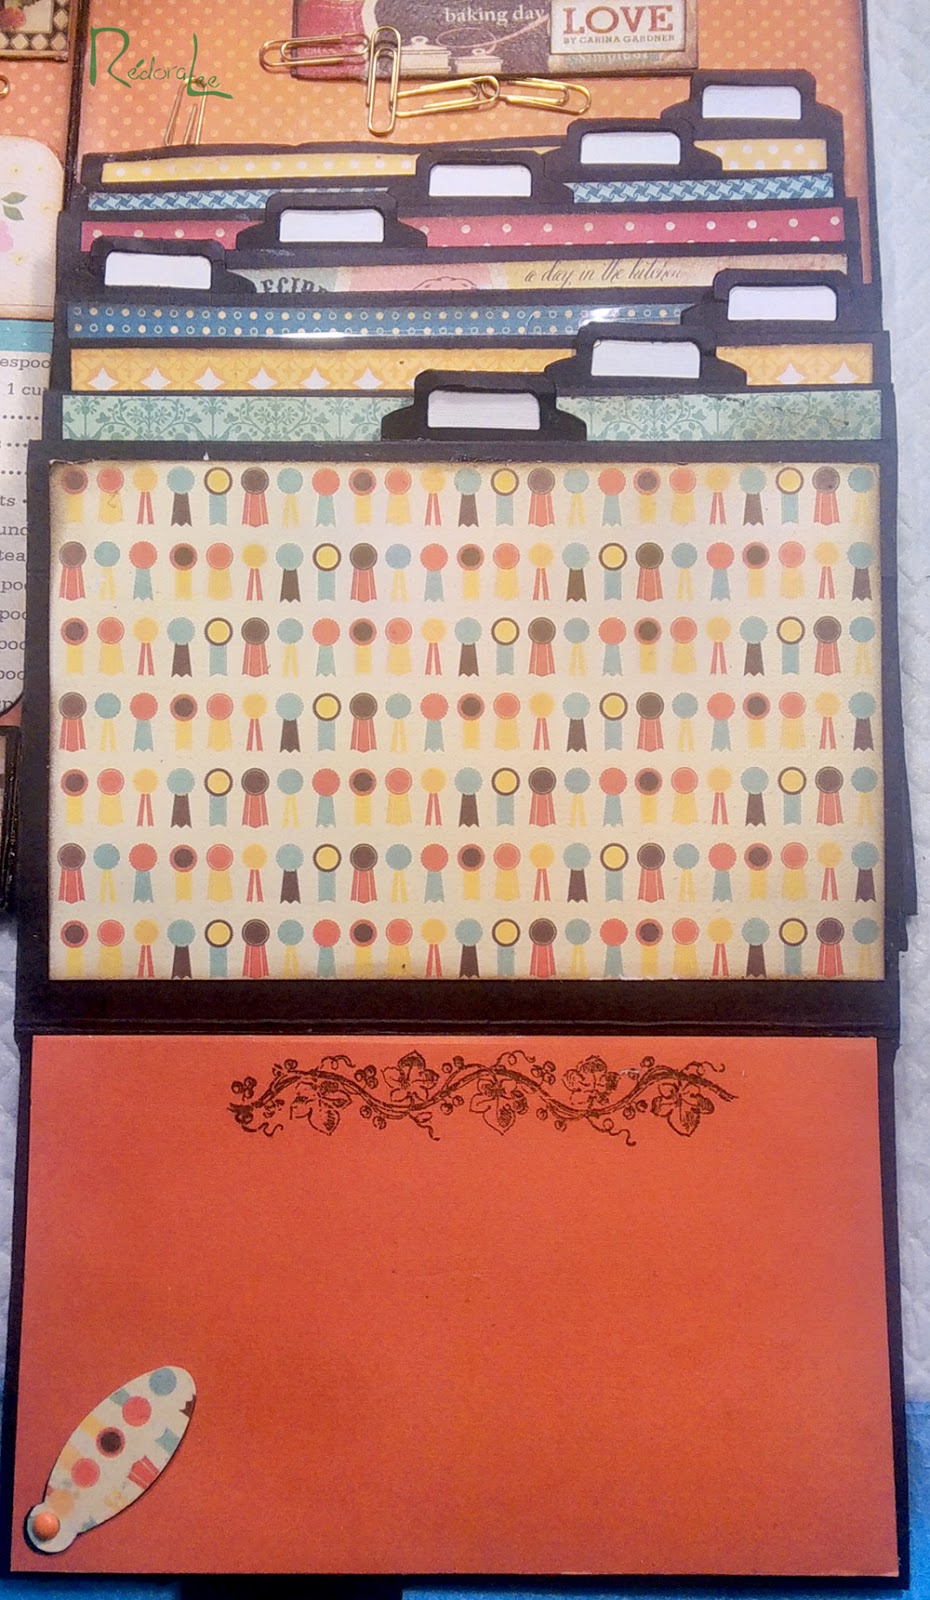
A little over two years ago, I created this recipe album for my friend, Amy.  The construction was bad and I replaced it. I deconstructed this album with the intention of reconstructing it and giving it to my niece.  But it languished in my unfinished projects box until I saw the "Feed Me" Challenge and knew this was the perfect opportunity to put the mini back together and fix the problems.
~~~~~
My Favorite Cake Recipe
The Reconstruction
I am a huge Mod Podge fan, but it did not work for this project.  The first time I constructed this project, I used Scor-Tape® and Modpodge to secure the cover to the base.  It began to peel away.  To repair the book, I used a combination of Scor-tape®, Art Glitter Adhesive™, Tombow® Metal Liquid Glue, and Tombow® Mono Liquid Glue.  I have learned the hard way that different glues give better results based on the materials. 

Glue Guide

During the reconstruction process, I realized that glue had seeped out from beneath the tabs, what a mess.  I was not sure I would be able to salvage the pages but two of my most favorite tools saved the day.  If you do not have glue erasers in your stash...get one or two, they are well worth the price!  As you can see, these got quite the workout on this reconstruction project.   I generally wipe down my cylindrical eraser with a baby wipe and I use an emery board to clean away the glue on the other one. If I were to repeat this project, I would use the WRMK® Tab Punch Board.
A New Beginning

Selfish me, I have decided to keep this Recipe Album for myself.  The Hubster is renovating the kitchen and one of our goals is to de-clutter.  I am in the process of going through my old cookbooks and selecting my favorite recipes.  We are then going to ship the cookbooks off to the Goodwill Store.  I still prefer recipe cards over videos.  With the cards, I can take my time and not worry about a device that is going to time out on me or having to rewind the video.  Okay, mostly, I am just a paper person!   Here are some looks at the completed, all new recipe album.

This is the front set of recipe pages.  The recipe pages are all magnetized as is the back of the binder.  This makes it easy to flip down pages.  The center spine is also magnetized.


This is the back set of recipe pages.  Because the magnets hold the pages together, it is easy to flip from front to back.  


A magnetic sheet beneath the design paper provides a place for paperclips 
and Magnets.  There is also a clip for recipe cards and a pen rest.

This is the ideal "stash reduction" project.  I used up a lot of loose 6"x6" paper pads and was able to get rid of quite a few 12"x12" kitchen themed papers.   If you decide to make a recipe album, I would recommend selecting one that uses ribbon to tie down the cards.  This project requires the use of eight magnets per page and that can get very expensive.


Thanks for stopping by!  I hope to see your work in the 
SOS "Feed Me" Challenge
Hugz,
Chana Malkah

Tuesday, January 31, 2017

Shopping Our Stash - Days of Yore!


Hello, Crafty Ones!
Shopping Our Stash  would like to see your
Vintage or Shabby Chic creations.
I look forward to seeing lots and lots of distressing!
Thes fabulous flowers were included in a bouquet of flowers given to us to lift our spirits. We lost The Hubster's mother and my sister within two weeks.  I just knew these would be wonderful in my Vintage Vase.
I love "engineered" projects!  This year I want to try as many new designs as I can find or think up in my own head.  I purchased these hinges to use on some cigar boxes I am up-cycling.  When I saw Alexandra's wonderful YouTube Video, I decided I would try her technique for using these closers on a standard box design.   I have a step tutorial for creating a post it note holder that creates the same box but the note holder tray can be made from less substantial paper (card stock instead of chipboard) and it does not require the closer.  You can find that tutorial here: RLD-Inky

Keepsake Box with Swing Hasp Closer
(using The Graphic 45® French Country Collection)
This elegant cut sheet from the G45 French Country Collection was perfect for the Crackled Bud Vase.  I love these bottles.  Good thing I like my probiotic drink.  Guaranteed bottle supply!
 Stamping on your crackled bottle will add to the vintage look!

Thanks for stopping by and be sure to enter your project into our challenge this week at:  SHOPPING OUR STASH!

HUGZ,
CHANA MALKAH

Friday, July 1, 2016

Altered Eclectics - Dressmaker's Closet - Altered Altoids Tin

Hello, Crafty Peeples!
Welcome to the July Challenge at Altered Eclectics!  
As always, our challenge is Anything Goes.  Remember, projects should be:
Mixed Media, Altered Art, Upcycling, Recycling, Repurposing .
Please, no ATC's and no Cards.

My Dressmaker's Closet
For a long while now, I have toyed with the idea of altering an Altoids tin. Many fabulous projects have been created using these little tins so the true challenge becomes thinking of a design that has not been shown.  
I was my intention to add a sewing machine, but all my dies were  too big.  
I really like making my own "rust."   
The Hubster says my altered tin looks like it has been hanging out in some old barn for years!   Lovely, that is just the look I was going for. 
I have begun work on another idea using a tin and hope to be able to share it by the end of July!  We shall see, you know our muses can nut up sometimes.

Please check out the fabulous creations presented by my Eclectic teammates.  You will be inspired!

Hugz,
Chana


Tuesday, March 8, 2016

Shopping Our Stash - In A Galaxy Far, Far Away

Hello, Crafty Peeps!
and
Thanks, Joshua!
Tine for another fun Challenge at Shopping Our Stash!  This week,  Donna is hosting and she wants us to deplete our stash by creating a project using:
Creatures from a Galaxy Far, Far, Away.
   (Star Wars, space, UFO's, Aliens)   
I own no cute stamps and I really didn't want to buy a digital just for this challenge, so, I turned to my grandson and asked him to draw a character from another galaxy.  So here we have Galaxia from Galaxis a planet in the Oreye Galaxy!  He drew this in about five seconds and then went back to his "serious art."  I like her and she now hangs on the wall in my sitting room.

Stash Items:  Vellum, Paper, Canvas, Aluminum Foil, Chalks
I created my Galactic background by embossing a piece of aluminum foil with the WRMK Next Level embossing folder "Wave."  I used Maya Gold® Blue Glitter Paint and added a little additional glitter.
I used Mod Podge™ to attach a piece of blue vellum to the canvas and mounted my aluminum foil using Scor-Tape.

I plan to use my Silhouette Mint to create a stamp using this image.  
I think Joshua will get a kick out of that!

Hope to see you in our SOS Challenge!
Hugz
CHANA


Thursday, March 19, 2015

Shopping Our Stash Challenge - I Made This! Create Your Own Background

Hello, Crafty Peeps!

I have been MIA for a few weeks, but felt well enough today to create a simple card for challenge over at Shopping Our Stash!  This week's challenge is CREATE YOUR OWN BACKGROUND!

I have wanted, for a while,  to try the FAUX TORN PAPER EDGE technique and this challenge seemed like the perfect opportunity.  I also wanted to try coloring a simple embossed image, so I was able to kill two birds with one simple stone.

The base cardstock is Neenah Natural White.  I used the "Faux" torn paper technique and
 stamped with Prima's Epiphany Script Stamp.  The brick wall was created by sponging 
TH Vintage Photo DI over a TCW Mini Bricks Stencil.

I used the Darice "Small Daisy" emobssing folder to create my panel.  The image was colored with
Viva Inka Gold's "Old Gold" and "Greenyellow."  I used "Old Gold" on the petals and then colored over that with my  Marvy LePlume II "No. 13", so the petals have a soft yellow shadow layer.  When the panel was completed, I applied three coats of Modge Podge.  I also applied MP to the card base.

The ribbon is a scrap piece of seam binding that was colored with TH Bundled Sage DI.
The brad is from Leeza Gibbons'  " Wishes & Dreams" collection.


Thanks for stopping by!  Please visit Shopping Our Stash and enter your project!
Hugz,
Chana Malkah