Showing posts with label memory box dies. Show all posts

Friday, November 27, 2020

Stash Party 2020 #53 - Joy To The World

 Hello, Crafty Makers!

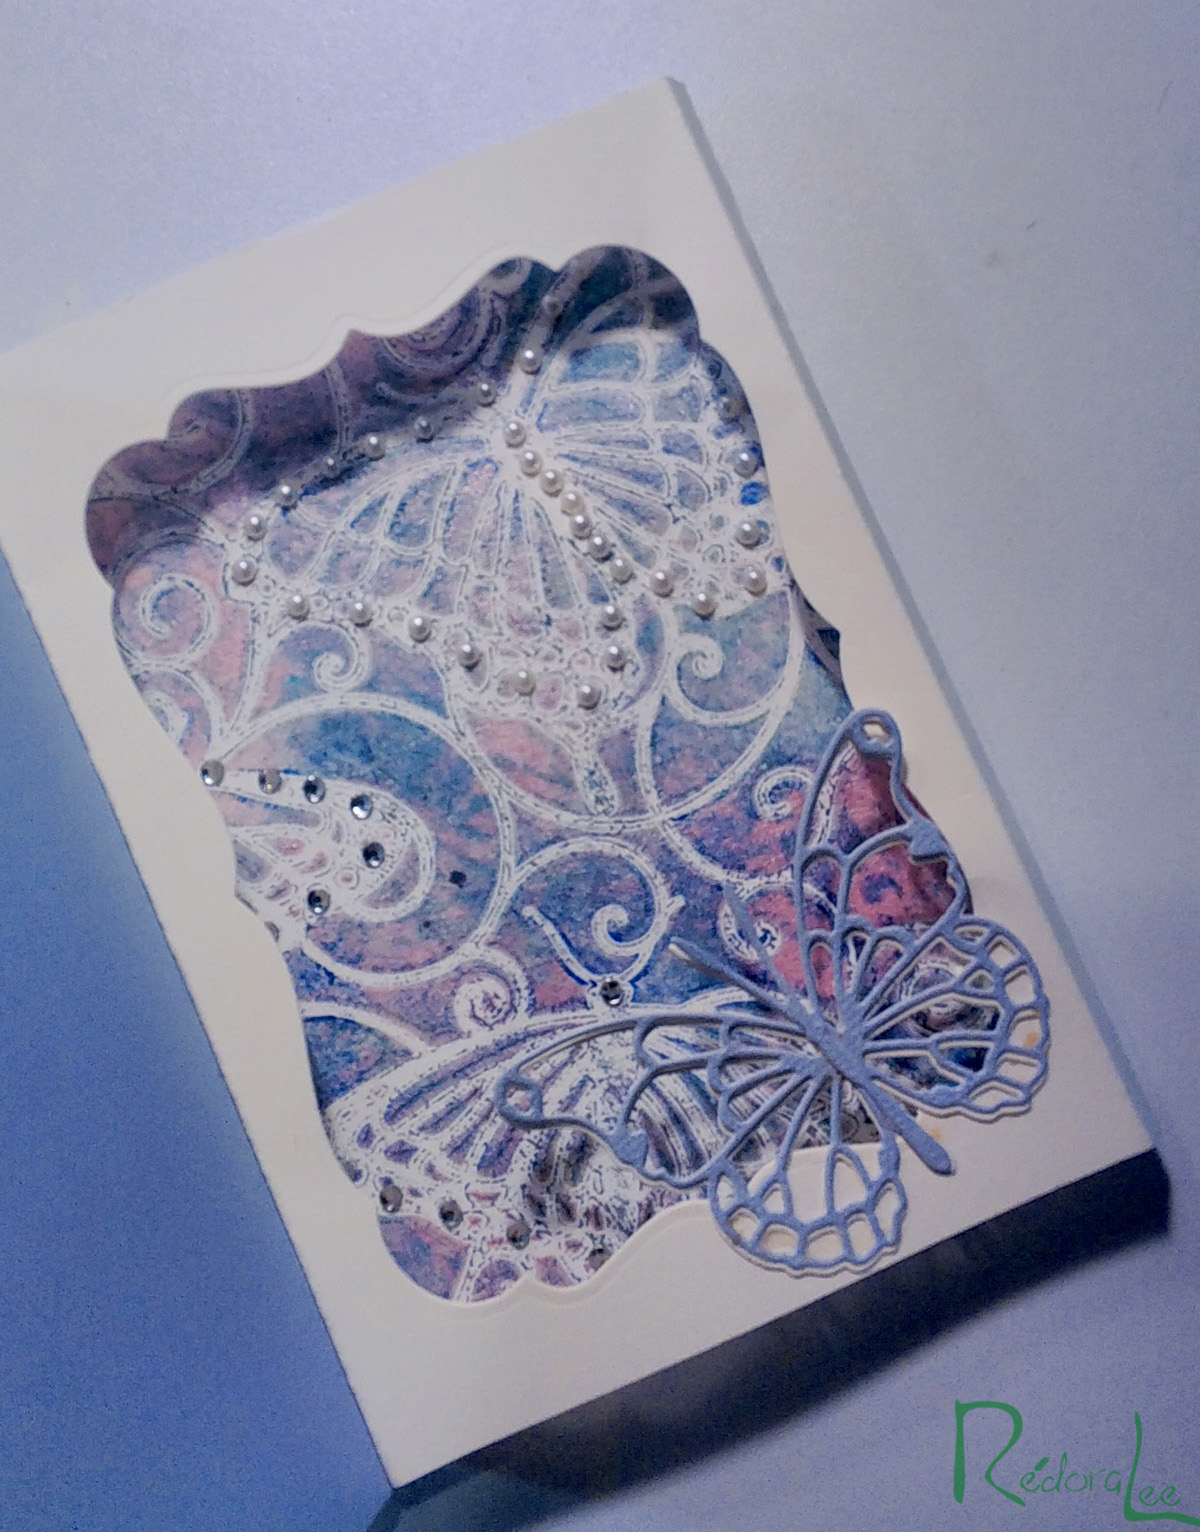
I am thrilled at how well this card turned out!  I had taken out both the "Joy" Die and the "Mini Mod Checkerboard" stencil to be used as the stash items for my next Christmas Card project.  I wanted to use traditional Christmas colors, so I visited a few of my favorite YouTube channels and was fortunate enough to find a project on Prairie Paper and Ink that used a very similar background stencil.

I had to make substitutions because I did not have the exact products that she used to create her background but my choices worked out okay in the end!  

I kept the inside very simple.  The ink pad I used to stamp this image was purchased back in 2008!  I have vowed to use all of my ink pads that fell into disuse when I started stamping with Distress Inks!

Thanks so much for stopping by!
Hugz,
Chana Malkah
Stuff I Used:
Memory Box  Die  - Joy
The Crafter's Workshop Stencil - Mini Mod Checkerboard
Teresa Collins for ColorBox - Posh White Pigment Ink
ClearSnap - Fairy Dust Glitter (no longer made)

Tuesday, November 24, 2020

Stash Party 2020 #52 - Peace on Earth, Joy To The World, and Merry Christmas

More fun with foiling! This ornament die is so old!  It is a Memory Box die that I purchased back in 2009 and ditto the ribbon die.  I also pulled out an embossing folder that I have not used in ten years!  I can definitely say that this was a true stash party!
One of these days I am going to learn how to successfully take pictures of foiled cards.  I am using a new tablet and I have yet to figure out the camera!

This card is actually my favorite of the three.  The poor photography does not do it justice!

Thanks so much for stopping by!
Hugz,
Chana Malkah
Stuff I Used:
I used two separate Memory Box Dies to create my ornament and bow, however, there is an off-brand die that combines them.    Snowflake Lace/Christmas Bell

Monday, August 3, 2020

A Place To Start - August Challenge - Create A Shaker Card

Hello, Crafty Peeps!
I am just delighted with the theme for our challenge this month at A Place To Start!  I love making shaker cards and this challenge gave me the opportunity to create a slimline shaker card, my first.

 GOOD VIBES
I have found it easier to use craft foam on my shaker card than messing around with the double-sided foam tape. I also used a single sheet of acetate. 
I forgot how acetate picks up shadows. That is not a defect in my top circle, it is a reflection from the light hitting the acetate. I simply could not take one more picture!😄 This is the first slimline card I have done in almost ten years.  When I saw the framework dies, I had to break my crafting diet and purchase two. I wanted them all but impulse control is a part of my three-year "no spending" challenge.
I did not want acres of white space on the inside of my card so I used my Mini Cubic Stencil to create a pattern that matched the face panel.  I added a touch of "Shaded Lilac" Distress Oxide Ink to the inside panel to create a little more interest.  I also added a think strip of cardstock along the edge to give the eye a little relief.


Thanks for stopping by!  
I look forward to seeing your entry!
A Place To Start

Challenges Entered:
Artsy Divas:  Always Anything Goes
The Corrosive Challenge: Always Anything Goes
Dragonfly Dreams: Anything Goes


Stuff I Used:
Framework Cutting Die


Spellbinders' Good Vibes Only

Memory Box - Sofia Heart
Sophia Heart Die - Memory Box - for Crafts :

Sunday, April 21, 2019

AAA Cards CAS Game #138 - Along The Edge w/Optional Twist: Sewing

Hello, Crafty Makers!
~~~~
Today, I challenged myself to go to Paper Playful and create a project for the first challenge on the Sunday list.  Of course, I forgot that my challenge, 613 Avenue Create, was the first one listed.  Undaunted, I went to the next challenge AAA Cards.
~~~~ 
This project not only satisfies my goal of entering more challenges but also allows me to check off another CAS project as well as using an old die from my stash of dies.
~~~~
Sharing Your Toys
A very different wedding card!
The challenge requires that your focal image, grouping, die cut, etc. be located on the edge of our card.  I knew I wanted to do a wedding card and so I first played around with several heart stamps and dies but nothing really moved me.  And then, while searching through my die stash, I came across my mixed media dies and thought one of them would be perfect.  This was intended as a single layer card but I felt it needed more so I added a layer of printed paper behind the die cut!   I love the cute little kiddie quote and found it perfect for a more casual card sentiment for this casual card design.
Thanks for stopping by and I hope you will check out this fun challenge at AAA Cards!

Hugz,

Stuff I used:
Top Flight™ White Card Stock
Graphic 45® "Couture 6x6 Patterns and Solids"
Memory Box® Open Studio™ "Distressed Windham Collage" Die
Kaiser Scrapbook ® "Island Lagoon" Rhinestones
ClearSnap "Fairy Dust Glitter"

Other Challenges Entered:
The Corrosive Challenge - Anything Goes


Saturday, January 19, 2019

Here and Now - Lots of Hearts - Art Impressions Challenge

Hello, Crafty Makers! 
Today I am featuring another image from my friend Rick St. Dennis' January "Hearts" bundle.   The theme of the challenge over at Art Impressions is "Lots of Hearts" and no one has more hearts than this fella!

Wrapped Up In Hearts
This is another one of my Wrap Cards.  I wanted to play around with a different shape and practice using shapes for which I don't have dies.
I colored the image and then cut it out leaving a one-eighth inch border around the edges.  Next, I traced around the edges of my cut image on the red cardstock and cut it remembering to leave a small section on the fold to serve as my hinge.  I traced the image again on a piece of white card stock to be used on the back of the flap.
I used my heart die to trace the shape onto the red card stock and then cut it out by hand, again remembering to leave a small portion attached at the fold.  Then I cut two white hearts for the second flap and two small red hearts.  One for the inside panel and one for the front flap.

Although it does not show well here, Wink of Stella was applied to all of the hearts on the image.  I try not to use loose glitter because it tends to get stuck to everything and takes days to get rid of completely.  IRL, the shimmer is beautiful! 
Stop by Rick's Zibbet store and pick up his January Bundle ($7.00 for six digital images and one free surprise image) you'll love them!

Thanks for stopping by!
Hugz,
Chana Malkah

Challenges Entered:


Tuesday, January 15, 2019

Shopping Our Stash: Hearts On Fire - Wrap Card

Hi, Crafty Makers!

This week's Hearts on Fire challenge at Shopping Our Stash presents a rare opportunity to create a project (not related to Valentine's Day) using one of the five hundred or so heart shaped dies and/or stamps languishing in your stash.  Of course, if you simply cannot help yourself, a Valentine project will work!

A Kraft Heart Themed Wrap Card
Once again, my love of Kraft card stock is on full display.  I really wish the "Brush of Stella™" on the hearts and the score lines had photographed better.  All that glitter gives the card a more elegant feel. 
Again, so much of the sparkly detail is lost in this photo.  
The accents show up better in the video (see below).
You can see a tiny bit of the Stella glow in this one.


I added the Kraft card layer behind the red layer AFTER I had completed and published the video.  It is amazing how that one small change made such a big difference in the project's presentation.


Challenges Entered:
A Perfect Time To Craft: ATG
Classic Design Team Open Challenge: ATG
Crafter's Galore Encore Challenge: ATG
Createful Hearts Designs: Must use hearts/red hand colored and family friendly.
Ellibelle's Corner:  Sparkle and Shine
Mix It Up Challenge: ATG + Sentiment as Main Focal
The Crafty Addicts: ATG
The Creative Crafters: ATG
The House That Stamps Built: Color Challenge

Thursday, September 13, 2018

Welcome Warm Greetings

Hello, Crafty Makers!
The Hubster and I have been holding our breaths for the past few months hoping that the house next door would be sold and not rented.  Prayers answered and a very nice family is moving in.  Hubster and the neighbor have already bonded over lawn mowers and leaf blowers.  My kind of neighbors, indeed.  I decided to create a quick card to welcome them to the community.

Welcome!
 Here's the Key To The Community
I have had this Memory box® die around six years or so but have only used it once or twice.  It is one of those things you get for a DT project and then forget about.  But along with my goal of learning new techniques, I am also trying to use stamps, dies, and embossing folders in new ways.  I scored the lines on this panel because I had already stamped and cut my panel but it still needed something.  I had one little boo b00 but I hope they will over look that!
I tried reducing the light hoping that the shadowing behind the leaves would show better.  I wanted to use the negative die so that the gold layer would be the color of the leaves.  But I also wanted to add more visual interest so I die cut a piece of black craft foam slightly smaller than my main panel and offset it just a bit. Not only did this create the shadow effect it also added dimension.   I added green and clear rhinestones to each leaf and scattered a few outside the main image.  I am working on making more effective use of the graphic design grid so on this card everything is left aligned.  It still feels weird but I guess I will get used to it!
I kept the inside simple and just wrote a short note welcoming them to the neighborhood and providing the contact information for our block captain.

Card Size:  4-1/4" x 5-1/2"

Materials and Supplies:
Memory Box "Lorelai Leaf" Steel Die
Sizzix Framelits™ w/Stamps "Warm Holiday Greetings"
Want 2 Scrap - Baby Bling Rhinestones: "Silver"
Kaiser - Rhinestones: "Split Pea"
Want 2 Scrap - Charm "Key to My Heart"
Bazzill Papers
Gold Card Stock
Black Craft Foam
Scor-Tape
Glitter Glue

Tools:
Die Cutting Machine
Stamp Platform or Acrylic Block
Scoreboard or Embossing Folder


Thursday, July 5, 2018

Don't Stop Believing - A Gelli Print Inside Shadow Box Card

Hello, Crafty Peeps!
Last night, I decided to play around with some stencils and my newly made Mono Printer (Gelli Plate). 
Mono printers are easy to make and fun to use.
This print was so pretty I just knew I had to use it to make a shadow box card. 
This closeup shows the wonderful texture on my monoprint.

Don't Stop Believing
Inside Shadow Box Card
The front of the project is very, very simple because the payoff is on the inside. 
The Butterfly Dies are Memory Box® - "Darla" and "Vivienne"
The acrylic inks are a combination of Liquitex® Basics and Martha Stewart® Pearlized Acrylic Paints.
 The Stencil "Mini Flutterby" is from The Crafter's Workshop
Click Here for Jennifer McGuire Inner Shadow Box Tutorial


Tuesday, July 14, 2015

Shopping Our Stash Challenge # 210 - Thanks Tag/Paper Piecing

Hello, Crafty Peeples!

Time for another fun challenge at Shopping Our Stash!  

Remember, let us know your stash items!

Our theme, Paper Piecing, a technique I love, but seldom use.  
Not only did I get a chance to revisit paper piecing, but also, I was able to use quite a few stash items and to create a tag Using one of the Prima Julia Nutting Stamps.   I have all the stamps and I have never used one of them in a project!   I love being on the SOS DT because it forces me to close my wallet and to open my STASH drawers, boxes and bags!  Thanks to my teammie, Leslie, for inspiring me!  She used drop shadows on her sentiments and I decided to give it a whir1!  Not as good as hers, but it's my first attempt!

Paper Pieced Items:
Hair Bow, Dress, Socks, Shoes, Bird, and Wagon
Stash Items:
Tag, Papers, Die


Supplies
Stamp: Prima "Julia Nutting" Doll Stamp
Die: Memory Box "THANKS"
Tag:  Graphic 45 Regular Tag Album 
Papers: We R Memory Keepers - Country Livin', Teresa Collins - Vintage Finds
Cover Stock: Bazzil Textured Paper
Distress Ink: Vinage Photo and Tea Dye
Pearls: Want2Scrap
Misc:  Copic Markers, Elmer's School Glue, Helmar 450 Quick Dry Adhesive, Mod Podge


Thanks for stopping by!  Look forward to seeing your entry in the challenge!
Hugz,
Chana


Tuesday, May 5, 2015

Shopping Our Stash - Challenge #200 - Big, Bold, and Beautiful

Hello, Crafty Peeps!

Shopping Our Stash is celebrating 200 Challenge Posts!  
We want to see "BIG, BOLD, AND BEAUTIFUL" creations.

Now is the time to use that HUGE Flower, that looked so good online,  but now languishes neglected and hidden in your stash!  Surely you can find Stencils, Masks and Die cuts that are too BIG f or regular use, but perfect for a challenge such as ours.   BOLD colors may be the route you take!  We want to see them all!   Thanks for supporting the SOS Challenge!

LIVE A BOLD LIFE CANVAS
My Recipe for Living A Bold Life
  LIVE every moment to the fullest.  Appreciate the beautiful Bold colors found in nature. Allow Music to elevate your soul.  
Surround yourself with the warmth of family and friends.
Fear Nothing but the lost of the Fear of G-d.

The background texture was created by applying mod podge to my canvas and 
 adding crumpled tissue paper.  The textured pattern is determined by how 
much your crumple your paper and how you work it onto the canvas.

I used a variety of paints for this project.  But the majority of the paint colors are from the Earth Safe Finishes "Chalk It Up" Acrylic Chalk Paint Line.  I also used some products by Lindy's Stamp Gang, Shimmerz Paints, Ranger Distress Inks, and Viva Inka Gold.  Memory Box and Sizzix Dies.

Thanks for stopping by!  Look forward to seeing your in our challenge
Hugz,
Chana

Monday, February 18, 2013

HEALTHY HEART MONTH


Hello, Crafty Peeps!  The Greetings Team Challenge at The Outlawz this week celebrates Healthy Hearts!   We are challenging you to create a card using embossing and the color red.  I'm sure we all have some hearts left over from Valentine's Day.


The embossed butterfly on this card was created using Memory Box's Vivienne Butterfly Die.  The sentiment was stamped with VersaMark and heat embossed with Pirate's Gold Embossing Powder.  The red button was threaded with gold elastic ribbon and added to a scallop circle with a piece of foam dimension.

I hope you will stop by The Outlawz and play along with us in the Greetings Challenge and one or two of the other seven (7) weekly challenges!

Hugz,
Chana


Monday, November 12, 2012

Just Chill! - Outlawz Greetings and Creative Freebies Chjallenge

Hello, Cardies,

Well, I am in my Mini Album Stage, so you will be seeing a lot of mini albums.  I am trying to step out of my element and try something different and new.   I love my cards and they will always be my staple, but I think Mini Albums have just stolen my heart.  
The image was provided by Sandi Huggett in the Outlawz Creative Freebies Challenge.  This cute little snowman and the Scrap Your Trash theme of the Outlawz Monday Greetings Challenge, inspired my paper choices. 
I used Echo Park's Winter Park  6x 6 Pad  I thought the cool colors were perfect for my "Chill" book!
The cover is Neenah Havalind Blue and  Smoke Grey (The grey paper 32 years old) ! 


Unfortunately this shot does not show the accordion fold.
The book was made alternating Grey, White and Blue #10 Business Envelopes.

I am working on three more mini albums.  There are so many ways to bind these cute little books, and so many materials that can be used to make them.  Hopefully, I will get a couple of tutorials posted this week.    Thanks for stopping by and taking a look.  I hope you will join in The Outlawz Challenges.  We have Eight fun and exciting challenges and the friendliest member in all of Cyberland!
Hugz,
Chana

Monday, February 20, 2012

HI THERE! -OUTLAWZ GREETINGS CHALLENGE

Recipe Challenge - Outlawz Greetings Challenge

Cardies, if you like Recipe Challenges, then we have a great one for you at The Outlawz.  THE RECIPE

2 Papers
 Purple, Brown/Swiss Dots, and Pinkish Purple

2 Embellishments 
Two flowers, One Brad, One Diecut

1 Ribbon
I was so good, I only used one ribbon.

The base cardstock looks black on the monitor I'm using this morning, but it is actually a very pretty color called Bagdad Brown.

Remember, you have to use at least the number of items called for in the recipe, but like any good cook, please feel free to season to your taste.

I found the sketch I used for this card in Paper Craft Magazine.

Thanks for stopping by!  Chana

Monday, February 13, 2012

G-d's Promise

Digital Images by Robert Jackson


Hello, Cardies!  The theme  for the Greeting Challenge at Outlawz this week is "Find A Rainbow"! 
 I know we will see some pretty marvelous creations from our members.  I had two Robert Jackson digis  I thought would be perfect for this theme.  I combined the two images in photoshop and then chalked in a pastel rainbow.  I used a Memory Box Cloud Die to cut out the sentiment.
  This is a very simple card, but for the moment it is the favorite card in my studio!


LEAVE A COMMENT ON THIS POST AND YOU HAVE THE OPPORTUNITY TO WIN THESE TWO DIGIS.  SCROLL DOWN TO THE COLOR CHALLENGE FOR AN OPPORTUNITY TO WIN MORE  JACKSON DIGIS AND GIFT CERTIFICATES!