Monday, June 17, 2019

A Place To Start /Mid-Month Project -Stencil Me In

Hello Crafty Peeps!
It is time for our mid-month DT make at A Place To Start.  I decided to create this fun pincushion using an Ann Butler tutorial.  This is my first attempt and I had a few issues but decided to post it anyway because our blog is all about new beginnings!
I used Ann Butler's Easy Design Elements (EZ-De's) Stencils for Stencil Girl to create this cute little pincushion.  I don't often use my very fancy Brother's sewing/embroidery machine but as part of my self-challenge for 2019, I am using sewing more on my projects.  The stitching was a little "wonky" so my corners did not turn out as evenly as they should have and there were a few other "oops" but in general, I am pleased with the outcome.
I am posting the link to the tutorial down below but I want to share some changes I made when creating my pin cushion.
  • I really did not want to purchase more craft inks, so I decided to see if the Distress Oxide Inks would work and they did. 
  • Because I am capable of losing anything while I am working on a project, I added a tassel to my pincushion.  
  • I also decided to use two buttons in the center of my cushion instead of one.
  • Rather than filling my pincushion with Fiber Fill (used in pillows, etc.) I used ground walnut shells.  This material keeps your pins sharp.
Links:    
I am including the YouTube Video but I recommend that you use the Step Tutorial HERE on Ann's Blog for correct measurements and cutting and sewing instructions!

Links to Stuff I used:
Fabric: Muslin

Stencils
Inks

Miscellaneous

Thanks for stopping by!  I look forward to seeing your fabulous stenciled project in our challenge!

Hugz!

Tuesday, June 11, 2019

One More Stationery Box

Hello, Crafty Peeps!
I am back with another Stationery Box.  This one I created as a gift for the young lady who works in the front office of my Physical Therapy practice.  I have reached my Medicare Cap for this year, so I will not see her again until next year.   

I have been hoarding Pink Paislee and Webster Pages papers for years.  I am so glad I saved them because they are perfect for my current fixation on Stationery Boxes as gifts.
 I try to vary the contents based on the recipient.  Taylor is a college student, so instead of 3"x5" cards and gift tags, I included additional post-it notes and a small composition book in her box.
I left the small pocket empty, but before I gave it to her I added a few small clothespins (with the days of the week on them) and a few fancy paper clips. 
 I totally forgot to pay attention to my paper design when cutting the triangles for my post-it note cover.  Fortunately, I had a scrap left that matched up kinda okay when I added the magnetic closure.
There are many iterations of what to include with your box.  Some folks do calendars, others make small notebooks.  I like the idea of post-it notes because they can be refilled. 
I am thinking of eliminating the stamp holder from my next SB.  Not many young people use snail mail these days.  I have an idea what I will add in its place.  Can't wait to try it out on the box I am currently working on.

Thanks for stopping by!
I hope you have found some inspiration here!
HUGZ,

Sunday, June 9, 2019

A Barrel of Monkeys - Wednesday Sketch Challenge Entry

Hi, Crafty Peeps!
The Wednesday Sketch Challenge provided a great opportunity to put another check in another box on my list of personal crafting challenges for 2019.  I actually used "flowers!" YAY!  I have literally hundreds of flowers that I bought because they were "so cute" and hundreds more that came with "kits."  I long ago stopped buying embellishments.  I use what I have on hand, or I create it.  Among my "mostly not used" stash are several flower creation sets and flower dies.  These days the most I buy are glue, paper, and on occasion a die or stamp needed for a DT project.  Otherwise, 2019 is purely stash projects. 
 A Barrel of Monkeys
 Here is the challenge sketch.

I have grown to love critter cards (this is new territory for me) and I was looking for the perfect sketch/layout in which to use them.  I tried to incorporate the little monkey holding a balloon, but couldn't make that work...maybe next challenge.

My biggest challenge was my attempt to create the look of a barrel on a flat surface.  Determined not to bother The Hubster, I played around with a few iterations and finally decided that putting my scoreboard to use was the best choice. A stencil and some distress ink gave me all the barrel "suggestion" I needed. 

I was not happy with all the blank space on the card in the lower left-hand corner.  So, I checked my personal challenge list to see what boxes remained unchecked and one was "Use More Flowers."  A long, long time ago, I purchased a kit that used the Prima Engraver series.  That was back during my "I love mini albums" phase.  Of course, that mini was never made but I was able to cut up one of the floral sprays and use it on this card.

I like this sketch and will probably use it for other projects.  Why don't you give it a try and join the Wednesday Sketch Challenge?

  Thanks for Stopping By!
Hugz,
Other Challenges Entered:


Friday, June 7, 2019

Even Bad Days! Blending, Stamps, and Stencils

Hi, Crafty Card Peeps!
The insomnia bug hit me pretty hard last night!  Cleaning my studio didn't tire me out so I decided to do some crafting.  Two of my DT projects this week required the use of stencils and I still had a bunch of stencils on my side table.  As I looked at all the disparate elements, that age-old crafting mantra came to mind, "Why not?"
"Even Bad Days"
I do not color well.  That has not, however, stopped me from purchasing stamps based on how beautifully they were colored by other crafters.  I have shied away from using this stamp but I guess a lack of sleep and a need to create overshadowed my fear of Copics and I just dove in.  A combination of Stamps, stencils, and Distress Oxide blending finally got me to a comfortable place with this project.
The image is stamped and colored with Copic markers.  I created a mask and then used my mermaid makeup brush to blend my background.   I removed the mask and used various size brushes to fill white spaces in the image.  Next, I stenciled in the umbrella.  The umbrella color is a combination of Faded Jeans and Squeezed Lemonade.  The photo does not do it justice.  IRL it is a fabulously delicious color that looks like denim fabric.
The puppy was on the same stencil sheet with the umbrella.  To stencil him I used Vintage Photo ink.  I added Mowed Lawn and Cracked Pistachio to ground the images.

I used my circle and tornado stencils to add a little interest to the umbrella and the top of the card.  I added Stickles to the umbrella and a few sequins to complete the face of the card. 

In my stash, I found a pretty, soft brown and beige small gingham paper.  I mounted this onto a piece of olive green cardstock.

In the end, I was pleased with my work.  I know that far more talented people have colored this image to a level of perfection I will never know.  But for this card, which I plan to give to a friend who is in a bad place right now, I think I captured the mood.

Thanks for Stopping By!
HUGZ,

Challenges Entered
Stamping Sensations - Show Your True Colors


Tuesday, June 4, 2019

Shopping Our Stash #397 - Stencil Me This - Life is a Zoo

Hello, Crafty Makers!
The fortnight challenge over at Shopping Our Stash is "Stencil Me This!"
I have two challenges this week that require the use of stencils.  To make my life easier, I used the same card style and just changed up my colors.  I hope you like this one.  
Listen Up!
This is my favorite of the three stencil projects I created this week.  I thought this cute little elephant would be the most engaging guest speaker and of course, his audience it totally ignoring him! 😊
I added a little "Wink of Stella" to the elephant but as usual, it did not photograph well.  The background stencil image was created using the "watermark" with stencils technique you can see a step tutorial HERE.
These little guys came with dies, which made masking them very easy.  I added little patches of green and the small puddle to ground my characters.  I have created more critter cards in the past few months than in all my years of crafting.  I think I really enjoy making them.

Thanks for stopping by.
Looking forward to seeing your entries in the challenge!
Hugz,
Challenges Entered

Monday, June 3, 2019

A Place To Start - June Challenge - Stencil Me In

Hello, Crafty Makers!
This month at A Place to Start, we are challenging our players to investigate new and exciting techniques for using stencils!
This watermarking with stencils and distress inks technique is a new one for me.
So I get to check another box in my 2019 personal challenge.
~~~~~~~
"The Art of Silence"
"For The Love of Yoga"

Step Tutorial
The supplies and tools listed are what I used.  Please use whatever you have on hand.  Please note that inks that are not reactive with water will not give the same result as Distress and Distress Oxide Inks.  I have provided links to some products.
Supplies and Tools
Paper
1 pc white cs - 4.25" x 11.00" scored at 5.50"  (A2 card base)
1 pc white cs - 4.00" x 5.25" 
1 pc black cs - 4-1/8" x 5-3/8"
1 pc white cs - 4.50" x 5.00" (for window back panel)
Inks - Distress Oxide (or ink of your choice)
Stencils
ColorBox® Art Screens: "SwirlDot" and "Funky"
Dies
Flower Cutting Dies (use what you have) 
Sizzix Pierced Rectangle Die (for window)
Stamps
Yoga Frogs w/sentiment (use what you have)
~~~~
Stamping Platform or Acrylic Blocks
Die cutting machine
scissors
paper trimmer
tape runner
glue (wet)
water (mister)
paper towel
craft mat
~~~~
Step 1
1.  Using your blending tool, apply distress inks to the 4-1/2"x5.0" white cardstock.  Note: The decorative back panel for your window will be cut from this card. Keep this in mind as you apply your ink and your stencil design.  Set aside.

2.   Bring your stencils and water mister to your work area.  Select your first stencil and lightly mist it with water.  You should have small, fine bubbles, not big ones. 
When you are satisfied with your moisture level, place the moist side of the stencil over your inked panel.
Cover the stencil with a paper towel and slide your (in opposite directions) hands across the towel.
Remove the towel to reveal your design.  Repeat the process with your second stencil. Set your panel aside to dry.
 

3.   Create your card base.  If you have not done so already, cut a piece of white cs to 4-1/4"x 11.00" and score at 5-1/2".  Fold on the score line and burnish.
4.  Cut a piece of Black cs to 4-1/8" x 5-3/8".  Layer on top of the white card base.  There should be a 1/16" border on all sides.
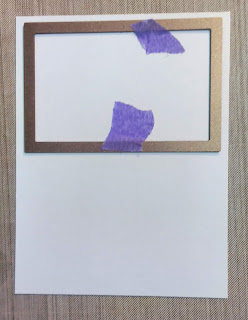
5.  Cut a piece of white cs to 4.00" x 5-1/4".   Select the appropriately sized rectangle die and use it to cut out the window section.  There needs to be at least a 1/4" margin at the top of the window and on both sides.
6.  Using the same rectangle die or a slightly larger one, cut a section from your colored panel.  While my panel was still wet, I applied "Wink of Stella" for a little shimmer.
7.   Position your decorative panel and face panel (do not adhere).
Determine where you will place your additional elements such as your flowers, images, and sentiment.
8.  Using a tape runner and wet glue (placing wet glue over the runner lines will allow a little wiggle time) adhere the decorative panel to the base of your card.
9.  Use your stencils and Distress Inks to decorate the white window panel.  You may leave this undecorated if that works better with your design.
10.  Stamp your image and sentiment onto the window panel and adhere any additional embellishments.  

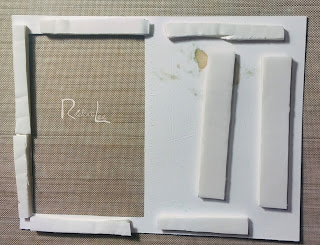
On the back of the panel, adhere a double layer of double-sided foam tape.  I used pieces left over from two other projects.
~~~~~~~
 The Final Card

Thanks for stopping by!
Click HERE to be taken to our Challenge
HUGZ,
Challenges Entered