Friday, July 29, 2016

Clearsnap Coloring Book Page - Coloring with Inks and Chalks

Hello, Crafty Peeps,
I have taken another journey into the world of coloring book pages and I am so pleased with my results.  Thanks to the generosity of Clearsnap® and their partner, Hot Off The Press, I have tons of fabulous adult pages to explore and grow my skills.

I hope you find inspiration in this project.  The Hot Off The Press Coloring pages are great.  I liked the thickness of the paper which made me feel more confident apply color and the color did not bleed through.

I used ColorBox® Chalk Inks and Clearsnap® Smooch "pearlized" Inks to color this image.  You can find the tutorial HERE on the Clearsnap Blog.

Thanks for stopping by!


Disclosure Statement

EFFECTIVE DECEMBER 1, 2009, FTC GUIDELINES REQUIRE BLOGGERS TO DISCLOSE ANY TIME THEY ARE COMPENSATED FOR ENDORSING OR REVIEWING PRODUCTS OR SERVICES.

The Project demonstrated above contains components received for free in return for my services and for posts on my blog. I affirm that I have not made, nor would I ever make or endorse, misleading statements regarding any product or service used in the operation of this blog.

IF YOU HAVE QUESTIONS REGARDING ANY PRODUCT OR SERVICE USED ON MY BLOG, PLEASE CONTACT ME AT CMALKAH@YAHOO.COM.


Saturday, July 23, 2016

Clearsnap® - It's In There! - Vintage Rx Pocket Page

Hello, Crafty Peeps,

This week on the Clearsnap® Blog, my teammates and I are sharing ideas for pocket pages, swaps, and letters.  I must admit this was my first foray into the world of pocket letters.  I previously created a pocket page cookbook.  

Our featured product this week is the fabulous Susan K. Weckesser Color POP Mint ink pad!  More details and product information can be found Here


GET EMOTIONAL AND KEEP CRAFTING!

Hugz!

Disclosure Statement

EFFECTIVE DECEMBER 1, 2009, FTC GUIDELINES REQUIRE BLOGGERS TO DISCLOSE ANY TIME THEY ARE COMPENSATED FOR ENDORSING OR REVIEWING PRODUCTS OR SERVICES.

The Project demonstrated above contains components received for free in return for my services and for posts on my blog. I affirm that I have not made, nor would I ever make or endorse, misleading statements regarding any product or service used in the operation of this blog.

IF YOU HAVE QUESTIONS REGARDING ANY PRODUCT OR SERVICE USED ON MY BLOG, PLEASE CONTACT ME AT CMALKAH@YAHOO.COM.


Saturday, July 16, 2016

Create Your Own Patterned Paper

Hello, Crafty Folks!
I enjoy creating my own backgrounds and my own patterned papers.  

The most difficult part of this project was deciding which Teresa Collins™  products to use.  Choosing from a new line of stamps created for ClearSnap® and exciting A4 embossing folders created for Craftwell® wasn't easy but I finally chose the "Love" and "Hope" stamps and her new Craftwell® A4 embossing folder "SnapShot".  Need I say more?

Before


To see the tutorial for this project and to learn more about the new Teresa Collins® products for ClearSnap® and Craftwell®, please check out my post on the ClearSnap® Blog

HUGZ
Challenges:


Disclosure Statement

EFFECTIVE DECEMBER 1, 2009, FTC GUIDELINES REQUIRE BLOGGERS TO DISCLOSE ANY TIME THEY ARE COMPENSATED FOR ENDORSING OR REVIEWING PRODUCTS OR SERVICES.

The Project demonstrated above contains components received for free in return for my services and for posts on my blog. I affirm that I have not made, nor would I ever make or endorse, misleading statements regarding any product or service used in the operation of this blog.

IF YOU HAVE QUESTIONS REGARDING ANY PRODUCT OR SERVICE USED ON MY BLOG, PLEASE CONTACT ME AT CMALKAH@YAHOO.COM.


Tuesday, July 12, 2016

Shopping Our Stash #260 - Get Inspired By Your Bedding!

Hey, Crafty Peeps!
We are back with another one of our off the wall Shopping Our Stash challenges!  The last time we wandered this far into the land of unique inspiration we asked you to get inspired by your shower curtain! I drew my inspiration from the bedding in one of our guest rooms. 
The primary focal is the geometric pattern in the comforter.   The comforter is reversible, so I was inspired by the greyish brown color and tried to match that in the cardstock used for my base.  My paper is much darker but the true color is more correctly reflected in the banner and the designer paper used on the inside. 

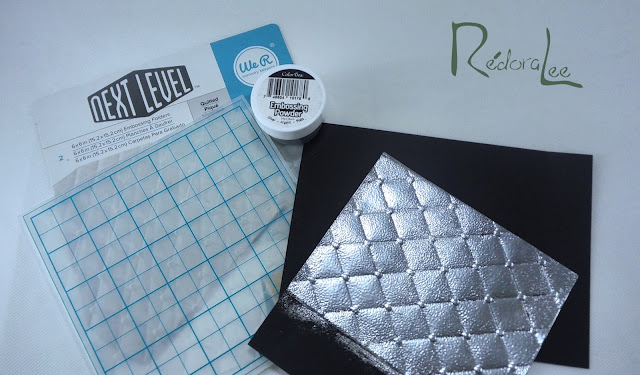
 I wanted to play around with double-embossing the front of my card.  For this creation, I used ColorBox® Silver Embossing Powder in combination with the WRMK® Next Level "Quilted" Embossing Folder
A tutorial for double-embossing can be found HERE on the ClearSnap® Blog
I finished off the design with the Heidi Swapp® Love, Love, Love Banner.  I die cut a heart using my Sizzix® Hearts. Both the sentiment and the heart are secured with double-sided foam tape.  This created a cool 3D look IRL.  

The interior was finished off with a designer sheet from Teresa Collins'™ "Far Away" collection.   Finally, I added a Petaloo Glass Flower. 

Thanks for stopping by!   Try this double-embossing.  You can create fun, elegant faux metal designs and save money!  
Hugz,
Chana

Materials
1 Pc Card Stock cut to 5-1/2" x 12.0"  (finished card will be 5-1/2" x 6.0")
1 Pc Card Stock cut to 5-1/4" x 5-1/4"
1 Pc Designer Paper - Teresa Collins™ Far Away
Embossing Folder - WRMK® Next Level - Quilted
ColorBox® Silver Embossing Powder
Top Boss® Embossing Ink
Die - Sizzix - Hearts
Embellishments -
     Heidi Swapp "Love, Love, Love" Banner
     Petaloo Premier Spring 1 Darjeeling Collection - Glass Flower with Leaves
Parchment Paper
Decoupage Clue
Double-sided foam
Tools
Paper Trimmer
Craft Iron

Disclosure Statement

EFFECTIVE DECEMBER 1, 2009, FTC GUIDELINES REQUIRE BLOGGERS TO DISCLOSE ANY TIME THEY ARE COMPENSATED FOR ENDORSING OR REVIEWING PRODUCTS OR SERVICES.

The Project demonstrated above contains components received for free in return for my services and for posts on my blog. I affirm that I have not made, nor would I ever make or endorse, misleading statements regarding any product or service used in the operation of this blog.

IF YOU HAVE QUESTIONS REGARDING ANY PRODUCT OR SERVICE USED ON MY BLOG, PLEASE CONTACT ME AT CMALKAH@YAHOO.COM.


Friday, July 8, 2016

Be Fearless - Embossing Fun with ClearSnap® and Craftwell®

Hello, Crafty Peeps!
I am just tickled pink to have this opportunity to work with the  new Teresa Collins™ partnership products developed for 


I am a lover of all things Teresa Collins and I usually purchase her 6"x6" designer paper pads in multiples of six each.  Now, I find myself addicted to her wood mounted stamps.  I knew this design needed a strong, bold sentiment. Teresa's "Be Fearless" stamp fit the bill perfectly.  It embossed perfectly and because the text is stacked, it set the tone for  the design composition.

My purpose for wet embossing a metallic powder over a dry embossed surface was to make an impact statement. Teresa Collins™Twill Herringbone embossing folder** delivered the impact and also helped achieve my design goals of deep impressions, texture, and structure. 

I have used embossing powders to create faux metal embellishments and thought that process might work well here.  The first dress form was dry embossed and then wet embossed with the Herringbone EF, but the design seemed to be fighting the gingham ribbon so I chose the non-embossed version.  If you want to be adventurous, try paper piecing an outfit for your dress form!

**This is an A4 (8.27" × 11.69") Folder it is too large for the Standard Big Shot.

Creating your own background
Working with dark colors can be tricky.  Creating your own background design gives you creative control.   I wanted to stay in the "brown" color family but needed to bring some light into the design.  ColorBox® Cat's Eye Chalk Ink is great to work with and very versatile.  I used the "Yellow Citrus" ink to balance the "Burnt Siena" and Copper.  I also swabbed a little "Creamy Brown" across the panel to deepen the creamy color of my cardstock.  The creamy brown is so luscious.  If you are going to add any chalk ink to your collection, add this one. 
I also decided to have some fun inside my card.  I heat embossed the edges of my word bubble!  The paper is Teresa Collins® "Now and Then" Collection.
 These are the products I used:
ClearSnap® Products
ColorBox® Cat's Eye Chalk Ink Pads: Yellow Citrus, Burnt Sienna
Teresa Collins™ ColorBox® Pigment Ink Pad: Fiesty Red
ColorBox® Top Boss™Clear Embossing Ink
ColorBox® Embossing Powder: Copper
ClearSnap® Teresa Collins Wood Mount Stamps: Be Fearless and Love
Craftwell® Products
Teresa Collins™ Collection A4 Embossing Folder: Twill Herringbone
Teresa Collins™Products
Teresa Collins™"Now and Then" 6"x6" Designer Pad
Other Supplies and Tools:
Die cutting/embossing machine
Cream colored Card Stock
Kraft Card Stock
Dies:  Word Bubble, Dress Form (or dies of your choice)
Ribbon, Glue, Double-sided Foam Tape or squares
Paper Trimmer
Heat Gun
The Tutorial Can be found on the ClearSnap® Blog!


HUGZ,


Tuesday, July 5, 2016

Shopping Our Stash Challenge #259- Say What? Use a Speech Bubble


Hello, Crafty Peeples!
  Once again, the lovely ladies at Shopping Our Stash have devised a plan to help  clear your crafting stash.  
SAY WHAT?
We are asking that you use a Speech Bubble.  Dive into those scrap tubs and make speech bubbles to your heart's content.  Be creative!  I decided to let my speech bubble Speak for itself.  Hubster says I get too deep sometimes! I am currently not speaking to him!  It won't last!

"Love Speaks"
I love the finish!  The copper color is rich and looks expensive! I like it much better than a foil finish for this type project!
Stash Items: Kraft Paper - 3yrs; Neenah Card Stock - 10 yrs.
Designer Paper  - 2yrs
Brads - 4yrs 
Lace - 2 yrs
Supplies:
Kraft Card Stock
Cream Card Stock: I used Neenah Baronial Ivory
Designer Series Paper: I used Teresa Collins® "Vintage Finds" 6"x6" pad
Teresa Collins™ for Craftwell® A4 Embossing Folder (you can substitute)
Teresa Collins™ for ClearSnap® Wood Mounted Stamp - "Love"
Teresa Collins™ ColorBox® Pigment Inks: Glam Green
ColorBox® Cat's Eye Chalk Inks:  Burnt Siena, Yellow Citrus
ColorBox® Embossing Powder - Copper
ClearSnap® Top Boss® Clear Embossing Ink
Spellbinders® Conversation Bubble One
Embellishments:  Brads, Lace/Ribbon
Tools:
Die Cutting/Embossing Machine
Heat Gun
Paper Trimmer

Double Embossing Technique:
Dry Emboss the front (or a portion) of your kraft card base 

Apply Clear Embossing Ink to the section that will be wet embossed.
Generously Cover area with "Copper" embossing powder.  Tap off excess.

 Melt powder with heat gun for a fabulous metallic finish!
Products used to create sentiment panel


Thanks for stopping by!  Check all the fabulous inspiration from my teammates at Shopping Our Stash!

Hugz,
Chana


Disclosure Statement

EFFECTIVE DECEMBER 1, 2009, FTC GUIDELINES REQUIRE BLOGGERS TO DISCLOSE ANY TIME THEY ARE COMPENSATED FOR ENDORSING OR REVIEWING PRODUCTS OR SERVICES.

The Project that is demonstrated above contains components I received for free in return for my services and for posts on my blog. I affirm that I have not made, nor would I ever make or endorse, misleading statements regarding any product or service used in the operation of this blog.

IF YOU HAVE QUESTIONS REGARDING ANY PRODUCT OR SERVICE USED ON MY BLOG, PLEASE CONTACT ME AT CMALKAH@YAHOO.COM.


Friday, July 1, 2016

ClearSnap® July Color Challenge - DIY Planner Cover

Hello, Crafty Peeples!
These colors are so in my wheel house!  
My regular visitors know that I like creating projects from scratch using recycled materials. These colors seemed perfect for my 2017 Purse Size DT Planner.  Yes, I could buy a planner and alter it, but I figure I already bought the cereal box, so why not cut it up, fix it up, and keep it out of the landfill!  Yeah!
Click HERE for Challenge. 

I am so impressed with the convenience of the ColorBox® 4-Color Premium Dye Ink Pads.  Using these pads and two ColorBox® Stylus Tools with Tips, I was able to easily switch between colors.

I think these red binding combs work really well with my decoupaged image and the fabulous colors!


Click HERE to go to the Challenge.
Supplies - For Cover
2 - Heavyweight Chipboard Panels (cut to desired size) Mine are 5-1/2"x 7-1/2"
Napkin or Decoupage Paper
Gesso (or white primer or white acrylic paint.)
Decoupage Glue
Parchment Paper
Tools: 
Paper Trimmer/Cutter
Binding machine and coils
Iron

Stay Tuned .... Pages and elements using ClearSnap® and ColorBox® stamps and inks are coming soon.

HUGZ,


Altered Eclectics - Dressmaker's Closet - Altered Altoids Tin

Hello, Crafty Peeples!
Welcome to the July Challenge at Altered Eclectics!  
As always, our challenge is Anything Goes.  Remember, projects should be:
Mixed Media, Altered Art, Upcycling, Recycling, Repurposing .
Please, no ATC's and no Cards.

My Dressmaker's Closet
For a long while now, I have toyed with the idea of altering an Altoids tin. Many fabulous projects have been created using these little tins so the true challenge becomes thinking of a design that has not been shown.  
I was my intention to add a sewing machine, but all my dies were  too big.  
I really like making my own "rust."   
The Hubster says my altered tin looks like it has been hanging out in some old barn for years!   Lovely, that is just the look I was going for. 
I have begun work on another idea using a tin and hope to be able to share it by the end of July!  We shall see, you know our muses can nut up sometimes.

Please check out the fabulous creations presented by my Eclectic teammates.  You will be inspired!

Hugz,
Chana