Showing posts with label Ranger Distress Oxide Ink. Show all posts

Thursday, September 10, 2020

2020 Stash Party #45 - Toad-Ally Cool - "Off The Wall" Card #1

Hello, Crafty Makers!
Today, I am sharing a project that I made using one of my favorite stamp sets!  These Stampendous Yoga Frogs are so darn cute and the sentiments are so on point!  This is also the first in what I am calling my "Off The Wall" series!
I love this sentiment because my little frog looks as though he is meditating while sitting in an alley!  I am currently playing around with different wall colors.  I think I want to do a set of these and send them to a friend who owns a Yoga studio.

Thanks for stopping by!
Hugz,


Stuff I used:

Friday, June 19, 2020

2020 Stash Party #24 - I Wish

Hello, Crafty Peeps!
This week, I opened a gift bag that I won at Bella Crafts.  There were a bunch of stamps in the bag and two became immediate favorites.  The "Best Day Ever" stamp that I used earlier in the week and the stamp I am using on this project.
~~~~~
 "I WISH!"
This project is another one of my blending practice sheets.  To create this panel, I actually applied gesso to the CS before adding the inks.  I had created the panels to use with my Gelatos but it occurred to me that the technique might work with oxide inks as well.   I wanted so badly to use this simple stacked stamp and after this practice sheet was done, I thought it would be perfect.

Working on blending and stenciling has also given me the opportunity to work on my "splattering" techniques.  I used Ranger's Picket Fence Paint for my white spatters!  In the next week, I plan to drag out all my metallic paints and have myself a spattering good time. I also mixed up my sequins on this using both berry and iridescent.  I was also looking for a different way to use up some of the gold cord I have amassed over the years.  Do you agree that my gold scribble is a nice addition?

I have more practice panels so you may see a lot of these in the coming days!
Hugz,
TCW Mini Viva La Art             TCW Mini Window Screen
Crafter's Workshop Template 6"x6"-viva La Art - Walmart.comJoan's Gardens: New Crafters Workshop Templates

Saturday, May 2, 2020

Stash Party #16 - Day 3 - Use One Stamp 5 Ways - A 5 Day Challenge

Hello, Crafty Makers!

I am back with my third card in the 5/5 challenge.
For this iteration, I used a border die to cut this cool pattern in the bottom of my card face. Next, I embossed the top portion with a swiss dots embossing folder.  Rather than stamping my sentiment onto the card face, I stamped it on a separate scrap of paper and mounted it onto the card face with 3D dots.
I colored the image and distressed the edges with Broken China Distress Oxide ink.  After that, I used my blending brush to add Squeezed Lemonade Distress Oxide in the center of the image and blended it softly into the inked edges. I then applied Perfect Pearls to the panel, brushed off the excess, and wiped the panel gently with a microfiber cloth.  In real life, the panel has a smooth, soft, satiny appearance.  To finish the design, I added a strip of foiled washi tape and a flower.  I added bling to the image and the center of the flower.

I am pleased with this project since I believe that it maintains the continuity of the design of the first two cards.  These cards will make a very nice gift set for somebody!

Thanks for stopping by!
Hugz,
Stuff I Used:
FAITH in what will be

Sunday, April 28, 2019

Colorful World - Freshly Made Sketches

Hello, Crafty Makers!
I was practicing lining up my new Stencil Girl®/Ann Bulter ™Quilting patterns before I tackle creating a pin cushion from one of Ann's tutorials.  Well, one of my practice sheets looked pretty not so bad, so I figured I would make a card.  
I looked around and found this sketch at 
That'll work!
~~~~
Colorful World
My world is a scrap piece of background paper I created on my homemade Geli plate.  I colored my frame with the Distress Oxide Inks used for the side panel then I used the Ann Butler™ stencil to add flowers.  The sentiment is from the Altnew® Crafty Mail Collection!
The challenge closes on the 29th. 
You still have time to play along..if you hurry!
Hugz,


Thursday, February 21, 2019

Splish, Splash, and Splatter! CAS and A New Technique

Hello, Crafty Makers!
My CAS quest continues and
 the new technique this week is Splash and Splatter!
For some odd reason, I have always been splatter challenged.  It made no difference if I used a toothbrush, paintbrush, or the highly touted Tim Holtz Splatter Brush, my splatter was a fail.
Splish, Splash, Splatter
I cannot express how delighted I am to finally be able to create splatter on my cards.  Not only do I have splatter, but I also have splashes!  I owe a big thank you to Loll Thompson and her wonderful video.   This was my first attempt.  It was supposed to be a practice sheet only but when it was done, I decided it would be okay on a card.
The Big Splash
I love the large splashes.  The fun elements can be created using Distress Stain or paints.  The intensity of the splash can be changed by spraying water on the sponge applicator of the Distress stain or paint bottle.
Just to add interest, I dragged my paintbrush through one of the splashes that I created using the Distress Paint.   I love the illusion of a nucleus in some of the splashes.
I used two pieces of bookbinding waxed cord to create a frame for my sentiment.  In my stash, I found a scrap of glitter paper that was a perfect compliment to the green ink!  I applied a little Distress Ink around the edges, added a few crystals and called it a day!
Stuff I Used:


Challenges:
The Card Concept: Pineapple Party -I used Colors From The Concept
Thanks for stopping by!
Hugz!


Tuesday, January 29, 2019

Shopping Our Stash #388 - Ode To Jessi

Hello, Crafty Makers!
This week at Shopping Our Stash, we are remembering our Teammate, Jessi, who recently passed away.  We each have chosen one of Jessi's projects and are using that project(s) as inspiration!
        
April Fool - Faux Tile
Think Ink 
I chose to combine two of Jessi's projects for my make.  I started my project by applying Versamark Clear embossing ink to my stamp and embossing it with white embossing powder.  I then colored the background with Ranger's Broken China Distress Oxide Ink.
White embossing powder and Broken China Distress Oxide Ink


The image was colored using Laromni makeup brushes and Oxide Distress inks. I also blended in Cracked Pistachio ink to give more depth to the Broken China background.
This was my first time coloring with the makeup brushes and I was truly impressed.  The smaller thin brushes are great for coloring in tight spaces.  The best part for me, though, was the fact that I only had to use two brushes.  I used one to color the background and one to color the flowers.  These brushes clean easily between applications, as well.
I wanted to add more "orange" to stay on theme with Jessi's Think Ink project, so I used a thin strip of the cardstock I planned to use for my base and wrapped it around my panel.  I cut the sentiment from a scrap piece of Neenah Solar White CS.
For dimension, I mounted a piece of white craft foam onto the back of my panel using double-sided tape and snail glue
I think Jessi would have liked this project. As an ode to Jessi's sparkling personality, I added a bit of Wink of Stella to each Petal.


Our team has created truly wonderful projects to honor Jessi.
Please visit each blog for special inspiration!

Hugz,


Friday, August 17, 2018

CAS Colours and Sketches - Take Flight

Hello, Crafty Makers!
Today, I crafted two cards for submission to 
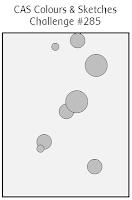
CAS Colours & Sketches Challenge.  
~~~~~~~~~
 For my first design, I used the smoosh technique with Ranger Distress Oxide Inks to create my "faux" watercolored background.  I arranged my feather stamps using my Tim Holtz Stamping Tool.  I had only four small stamps in this collection, so I had to stamp twice but using the tool made short work of that.  I added Wink of Stella to the feathers and I was done!
Note Card Size: 4.25"x5.5", Panel Size: 4.0"x5.25"
Panel:
Materials:
Hot Off The Press "Feathers" Stamp Collection
Neenah "Ebony" and "Brilliant White" Linen Cardstock
Wink of Stella
Ranger Distress Oxide Inks: 
Peeled Paint, Fossilized Amber, Broken China
Other Inks:
Ranger Distress Ink: Vintage Photo, StazOn Solvent "Jet Black"
~~~~~~~~
For this second project, I first stamped and heat embossed the feathers and sentiment.  Then, I painted my background using my distress inks.  I felt the white spaces needed to be toned down to allow the white embossed feathers to stand out more.  I achieved this by lightly dabbing Vintage Photo Distress Ink on most of the white spaces and to distress the edges of the panel. The final touch was to stamp a few star sprays around a few of the feathers and apply a little Wink of Stella to my feathers.  I was going for an abstract presentation and I think I got there.
Note Card Size: 4.25"x5.5", Black Layer: 4.0"x5.25 Panel Size: 4-3/8"x 5-1/8"
Panel:
Materials:
Hot Off The Press "Feathers" Stamp Collection
Neenah "Ebony" and Brilliant White Linen Cardstock
White Embossing Powder, Wink of Stella
Ranger Distress Oxide Inks: 
Peeled Paint, Fossilized Amber, Broken China
Other Inks:
Ranger Distress Ink: Vintage Photo, StazOn Solvent "Jet Black" 

Happy Making!
HUGZ,
CHANA MALKAH


Submitted To:
CAS Colours & Sketches
 CAS Colours & Sketches Challenge